
Creating Projects
• File > Open > Offline
• Manage > Projects>New Project
• Provide a Name to the project
• Select rpd objects to be part of the project and save


“extractprojects” Utility
• Command line utility for extracting OBIEE projects from MUD RPD
• Located at the Dir : ORACLE_INSTANCE/bifoundation/OracleBIApplication/coreapplication/setup
• extractprojects –B base_repository_name -O output_repository_name {-I input_project_name} [-Prepository_password] [-L]
• extractprojects -B my_repos.rpd -O extract_repos.rpd -I project1 -I project2
Give password: my_rpd_password
• Logging file ProjExtr.YYYYMMDD.HHMMSS.xml
MUD Menu Options
• Compare with Original. Compares the working extracted local repository to the original extracted repository. When this option is selected, the Compare repositories dialog opens and lists all the changes made to the working extracted repository since you checked out the projects.
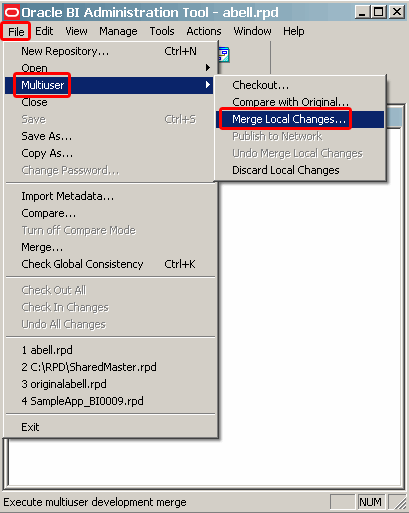
• Merge Local Changes. Locks the master repository on the network multiuser directory to allow you to check in your changes.
• Publish to Network. After you successfully merge your changes, the master repository opens locally and the Publish to Network submenu item is available. When you select this option, the lock is removed, the repository is published, and the repository closes.
• Undo Merge Local Changes. Rolls back any previously merged local changes, and leaves the repository checked out so that you can make additional changes and then merge your local changes again. This option is only available after you have already merged local changes.
• Discard Local Changes. Any time after check out and before check in, you can discard your changes. When you select this option, the working repository closes without giving you an opportunity to save your work.
MUD Env Development Options
• \\network\MUD\devoptfile.opt created to specify development options
• In standard windows INI format
• Hidden flag should be turned on for the file
• To be managed “ONLY by MUD administrators”
• OPT file contents and explanations :
[Options]
BuildNumber = Yes (Displays Version of rpd)
Admin = weblogic;admin2 (Logins of MUD Admins)
Mandatory Consistency Check = Yes (Forces CC when before Publish)
Equalize During Merge = Yes (Forces Equalization during merge process)


OBIEE 11G Multiuser Development Environment
Preparing the Environment - Initial Administrative Tasks
The Oracle BI Repository development process is conceptually identical to the classic Software Configuration Management (SCM) three-way merge, in that changes are managed by merge and reconciliation. The Oracle BI Repository is stored as an .rpd file. Changes are managed by using the Administration Tool. Developers check out the file and make changes locally. Then, these changes are reconciled and merged into the master repository. To read a more detailed description and view an image of the merge process, click this
link.
In this topic, you review user roles and privileges in Oracle WebLogic Server, set up the MUDE directory, and create a project.
Verifying User Roles and Privileges by Using WebLogic
In previous releases of Oracle BI, users were stored in the repository. These users are now stored in the WebLogic LDAP or whatever identity store with which your system is configured.
To review user roles and privileges in Oracle WebLogic Server, perform the following steps:
1 . Open the WebLogic Administration Console. Open a browser window and in the address bar, enterhttp:\\:port\console (for example, http:\\localhost:7001\console). Note that 7001 is the default port assignment for the Oracle WebLogic Server Administration Console.
2 . The Oracle WebLogic Server Login window appears. Enter your username and password (for example,weblogic/welcome1).
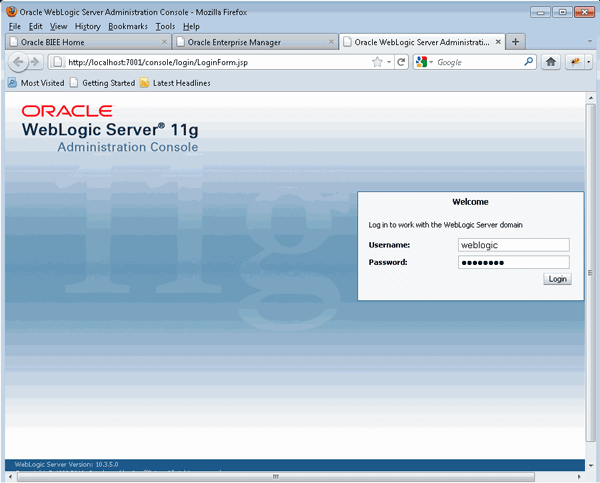
Note: During installation, you are prompted for a username and password to use as an Oracle BI Administrator. This user (weblogic, for example) has administrative privileges across the Oracle Business Intelligence (BI) stack. This includes the Oracle BI Repository, the Oracle BI Presentation Catalog, Oracle BI Publisher, the identity store in WebLogic, and so on.
3 . Click Login. The Oracle WebLogic Server Administration Console appears.

4 . Select Security Realms from the Domain Structure pane on the left.

5 . The "Summary of Security Realms" pane appears on the right. Select myrealm from the Realms table.

6 . The "Settings for myrealm" pane appears on the right. Click the Users and Groups tab.

7 . All users who are configured in this security realm appear in the Users table. In the Name column, clickabell.

8 . The "Settings for abell" pane appears. From this pane, you can change Adam's name, password, attributes, and the groups to which he belongs. Click the Groups tab.

9 . Review the detail for Adam Bell on the Groups tab and note the two selection areas: Available and Chosen. You select a group and then use the arrow buttons (

) to toggle a parent group membership on or off for the specific user.
There are three default groups specific to Oracle BI: BIAdministrators (in the Available grouping in the image), BIAuthors, and BIConsumers (both in the Chosen grouping in the image). These default groups are provided as a convenience during installation, so that you can use the Oracle BI software immediately. Groups are nested in a hierarchy.
Members of the BIAdministrators group have permissions equivalent to those of theAdministrator user of earlier releases. Members of the BIAdministrators group are by default members of both other groups.
Members of the BIAuthors group have permissions necessary to create content for others to consume. Members of BIAuthors are members of BIConsumers.
Members of the BIConsumers group have permissions necessary to consume content created by others.
Now that you've reviewed Adam's privileges, click the breadcrumb trail for "Users and Groups" (highlighted in the image below, just above the "Settings for abell" pane) to review the privileges for Helen Mayes. The breadcrumb trail provides a means for you to quickly navigate back to pages that you have previously viewed.

10 . The "Settings for myrealm" pane reappears. Click hmayes.

11 . Once again click the Groups tab. Note that Helen is also a member of the BIAuthors and BIConsumers groups.

12 . Click Log Out and then close your browser.

Reviewing User's Roles in Identity Manager Within the Administration Tool
You can also review default security settings by using the Administration Tool.
To review security settings within the Administration Tool, perform the following steps:
1 . Open the Administration Tool. Click Start > All Programs > Oracle Business Intelligence > BI Administration.

Note: When you first start the Administration Tool, a DOS window appears. Keep this window open while you work. You can minimize the window to avoid accidentally closing it.
2 . Click File > Open > Offline.

3 . The repositories are located in \bifoundation\OracleBIServerComponent\coreappplication_obips1\repository(for example,c:\bi11g\instances\instance3\bifoundation\OracleBIServerComponent\coreappplication_obips1\repository).
In the Open dialog box, select the SampleApp repository (for example, SampleApp_BI0010.rpd) and clickOpen.
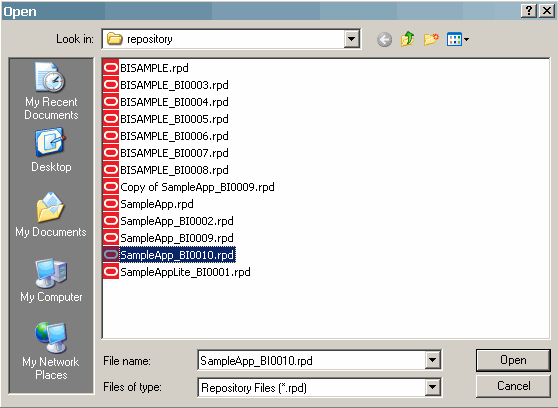
Note that Oracle BI Release 11g (11.1.1.5) automatically appends a numeric, incremental suffix to each version of the .rpd file.
4 . A message box appears, indicating that this repository must be opened in read-only mode. This is because the repository has been loaded into the Oracle BI Server. Click Yes when the message box appears.

5 . In the Open Offline dialog box, enter the Repository Password (for example, Admin123) and click OK. If you are unsure of this password, you can verify it with your local administrator.

The repository opens in read-only mode.

6 . Click Manage > Identity.
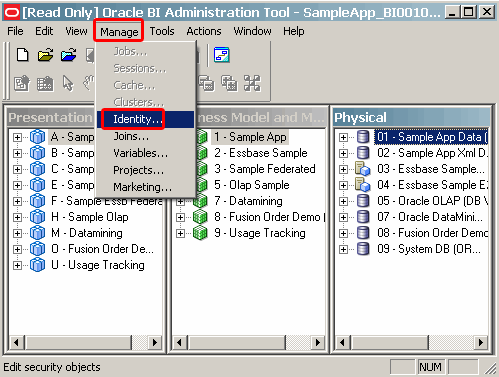
The Identity Manager dialog box appears. You can review each user authorized for this repository and also each application role.

7 . Double-click hmayes to view the roles that are assigned to Helen.

8 . These roles are precisely the same as those identified in Oracle WebLogic Server. Click Cancel.

You can similarly view Adam's application roles, if you so choose.
9 . Click Application Roles. Examine the roles available in the Administration Tool.

10 . Click Action > Close to close Identity Manager.
11 . Click File > Close to close the repository. Leave the Administration Tool open.
Creating a Project
The next step is to create one or more projects. As mentioned above in Scenario, the primary reason to create projects is to support multiuser development. Administrators can create projects so that developers and groups of developers can work on projects in their own area of responsibility.
To create a project, perform the following steps:
1 . For this tutorial, SampleApp_BI0009.rpd, will be modified in the MUDE. You can use the most current offline version of your repository.
In the Administration Tool, click File > Open > Offline (or you can select the repository from the recent repository list).

2 . Enter the repository password (for example, Admin123) and click OK.
3 . Click Manage > Projects to open the Project Manager.

The Project Manager dialog box appears. Two projects are evident in the right pane: Samp Essbase and Samp Relational. These projects were defined as metadata objects in the Sample App repository that is shipped with the Sample Application.

4 . Click Action > New Project.

The Project dialog box appears. The Project dialog box is composed of two panes—the available objects are contained in the left pane, whereas the selected items are contained in the right. You build the project by adding subject areas or logical fact tables to the project. Additionally, the Project dialog box consists of a name text box (required entry) and a description text box (optional) for documentation purposes.
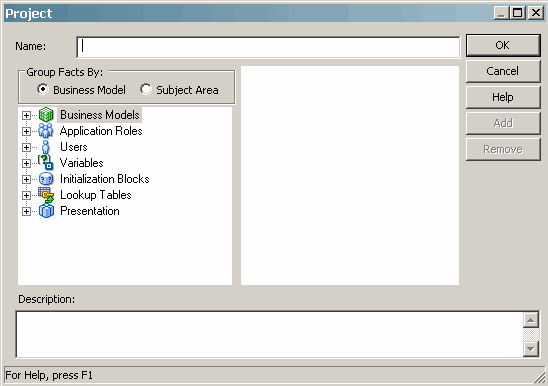
You can group facts by subject area or by business model. You can also select one or more logical fact tables in the business model that are related to the subject area or you can select a subject area. The Addbutton is enabled once an object is selected in the left pane.
The Administration Tool adds all the logical fact tables automatically. Adding a subject area includes all fact tables and dependencies in the subject area. Adding a logical fact table includes the subject area containing the table. In both cases, logical dimension tables joined to the logical fact tables are implicitly included, even though they do not appear in the right pane.
5 . Enter Sample Apps Fact Table in the project name text box.

6 . Click the plus sign (

) to expand Business Models, and then expand 1 - Sample App.

7 . Select F0 Revenue Base Measures in the left pane and click Add. The logical fact table appears in the right pane.

8 . Click OK. Your new project appears.

9 . Add a second project. Click Action > New Project.
10 . Enter Sample Apps Presentation in the project name text box.
11 . Click the plus sign (

) to expand Business Models.
12 . Select 1 - Sample App and click Add.

Note: You must have at least one fact table in a project.
13 . Collapse Business Models. Click the minus sign (

) for Business Models to gain more space in the left pane.
14 . Click the plus sign for Presentation to expand the Presentation node in the left pane.

The Presentation node contains Presentation layer objects that are not automatically added to your project. You must explicitly include these objects in your project, if you want to work with them.
15 . Select A - Sample Sales in the left pane and then click Add. Presentation (A - Sample Sales) appears in the right pane.

16 . Expand Presentation, and then expand A - Sample Sales in the right pane and take some time to review the structure.

17 . Click OK to add the new project.

18 . Double-click the Sample Apps Presentation project in the right pane of Project Manager to edit the project.
19 . Expand Presentation > A - Sample Sales in the right pane.
20 . Remove all but the following tables from the right pane:
—Time
—Products
—Offices
—Sales Person
—Customers
—Cust Regions
—Orders
—Ship To Regions
—Orders Dates
—Base Facts
—Calculated Facts
Select the table that you want to delete (for example, Alternate Calendars) from the right pane, and then click Remove. Hint: You can press Ctrl-click to select multiple tables.
Your project selection should look like this:

21 . Click OK.
22 . Click File > Save to save your changes to the repository. When prompted to check global consistency, click No.

23 . Click File > Close to close the repository.
24 . Minimize the Administration Tool.
Setting Up the MUDE Directory
The final administrative-type step that you perform is to locally set up the MUDE. The administrator must identify or create a shared network directory that all developers can access. Then, the administrator copies the appropriate repository files to that location. Typically, this directory is a shared network directory and contains copies of master repositories that multiple developers access during checkin and checkout. Developers create a pointer to this directory when they set up the Administration Tool on their own machines. This directory must be accessible to all developers and repository servers.
Note: The administrator must set up a separate, shared network directory that is dedicated to multiuser development. If it is not set up and used as specified, critical repository files can be unintentionally overwritten and repository data can be lost. In this OBE, the shared directory is a local directory, :\RPD.
To set up a multiuser development directory and copy the appropriate repository file, perform the following steps:
1 . Navigate to a local drive and create a new directory named RPD (for example, c:\RPD).

2 . Right-click RPD and select Properties from the shortcut menu.

3 . In the RPD Properties dialog box, click the Sharing tab. Select Share this folder and click Permissions.

4 . In the "Permission for RPD" dialog box, select the Full Control check box and click Apply.

Note: For this tutorial only, full control is being granted. Normally you would only grant full control permissions to those people who require access to the RPD.
5 . Click OK > OK.
You have shared your directory that will house the repository.
6 . Next, copy the most current offline version of the SampleApp repository that will be modified in the MUDE.
Navigate to \bifoundation\OracleBIServerComponent\coreappplication_obips1\repository (for example,c:\bi11g\instances\instance3\bifoundation\OracleBIServerComponent\coreappplication_obips1\repository) and select the highest version of the SampleApp repository.

7 . Copy and paste the repository file into the :\RPD directory (for example, c:\RPD).

8 . Right-click the repository file and rename the file SharedMaster.rpd. This is the dedicated multiuser development repository that will be modified and merged back into the master repository. This repository contains the user projects as well.

You have completed the administrative tasks.
WORKING IN A MUDE
Setting Up Users and Pointing to the Multiuser Directory
Before a developer can access the MUDE, the user must be set up in the Administration Tool. This includes identifying the user and pointing to the appropriate repository.
To set up a user to access the MUDE, perform the following steps:
1 . Click Tools > Options. The Options dialog box appears. Click the Multiuser tab.
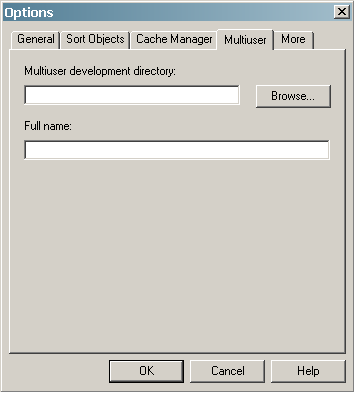
The �Multiuser development directory� text box is mandatory. It must be completed by any user who wants to use the MUDE feature. The multiuser development directory must be set to the directory on the network shared with other MUDE developers. The Administration Tool stores this path in a hidden Windows registry setting on the developer�s workstation, and uses it during checkout and checkin.
The �Full name� text box is optional. If a user enters a name in this text box, the value is used by default in the �Full name� text box of the repository Lock Information dialog box—this dialog box locks the master repository in the shared directory. For convenience and tracking, each MUDE developer should enter a full name. The value is stored in the HKEY_CURRENT_USER part of the registry and is, therefore, unique for each login.
Note: For this tutorial, Administrator is used as the developer name because it is not possible to produce multiple users on multiple machines for this OBE. In a real-world scenario, this step would be performed on each developer user's computer.
2 . Click Browse.
3 . In the Browse For Folder dialog box, navigate to and select your shared RPD directory, and then click OK.

4 . Enter Administrator in the "Full name" text box and click OK.
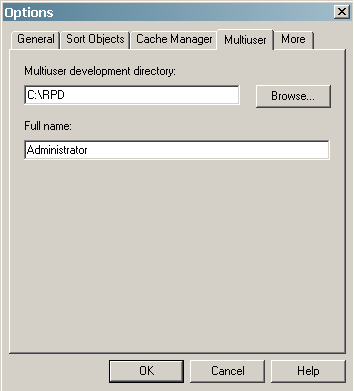
You are now ready to perform multiuser development.
Checking Out a Project
To check out the project, which begins the development process, perform the following steps:
1 . Click File > Multiuser > Checkout.

2 . In the "Extract from SharedMaster.rpd" dialog box, enter the repository password (for example, Admin123) and click OK.

3 . The Browse dialog box appears. Select the check box for Sample Apps Presentation and click OK.
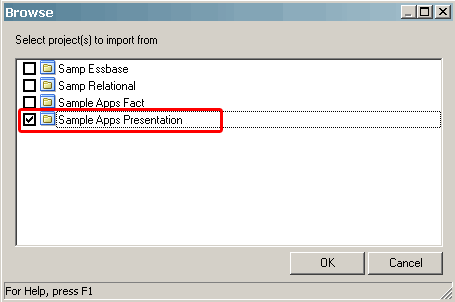
4 . The "Create new subset repository" dialog box appears.

In the "Create new subset repository" dialog box, change the default file name, Metadatan.rpd (where nrepresents a variable number), to abell.rpd.
There are several items to note at this point:
The file name (abell.rpd, representing Adam Bell) is arbitrary.
The repository file is being saved to the default repository directory (\bifoundation\OracleBIServerComponent\coreappplication_obips1\repository) not the RPD directory.
A copy of the shared repository (SharedMaster.rpd) has been copied to the default repository directory.

5 . Click Save.
6 . Adam Bell's repository appears with the subset of data from the Sample Apps Presentation project. The other subject areas and business models from SharedMaster do not appear. Note that Adam's repository name appears in the title bar at the top of the Administration Tool.
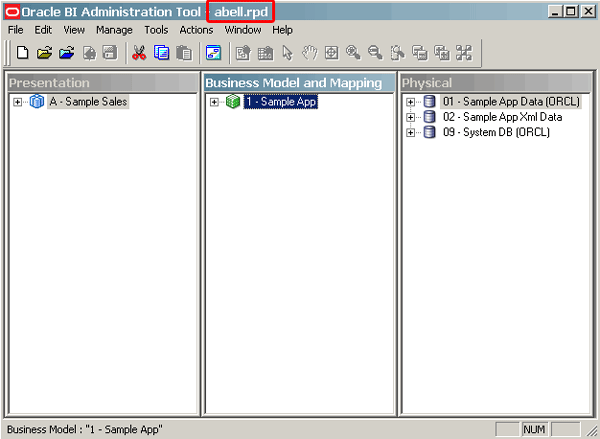
Leave the repository and the Administration Tool open. Minimize the Administration Tool.
7 . Navigate to :\RPD by using Windows Explorer. Two new files appear: SharedMaster.000 andSharedMaster.mhl. The SharedMaster.000 file is an automatic backup file for SharedMaster.rpd, whereas the SharedMaster.mhl file tracks the checkout status and parameters, including project, computer, and user.

8 . Navigate to the default repository directory (\bifoundation\OracleBIServerComponent\coreappplication_obips1\repository). Three new files appear: originalabell.rpd, abell.rpd.Log, and abell.rpd. The abell.rpd file is a subset of the SharedMaster repository that you modify. The originalabell.rpd file contains the original repository file, which the Administration Tool uses to track your changes or revert to the original. Finally, the abell.rpd.Log file is your local log file.

9 . Check out the repository as Helen Mayes. Open up a new instance of the Administration Tool, and then click File > Multiuser > Checkout.

10 . In the "Extract from SharedMaster.rpd" dialog box, enter the repository password (for example, Admin123) and click OK.

11 . The Browse dialog box appears. Select the check box for Sample Apps Presentation and click OK.

Note that you are not given any indication that another developer currently has the project out for update. This is an intentional feature of the the product. Multiple developers can work on a single project. All changes are merged during the checkin process.
12 . In the "Create new subset repository" dialog box, change the default file name, Metadatan.rpd (where nrepresents a variable number), to hmayes.rpd.

13 . Click Save.
14 . Helen Mayes' repository appears.
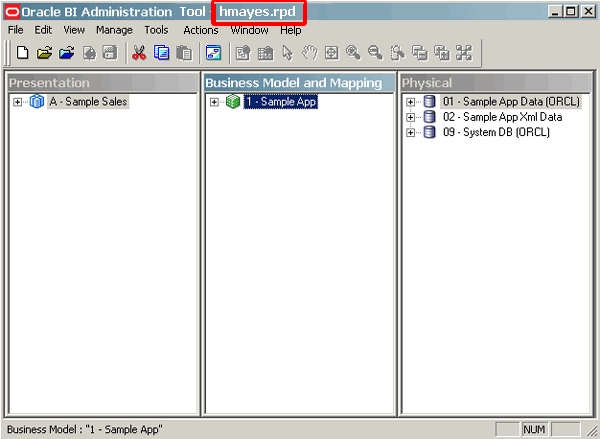
Leave the repository and the Administration Tool open. Minimize the Administration Tool.
15 . Navigate to the default repository directory (\bifoundation\OracleBIServerComponent\coreappplication_obips1\repository). Three new files appear for Helen Mayes, just as they appeared for Adam Bell: originalhmayes.rpd, hmayes.rpd.Log, andhmayes.rpd.

Making Changes to the Repository
The same repository and project were simultaneously opened, demonstrating the MUDE. Adam and Helen are ready to begin their modifications.
Most changes that can be made to standard repository files are also supported for local repository files (such as abell.rpd and hmayes.rpd). You can add new logical columns, logical tables, change table definitions, and so on.
Physical connection settings should not be modified in a local repository. To prevent you from overwriting passwords and other important objects in the master repository, the physical connection and security settings, and database feature tables changes are not retained during a multiuser development merge. Note: All repository connection information specified in the repository metadata, such as Open Database Connectivity (ODBC), must also exist on the developer's workstation.
To make changes to the repository, perform the following steps:
1 . Select Adam's Administration Tool. You can maximize the tool or simply select it from the taskbar along the bottom of your window.

Adam's Administration Tool reappears.

2 . Click View and deselect Physical. The Administration Tool should look like this:

3 . Click View and deselect Business Model and Mapping. Only the Presentation layer should be visible in the Administration Tool.
4 . Expand A - Sample Sales.

5 . Select Customers and Cust Regions by using the Ctrl-click method.

6 . Right-click and from the shortcut menu, select Delete and then confirm the delete. This is an easy modification to track during your review process.
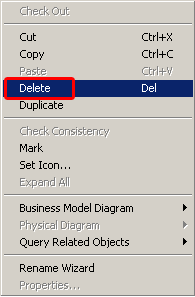
Adam Bell's repository should look like this:

7 . Click File > Save and do not check for global consistency.
8 . Select Helen's Administration Tool now. You can limit the view to just the Presentation layer if you so choose, just as you previously limited Adam's view.
9 . Expand A - Sample Sales and select Products.
10 . Right-click and from the shortcut menu, select Delete and confirm the delete.
Helen's repository should look like this:

11 . Click File > Save and do not check for consistency.
Reviewing Multiuser Options During Development
After you and other developers have finished making your changes, you have several options available for analyzing the changes. These options include the following:
Compare with Original: Compares the working, extracted local repository to the original extracted repository
Merge Local Changes: Allows you to check in your changes. (Discussed below in "Merging Local Changes.")
Publish to Network: Locks the repository, verifies that no other developer-published changes to the master exist, and then publishes the repository. (Discussed below in "Publishing Local Changes.")
Undo Merge Local Changes: Rolls back any previously merged local changes, and leaves the repository checked out so that you can make additional changes, and then merge your local changes again. This option is only available after you have already merged local changes.
Discard Local Changes: Abandons your changes. When you select this option, the working repository closes without giving you an opportunity to save your work. You can discard your changes any time after checkout, but before checkin.
To review the multiuser options, perform the following steps:
1 . Using Adam's repository (abell.rpd), click File > Multiuser > Compare with Original.

2 . The "Compare repositories" dialog box appears. In this example, this dialog box compares abell.rpd (the subset repository) with originalabell.rpd. You can see the deletion of the Presentation layer tables by Adam. Scroll down and examine all objects that were deleted.
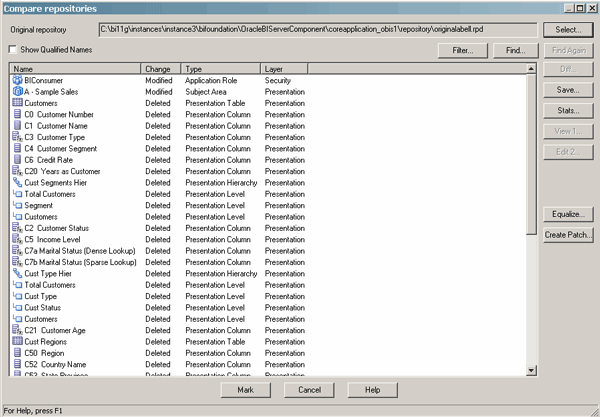
Within this dialog box, you can perform functions, such as Equalize (used to treat two objects in two repositories that have the same name but different upgrade IDs as the same object), Mark (annotates the object you select with a surrounding box for comparison against other objects), Create Patch (generates an XML patch file that contains only the changes made to a repository, which can then be applied to the original version of the repository to create the new version), and so on.
3 . Click Cancel.
4 . Minimize Adam's Administration Tool.
5 . Compare Helen's changes now. In Helen's Administration Tool, click File > Multiuser > Compare with Original.

6 . Review the changes and then click Cancel.
7 . Helen realizes that she should not have deleted the Products table. She needs to undo her changes before the local repositories are merged, and the new master is created.
Click File > Multiuser > Discard Local Changes.
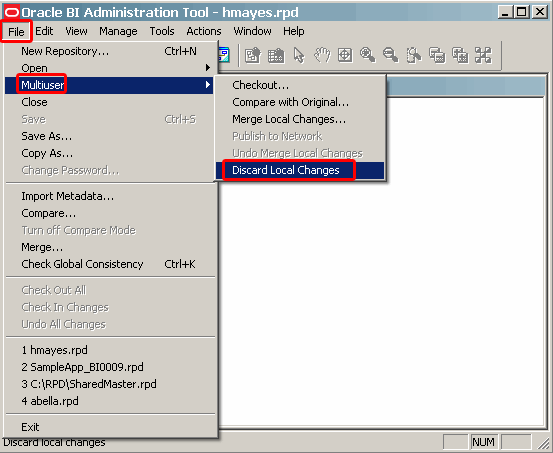
Products is restored to the repository and the repository immediately closes (the Administration Tool remains open).
8 . Navigate to \bifoundation\OracleBIServerComponent\coreappplication_obips1\repository. You can clearly see that Helen's three files, originalhmayes.rpd, hmayes.rpd.Log, and hmayes.rpd, have been removed and will no longer become part of the repository update.

9 . Helen needs to continue her work in the MUDE. She therefore needs to check out the shared repository once again. In the Administration Tool, click File > Multiuser > Checkout.
Note: If you are running this tutorial on a local machine and are building both developer's (abell andhmayes) repositories on the local hard drive, you may receive a Window's sharing message that prompts you to overwrite the SharedMaster.rpd. If you receive this message, click No.
10 . In the "Extract from SharedMaster.rpd" dialog box, enter the repository password and click OK.
11 . The Browse dialog box appears. Select the check box for Sample Apps Presentation and click OK.
12 . In the "Create new subset repository" dialog box, change the default file name to hmayes.rpd, as previously named, and click Save.
13 . Expand A - Sample Sales and ensure that Products has been restored.
Helen's repository should look like this:

14 . Minimize Helen's Administration Tool.
CHECKING IN AND PUBLISHING A MUDE PROJECT
Merging Local Changes
After all changes are finished, the developers must check the project into the master repository in the multiuser development directory. Only one developer at a time can merge metadata from a local repository into the master.
The following actions occur when the checkin (merge) process begins:
The Administration Tool determines whether the shared master repository is currently locked. If not, it locks the shared master repository, preventing other developers from performing a merge until the current merge is complete.
If there are any conflicts, the Merge Repository Wizard opens and displays the Define Merge Strategy page. You then make merge decisions about whether to include or exclude objects by choosing Current or Modified from the Decision drop-down list.
A local version of the master repository opens.
The Administration Tool automatically creates a comma-separated value (.csv) file in the local repository directory on the developer�s machine. This file lists changes made to the shared master repository during the merge.
A new file is created in the shared master repository directory with a modified subset.
To merge your changes to the master repository, perform the following steps:
1 . Select Adam's Administration Tool. Click File > Multiuser > Merge Local Changes. This locks the shared repository until checkin is complete.
The Merge Repository Wizard briefly flashes.
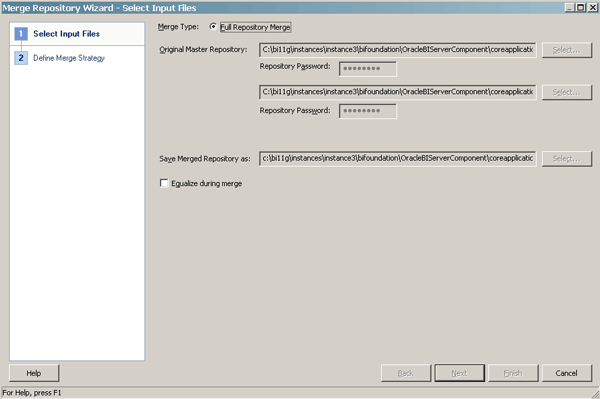
If any conflicts exist, the Merge Repository Wizard - Define Merge Strategy dialog box would appear. You would then make merge decisions about whether to include or exclude objects by choosing Current or Modified from the Decision drop-down list.
2 . The SharedMaster repository opens. Expand A - Sample Sales to verify that the deleted objects (Customers and Cust Regions) do not appear.
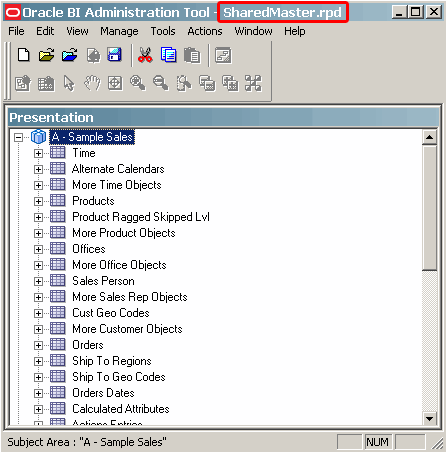
At this point, you can undo the local merge, discard the local changes, or publish the repository. These options are available from the File > Multiuser submenu.
If other local repositories need to be merged (for example, hmayes.rpd), you must merge these before publishing. When working in a MUDE, the master repository is not locked when you merge local changes. Instead, the master repository is locked during the "Publish to Network" step. This reduces the total time that the master repository is locked to avoid lock contention issues.
An Oracle best practice is to publish immediately following the merge.
3 . As noted in the introduction to this topic, a merge log file (*.csv ) is created that contains the merge changes. Navigate to \bifoundation\OracleBIServerComponent\coreappplication_obips1\repositoryand open SharedMaster.merge_log.csv.

4 . Review the changes in the merge log file.

5 . Close the log.
Publishing Local Changes
After all local repositories are merged, you publish the local changes to create a new master repository. The publish step checks to ensure that no other developer published changes to the master between the time that you merged local changes and the time that you published to the network. If the program logic discovers that another repository developer has published to the network in this time period, the system will automatically redo the merge with the master, rolling back the repository version that you used for the Merge Local Changes step, and then it will merge your changes with the new master.
To publish the local changes, perform the following steps:
1 . Adam had previously sent out an email reminding his peers that he was ready to merge and publish the new repository. Helen did not see the email. Adam continues with his task.
In Adam's Administration Tool, click File > Multiuser > Publish to Network.
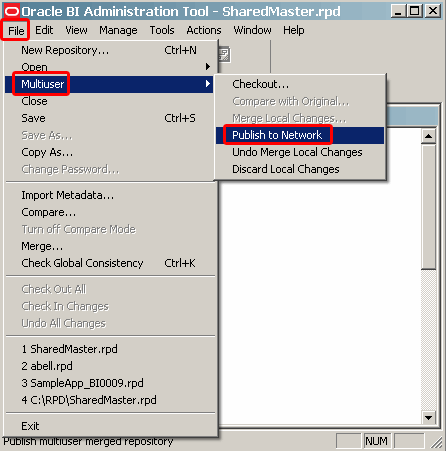
Do not check for consistency.
2 . The Lock Information dialog box appears. The master repository is locked to prevent concurrent update.
Enter Adam Bell in the Full Name text box and enter a comment for documentation into the Comment text box.

3 . Click OK. If you receive a message prompting to use this full name, click Yes.
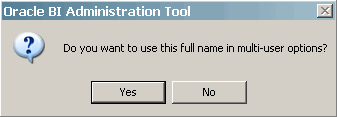
The local copy of the master repository merges with the master repository in the shared folder. That is, Adam's changes are merged into SharedMaster, and then, originalabell.rpd, abell.rpd.Log, and abell.rpdfiles are deleted. The SharedMaster repository within Adam's Administration Tool closes.
Resolving Issues for a Repository Update
1 . Helen wants to assist with the devlopement effort. She decides that she will perform the publication of the repository to the network (not knowing that Adam has already merged and published the repository).
Before Helen can publish, she needs to perform a merge (although she has not made any changes to the repository ). In Helen's Administration Tool, click File > Multiuser > Merge Local Changes. The Merge Repository Wizard - Define Merge Strategy dialog box appears.

2 . Select the first row of the Conflicts table. The Differences pane refreshes with conflict details.

3 . Click the ellipsis button (

) to the right of the Differences pane to review the details of the objects that were modified.

4 . Click Cancel.
5 . Notice that the repository panes area displays the original (originalhmayes) repository, along with her modified repository, and the current (SharedMaster) that was updated by Adam.

At this point, Helen must make a decision about how to proceed with the merge. Realizing that there is a conflict between her version and the master, Helen contacts Adam and resolves the issue.
6 . In the Conflicts table at the top of the wizard, select the Decision drop-down list for the Customers table, and then select Current. This selection chooses the current repository (the repository that does not contain Customers and Cust Regions) over Helen's version.

7 . In the Conflicts table at the top of the wizard, select the Decision drop-down list for the Cust Regions table, and then select Current.

8 . Click Finish.
9 . Click File > Save and do not check for consistency.
10 . Click File > Close, leaving the Administration Tool open.
Reviewing the History and Verifying the New Repository
You can review all modification activity by reviewing the history associated with the MUDE.
To review the history, perform the following steps:
1 . Click File > Multiuser > History and when prompted, enter the password.
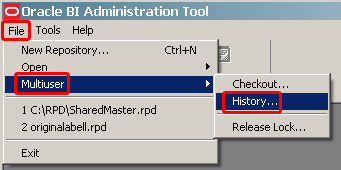
The "SharedMaster.rpd Multi User History" dialog box appears.

2 . Right-click the Version 1 row and select View > Details.

Note: You can also review the projects and changes before the merge.
3 . The "Version 1 details" dialog box appears. This shows all multiuser changes.
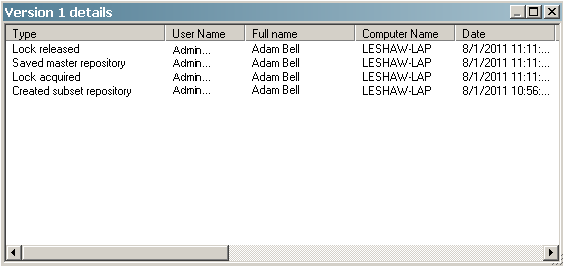
Click X to close both the "Version 1 details" and " SharedMaster.rpd Multi User History" dialog boxes.
4 . Next, open the new repository. Click the Open Offline icon (

), navigate to :\RPD, and selectSharedMaster.rpd.
5 . Click Yes to acknowledge that you can only open it as a read-only file.
6 . Enter the password. The new repository appears.
7 . Expand A - Sample Sales in the Presentation layer and verify that the new repository changes have been merged successfully and that the Customers and Cust Regions objects are not part of the new repository.
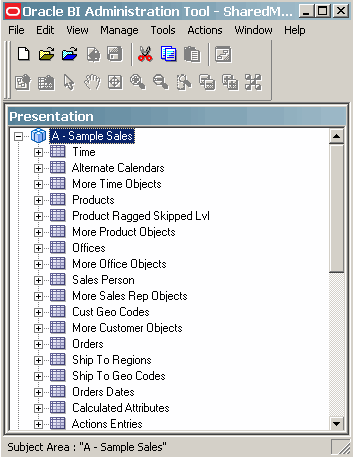
Click File > Exit to close the Administration Tool.
8 .
Navigate to :\RPD and notice that a new subset file appears. If you need to roll back the changes, you can use this subset to accomplish that task.


 ) to toggle a parent group membership on or off for the specific user.


 ) to expand Business Models, and then expand 1 - Sample App.


 ) for Business Models to gain more space in the left pane.


 ) to the right of the Differences pane to review the details of the objects that were modified.


 ), navigate to :\RPD, and selectSharedMaster.rpd.
