Overview
CAF is designed to help OBIEE users clone and synchronize requests, dashboards, and repository metadata from a source OBIEE environment into another target OBIEE environment. CAF can be used with source and target environments that have nothing in common. The only prerequisite is that the target environment must have a logical model designed in its repository.
CAF can clone any request or dashboard existing in any OBIEE Presentation Catalog. There are no specific properties that a request or dashboard must have to make it eligible for cloning with CAF. Using the CAF wizard, users can choose from a list of existing requests or dashboards and then clone these objects to another environment. CAF clones all existing formatting, views, Answers calculations, presentation variables, and logical calculations used in the requests. If there are any modifications to the target repository as a result of the cloning process, CAF is able to synchronize the modified target Presentation Catalog with the modified target repository.
Please note that CAF is a free utility and is not maintained as a licensed Oracle product. It is available for use by both internal and external audiences.
This tutorial provides the following:
| Instructions for installing CAF | |
| Steps for cloning OBIEE requests | |
| Steps for cloning OBIEE dashboards | |
| Steps for cloning OBIEE repository logical objects | |
| Steps for synchronizing a modified Presentation Catalog with a modified repository | |
| Steps to verify results in Oracle BI Answers and Oracle BI Catalog Manager |
Prerequisites
Before starting this tutorial, ensure that you have installed and configured:
| Oracle Business Intelligence Suite Enterprise Edition, version 10.1.3.4 or later. Please note that CAF will not work with the future OBIEE 11g platform. | |
| Java JDK version 1.6 or later | |
| Windows XP. CAF has only been tested in a Windows XP environment. There is no guarantee it will support other OS environments. This tutorial assumes a Windows XP environment. |
You can download Oracle Business Intelligence Suite Enterprise Edition from the Oracle E-Delivery Web site.
If you need assistance with OBIEE installation, system requirements, and so forth, you can access the most current documentation on the Oracle Documentation page.
Note:
The servers for this OBE are hosted locally (localhost). If your server is not stored locally, the format is generally the IP address or the machine (server name). Confirm this information with your administrator before beginning this tutorial.
Installing Content Accelerator Framework
In this subtopic you learn how to download and install the Content Accelerator Framework utility.| 1. | Download the CAF utility (CAF...Install.zip) from the Oracle Business Intelligence Enterprise Edition Plus page onOracle Technical Network (OTN). The Downloads section is located on the right side of the page. |
| 2. | Extract the CAF installation zip file into your OBIEE installation directory at the top level, for example, C:\OracleBI. |
| 3. | Notice that this creates a temporary subdirectory with all required source and installation files:C:\OracleBI\TEMP_CAFV1_Install. This directory and all of its contents are removed from your disk when installation completes.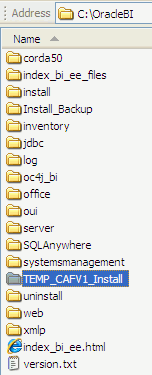 |
| 4. | Before proceeding with the installation, close any open instances of OBI Catalog Manager. To close open instances of Catalog Manager, open Windows Task Manager, select the Processes tab, and stop any running instances of the following processes: catalogmanager.exe java.exe javaw.exe |
| 5. | Navigate to the directory \OracleBI\web\catalogmanager\plugins. |
| 6. | Create a backup of the file com.siebel.analytics.web.catalogmanager_1.0.0.jar and move the backup file outsideof the OBIEE directory structure. |
| 7. | Delete the original com.siebel.analytics.web.catalogmanager_1.0.0.jar file from \OracleBI\web\catalogmanager\plugins. |
| 8. | Try to open Catalog Manager by selecting Start > All Programs > Oracle Business Intelligence > Catalog Manager. Catalog Manager should not open and you should receive an error message similar to the following: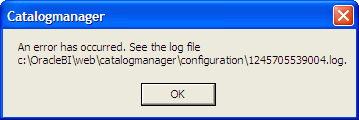 This step is to confirm that you have properly completed the pre-installation steps 4-7 and Catalog Manager is not able to access the original com.siebel.analytics.web.catalogmanager_1.0.0.jar file. If Catalog Manager does open and you do not receive the error message, repeat steps 4-7. You cannot proceed with the CAF installation until you have successfully completed steps 4-8. |
| 9. | Navigate to \OracleBI\TEMP_CAFV1_Install. |
| 10. | Double-click CAFV1_Install.bat.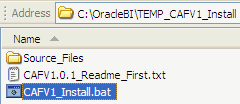 |
| 11. | In the command window, enter Y to proceed.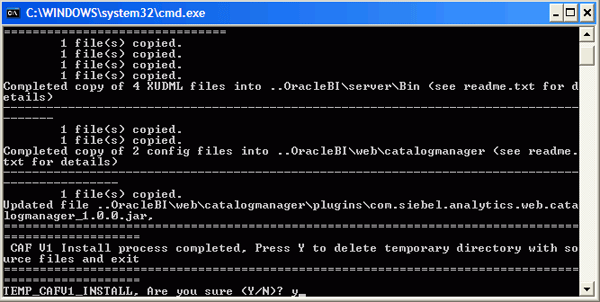 |
| 12. | To verify installation is successful, select Start > All Programs > Oracle Business Intelligence > Catalog Managerand confirm that Catalog Manager now opens. |
| 13. | Select File > Open Catalog and open any available online or offline Presentation Catalog. |
| 14. | Expand the Presentation Catalog tree in the left pane until you are able to highlight an existing request in the right pane.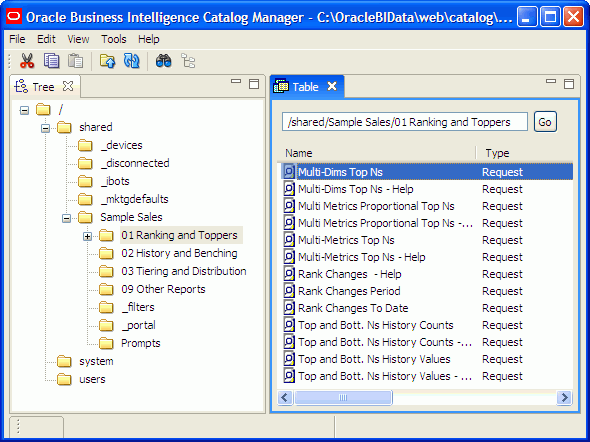 |
| 15. | Right-click the highlighted request and verify that the contextual menu choices include both a Clone and aSynchronize option. This confirms your CAF installation is successful.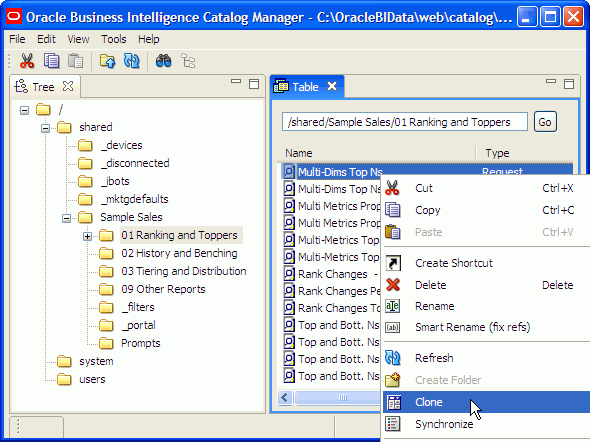 |
| 16. | Close the catalog without selecting Clone or Synchronize. |
| 17. | Close Catalog Manager. |
Setting Up the OBE Training Folders
In this subtopic you learn how to set up the training folders you need to complete the steps in this OBE. Please note that the steps in this subtopic are for the purposes of this training only and are not required in your production environment.
In order to exactly match the examples provided in this OBE, you need to start with clean copies of the Sample Sales and Paint Presentation Catalogs and repositories that ship with the OBIEE product. By clean copies, we mean Presentation Catalogs and repositories that have not been modified after the initial installation of OBIEE. You can find clean versions of these Presentation Catalogs and repositories in \OracleBI\server\Sample. If you do not have clean copies, you can download the Presentation Catalogs and repositories from
In order to exactly match the examples provided in this OBE, you need to start with clean copies of the Sample Sales and Paint Presentation Catalogs and repositories that ship with the OBIEE product. By clean copies, we mean Presentation Catalogs and repositories that have not been modified after the initial installation of OBIEE. You can find clean versions of these Presentation Catalogs and repositories in \OracleBI\server\Sample. If you do not have clean copies, you can download the Presentation Catalogs and repositories from
If you already have a more recent version of Sample Sales in your environment, you may notice slight differences in the structure of the Presentation Catalog, but the examples used in this OBE should still be available in the more recent versions of Sample Sales.
Throughout this OBE we refer to Sample Sales as the source and Paint as the target. The source Presentation Catalog and repository for cloning are from the Sample Sales sample application, and the target Presentation Catalog and repository are from the Paint sample application. During the cloning process in this OBE, the source Presentation Catalog is offline, the target Presentation Catalog is online, and both the source and target repositories are offline. The source and target can be on separate machines or the same machine. For the purposes of this tutorial it is assumed that the source and target are on the same machine.
Throughout this OBE we refer to Sample Sales as the source and Paint as the target. The source Presentation Catalog and repository for cloning are from the Sample Sales sample application, and the target Presentation Catalog and repository are from the Paint sample application. During the cloning process in this OBE, the source Presentation Catalog is offline, the target Presentation Catalog is online, and both the source and target repositories are offline. The source and target can be on separate machines or the same machine. For the purposes of this tutorial it is assumed that the source and target are on the same machine.
| 1. | Create a new folder named CAF_Training on your local drive. For example, C:\CAF_Training. |
| 2. | Create two subfolders in C:\CAF_Training: Source and Target.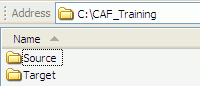 |
| 3. | Copy a clean version of the Sample Sales repository, samplesales.rpd, to the C:\CAF_Training\Source folder.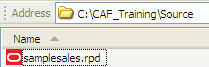 |
| 4. | Copy a clean version of the Paint repository, paint.rpd, to the C:\CAF_Training\Target folder.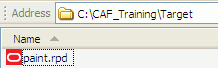 |
| 5. | If necessary, copy clean versions of the samplesales and paint Presentation Catalogs to\OracleBIData\web\catalog.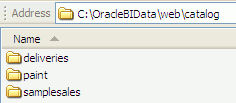 |
Exploring Sample Sales Requests
In this subtopic you explore some of the requests you will clone from the source environment (Sample Sales) to the target environment (Paint).
| 1. | Stop the Oracle BI Server and Oracle BI Presentation Server services.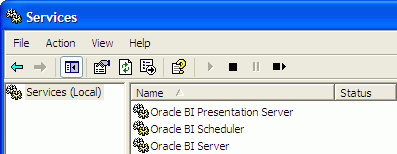 |
| 2. | Set samplesales.rpd as the default repository in the Repository section of \OracleBI\server\Config\NQSConfig.ini.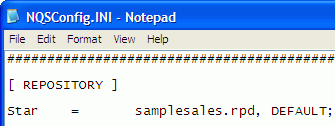 |
| 3. | Set samplesales as the catalog identified in the <catalogpath> section of\OracleBIData\web\config\instanceconfig.xml.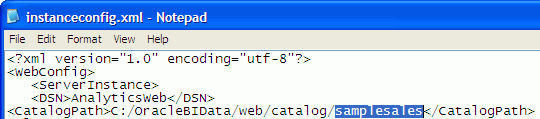 |
| 4. | Start Oracle BI Presentation Server and Oracle BI Server services. |
| 5. | Select Start > All Programs > Oracle Business Intelligence > Presentation Services to open Oracle BI Presentation Services. |
| 6. | Log in as Administrator with password Administrator. |
| 7. | Click the Answers link. |
| 8. | Expand Shared Folders > Sample Sales > 03 Tiering and Distribution.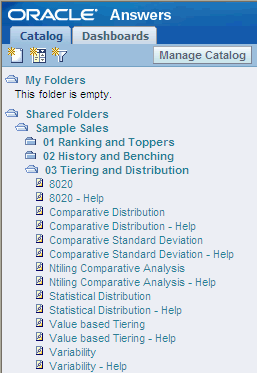 |
| 9. | Click the 8020 request to explore its views and formatting.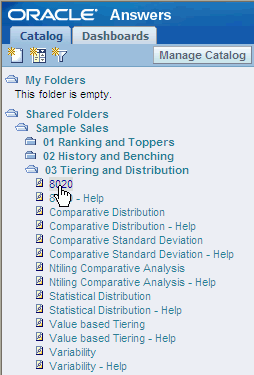 |
| 10. | Notice that the request includes a variety of Answers’ views, including charts, graphs, and tables. You will compare this layout to the layout after you clone the request.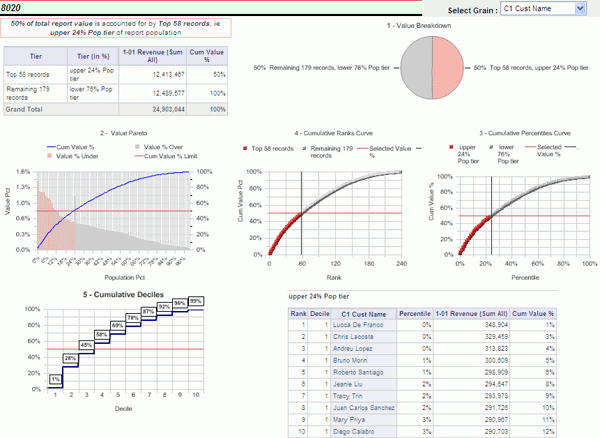 |
| 11. | Notice the C1 Cust Name data. You will compare this to the data displayed after you clone the request.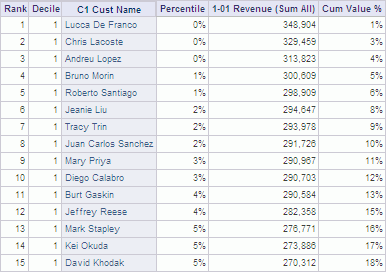 |
| 12. | Click the Modify button to view the criteria for the request. The screenshot shows only a partial view of the request criteria. |
| 13. | Click the Edit Formula button for the Rank column to open the Edit Column Formula dialog box.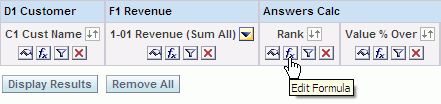 |
| 14. | Notice that the rank formula uses a Sample Sales column: "F1 Revenue"."1-01 Revenue (Sum All)". You will compare this to the column displayed in the formula after you clone the requests. |
| 15. | Click Cancel to close the Edit Column Formula dialog box. |
| 16 | Click the Answers link. |
| 17. | Expand Shared Folders > Sample Sales. |
| 18. | If desired, explore the following requests and their descriptions in the 03 Tiering and Distribution folder: Comparative Distribution Comparative Standard Deviation Ntiling Comparative Analysis Statistical Distribution Value Based Tiering Do not modify the requests. These requests and the 8020 request are the requests you will clone from the Sample Sales source Presentation Catalog to the Paint target Presentation Catalog. |
Building a Sample Sales Request for Demonstration Purposes
In this subtopic you build a request using columns in Sample Sales. You use this request later in this OBE to demonstrate how to use CAF to synchronize logical objects between source and target repositories.
| 1. | Click the Answers link to return to the Answers start page . |
| 2. | Click the Sample Sales subject area.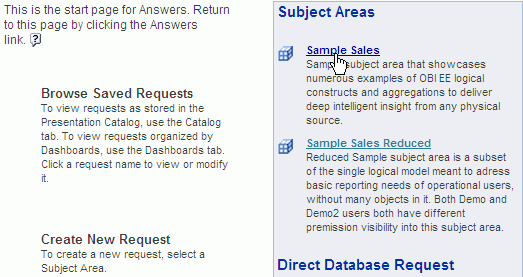 |
| 3. | Use the following columns to create a new Answers request, which uses logical calculations in the repository: "D0 Time"."T05 Per Name Year" "D2 Market"."M04 Region" "F3 Bookings"."8-X1 Book to Bill Ratio" "F1 Revenue"."1-01 Revenue (Sum All)"  |
| 4. | CTRL + click the " D4 Product"."P02 Product Type" column to open Create/Edit Filter dialog box. Using CTRL + click allows you to build a filter for a column that is not included in the request. |
| 5. | In the Operator field select is prompted to create the following filter: P02 Product Type is prompted |
| 6. | Click OK. |
| 7. | Use the Add Filter button for the T05 Per Name Year column to add the following filter: T05 Per Name Year is prompted 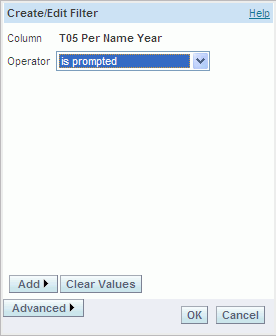 |
| 8. | Notice that the request now has two filters and that P02 Product Type is prompted is a filter on a column that does not exist in the request.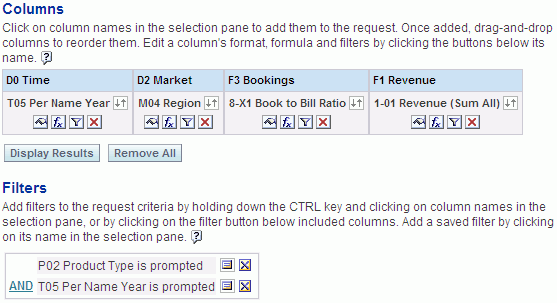 |
| 9. | Save the request in Shared Folders > Sample Sales and name it CAF_EXP_1.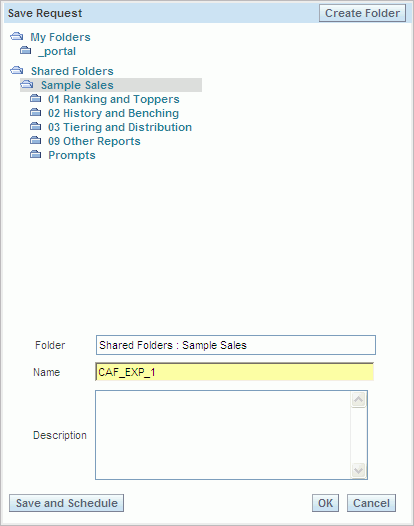 |
| 10. | Log out of OBI Presentation Services and close the browser. |
Setting Up Paint as the Target Presentation Catalog
In this subtopic you learn how to set up Paint as the target Presentation Catalog, which is where the generated code for cloned objects is saved. When you clone objects with CAF, you provide details of the target Presentation Catalog instance in the format hostname:portnumber. CAF requires an online target Presentation Catalog in order to clone the objects. Note that this can be any online Presentation Catalog.
CAF uses the online Presentation Catalog to create folders, requests and dashboards with the correct cloned objects. Once the objects are created in the Presentation Catalog, they can be copied or moved within the Presentation Catalog instance or to another Presentation Catalog instance.
Complete the following steps to identify Paint as the online Presentation Catalog in the catalog path in \OracleBIData\web\config\instanceconfig.xml.
| 1. | Stop the Oracle BI Presentation Server and Oracle BI Server services. |
| 2. | Set paint.rpd as the default repository in the Repository section of \OracleBI\server\Config\NQSConfig.ini.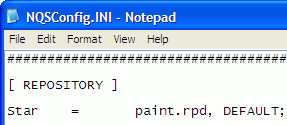 |
| 3. | Modify \OracleBIData\web\config\instanceconfig.xml so that paint is the catalog identified in the <catalogpath> section.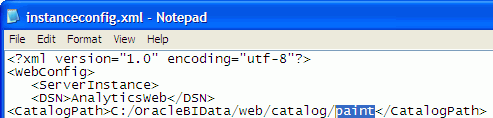 |
| 4. | Restart the Oracle BI Presentation Server and Oracle BI Server services. |
Cloning Answers Requests
The goal of this topic is to use CAF to clone a set of Answers requests from a source Presentation Catalog to a target Presentation Catalog.
To clone a set of Answers requests, perform the following steps:Selecting the Source Requests for Cloning
In this subtopic you learn how to use Catalog Manager and the CAF Wizard to select the requests you want to clone in the source Presentation Catalog.
| 1. | Select Start > All Programs > Oracle Business Intelligence > Catalog Manager to open Oracle BI Catalog Manager. |
| 2. | Select File > Open Catalog.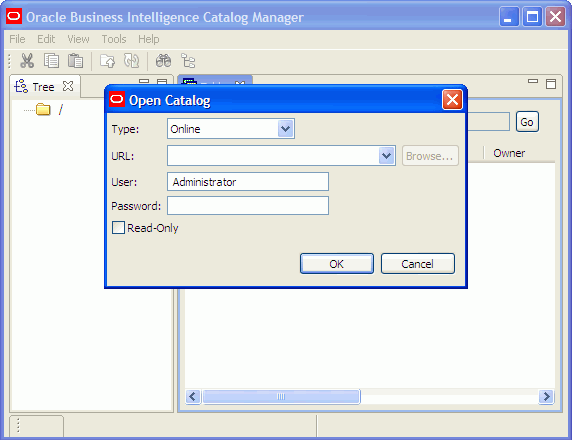 |
| 3. | In the Type drop down list, select Offline. Please note you are using offline mode in this example, however when using CAF to clone objects you could open the source Presentation Catalog in online mode.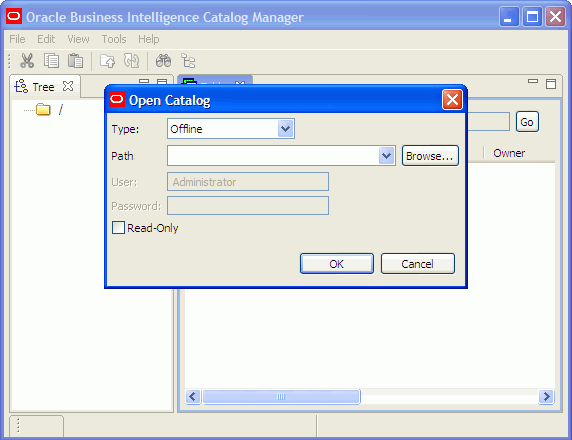 |
| 4. | In the Path field, browse to \OracleBIData\web\catalog\samplesales. This is the source Presentation Catalog for the cloning process. In this OBE the samplesales Presentation Catalog is located on the C:\ drive.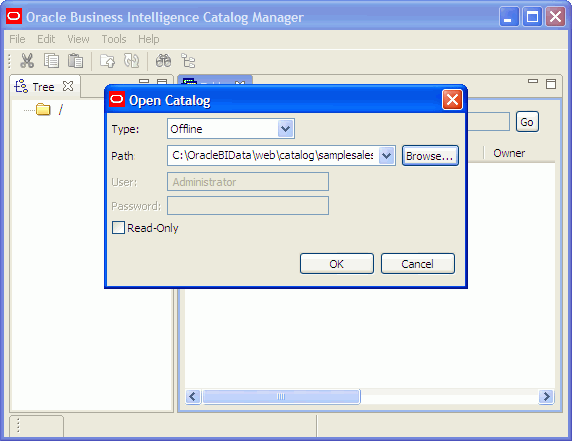 |
| 5. | Click OK to open the samplesales Presentation Catalog in Catalog Manager. |
| 6. | Expand the tree to shared\Sample Sales\03 Tiering and Distribution. In the right pane you can see a list of the Sample Sales requests you explored earlier in this tutorial.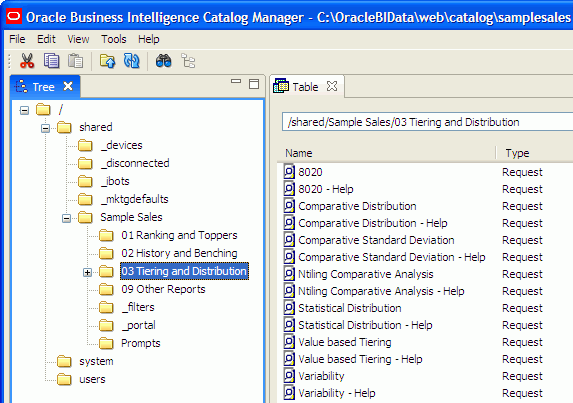 |
| 7. | In the list, use Ctrl + click to select the following six requests: 8020 Comparative Distribution Comparative Standard Deviation Ntiling Comparative Analysis Statistical Distribution Value Based Tiering Please note that you are not selecting the “- Help” requests or the “Variability” requests. 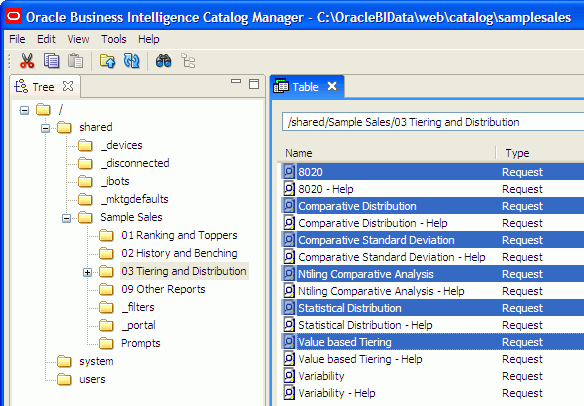 |
| 8. | Right-click any one of the highlighted requests and select Clone to open the Content Accelerator Wizard dialog box.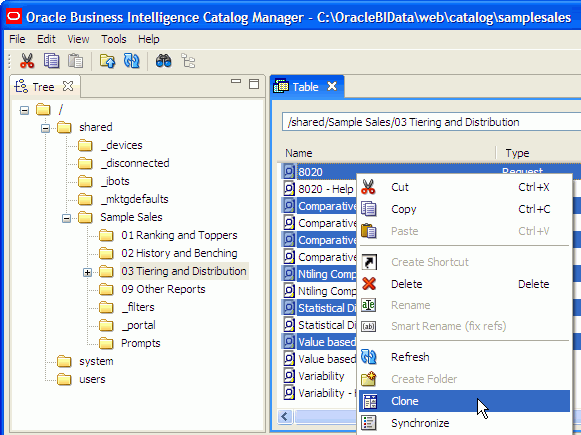 |
| 9. | In the Source Rpd field, browse to the location of the source repository. In this tutorial the location isC:\CAF_Training\Source\samplesales.rpd. This is the path to the repository that supports the source requests selected for cloning. CAF requires this information to list the objects used in the selected source requests, and to identify the minimum set of mappings needed for objects in the target environment. Some logical calculations in the source repository (used in requests) may also get cloned into the target repository. Only an offline version of a source repository is accepted by CAF. As in this example, you can use a copy of the repository originally used to support the source requests. The source repository is not modified during the cloning process.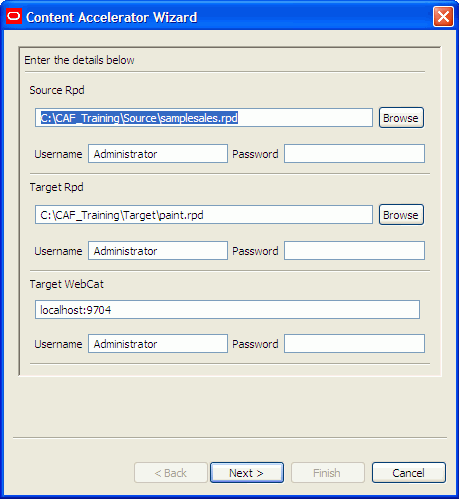 |
| 10. | Enter Administrator as the username and password for the Source Rpd. |
| 11. | In the Target Rpd field, browse to the location of the target repository. In this tutorial the location isC:\CAF_Training\Target\paint.rpd. This is the path to the repository that supports the target Presentation Catalog to which the selected requests will be cloned. CAF requires access to the target repository in order to provide the possible mappings from source objects to target objects. An offline version of the target repository is required. In some situations, CAF may need to modify the target repository during the cloning process; for example, in a situation where logical calculations are included in the source requests. If it is necessary to modify the target repository, a warning message is displayed before the target repository is updated and a backup of the original target repository is saved in the same folder as the target repository with a “_backup” suffix added to its name. |
| 12. | Enter Administrator as the username and password for the Target Rpd. |
| 13. | In the Target Webcat field, enter the location of the target online Presentation Catalog in the format hostname:port number. In this example the target Presentation Catalog is Paint on a local machine, so the hostname:port number is localhost:9704. This is where CAF creates cloned copies of the requests you selected in the source Presentation Catalog (samplesales in this example). CAF requires an online Presentation Catalog to clone the requests.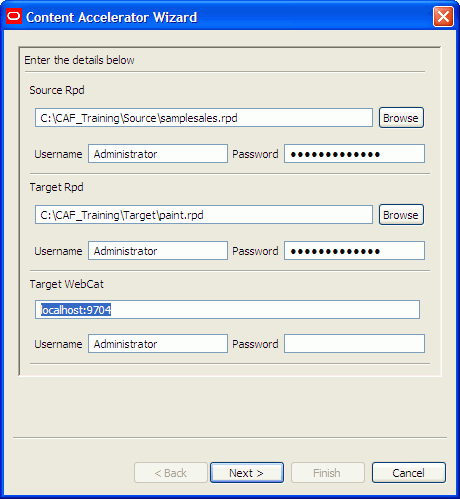 |
| 14. | Enter Administrator as the username and password for the Target Webcat. |
| 15. | Click Next. |
| 16. | Select Paint as the target subject area. |
| 17. | Click Next. |
Mapping the Required Columns
In this subtopic you learn how to map columns in the source Presentation Catalog to columns in the target Presentation Catalog.
| 1. | Notice in the “required object mappings” section that presentation columns are listed on the left. These are the minimum set of base columns needed to support the selected source requests. If some requests share the same columns in their design, those columns will be listed here only once. If some requests use columns that are logical calculations in the repository, then only the base arguments needed to reproduce those logical formulas are listed here. Each object listed in this screen is used at least once in one of the requests you are cloning.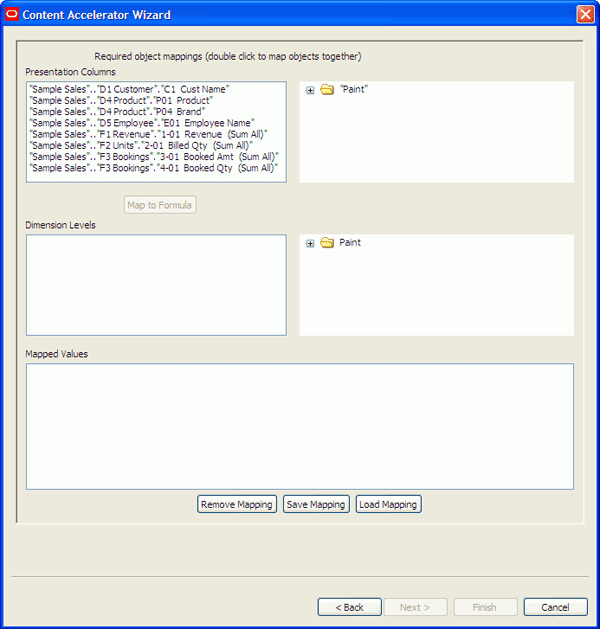 |
| 2. | Expand Paint in the right pane to expose the folders and columns in the Paint Presentation Catalog. |
| 3. | Select C1 Cust Name in the left pane. |
| 4. | Double-click Markets > District in the right pane to add the mapping to the Mapped Values section. In this screen you must provide source to target mappings for each required column in order to clone the source content to the target environment. Please note, as in this example, that some of the columns selected for mappings in this tutorial are for demonstration purposes only and are not necessarily a perfect “business” match between the source and target catalogs.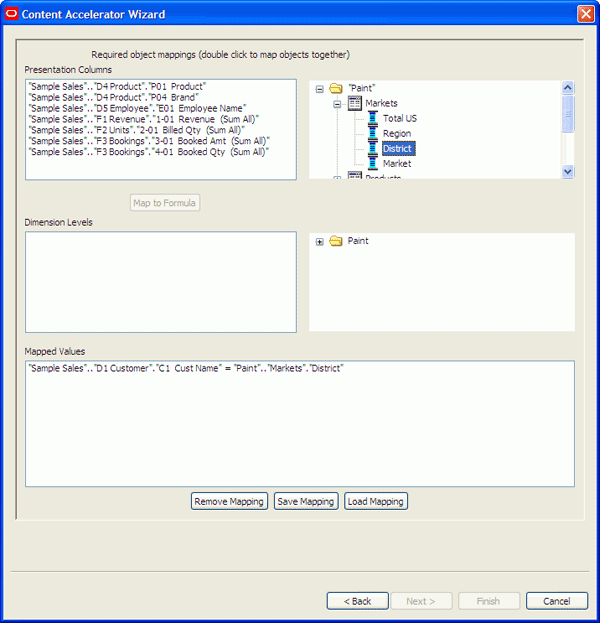 |
| 5. | Select the 4-01 Booked Qty (Sum All) column in the left pane.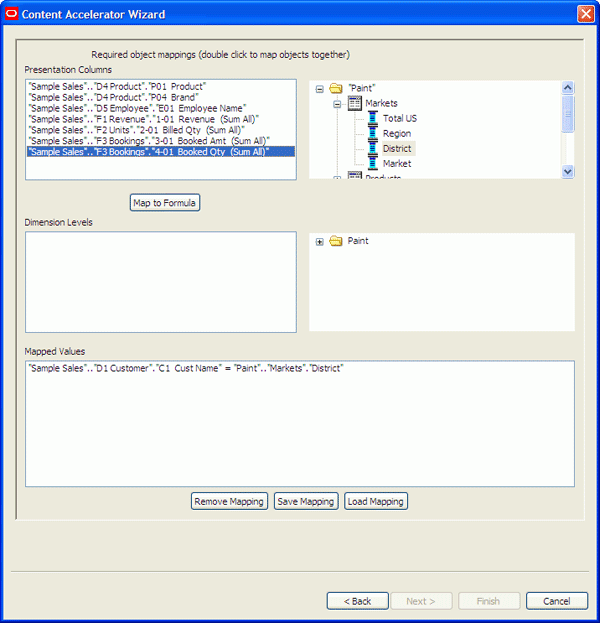 |
| 6. | Double-click Products > UPC in the right pane. A warning message is displayed. If the data types of the source and target columns are not the same, CAF displays a warning message. You can still proceed with the mapping, but there is a risk that the cloned request may not work correctly. The impact of using different data type columns varies depending on the request itself or which data types are matched together. Generally it is advised to comply with the identical data type requirement, unless you are very familiar with the source request design and understand the consequences of proceeding with mismatched data types.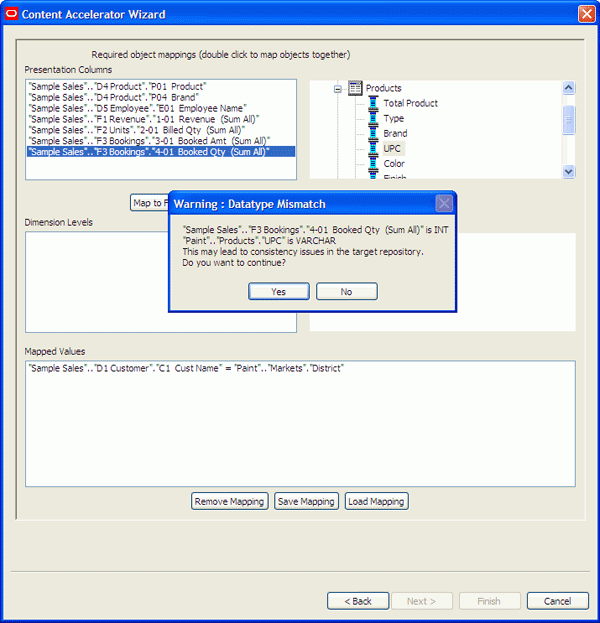 |
| 7. | Click No to continue. |
| 8. | Correct the mapping: 4-01 Booked Qty (Sum All) = Sales Measures > Units 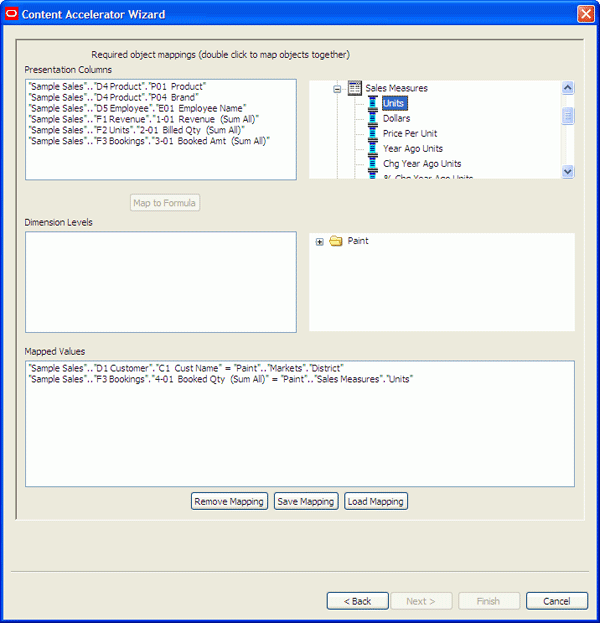 |
| 9. | Repeat the steps to add the following mappings to the Mapped Values section. To proceed to next step, all columns in this screen must be mapped to target columns: P01 Product = Products > Type P04 Brand = Products > Brand E01 Employee Name = Markets > Market 1-01 Revenue (Sum All) = Sales Measures > Dollars 2-01 Billed Qty (Sum All) = Sales Measures > Units 3-01 Booked Amt (Sum All) = Sales Measures > Dollars 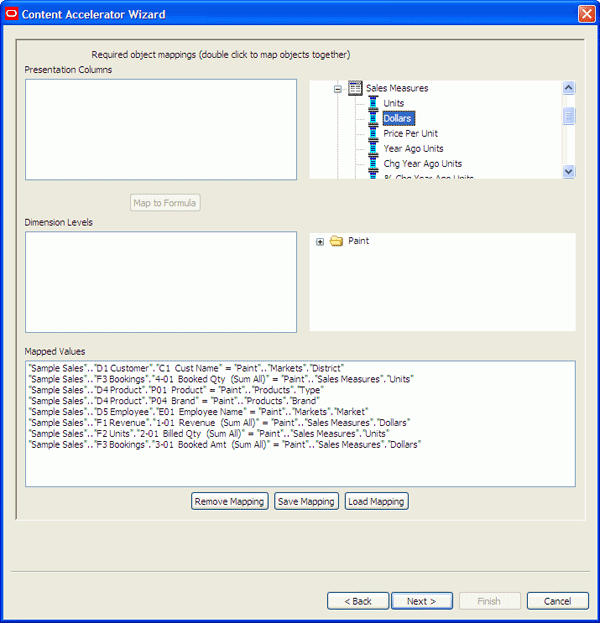 |
| 10. | Click Save Mapping and save the mapping as training_map in the C:\CAF_Training folder. The Save Mappingbutton allows detail information about mappings to be saved and reused for subsequent cloning processes. This feature is very helpful when multiple cloning processes are required between two environments. |
| 11. | Click OK to verify that the mapping was saved. |
| 12. | Click Next to open the Optional object mappings screen. The optional object mappings screen lists all the columns used only by filters in the source requests. These columns are not mandatory for the cloned requests to function properly. You can choose to provide mappings for all of the columns in this screen or for just a subset. Only those columns for which mappings are provided are carried forward as filter definitions in the target. If a filter column is already listed on Required Object Mapping screen, then its substitute mapping is reused and the column is not listed here in this Optional Column Mapping screen. For the purposes of this exercise, leave the optional columns unmapped and click Next to proceed.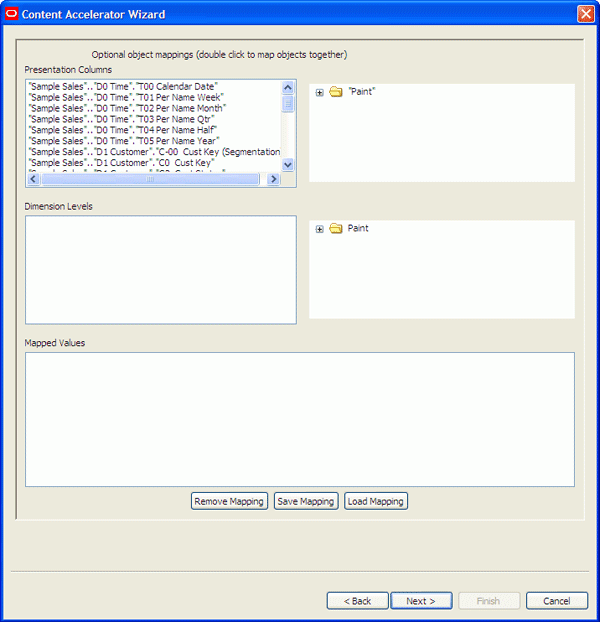 |
Identifying a Path for the Target Requests
In this subtopic you learn how to identify the location in the target Presentation Catalog where the cloned requests will be stored.
| 1. | In the Path for the Target Request(s) field, enter /shared/CAF_Training. This will create a subfolder namedCAF_Training in the shared folder of the target Presentation Catalog.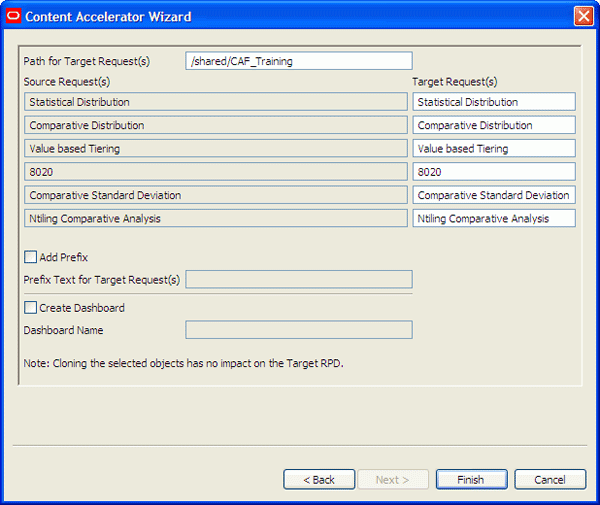 |
| 2. | Leave the target request names as they are. |
| 3. | Check the Add Prefix box and enter C1_ as a prefix for the target requests.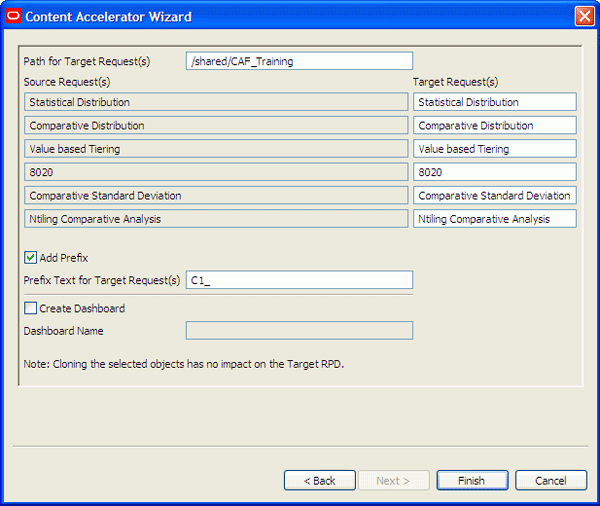 |
| 4. | Leave Create Dashboard unchecked. In this example you do not want to create a new dashboard with cloned requests. If you did want to create a new dashboard with each cloned request, then you would click on Create Dashboard and provide the dashboard name. This feature creates one page per cloned request within a single dashboard in the _portal folder of the specified path for the target requests. Please note that this process is different from the dashboard cloning process where existing dashboards are used as a source for cloning process. You use the dashboard cloning process later in this tutorial. |
| 5. | Notice the message: Cloning the selected objects has no impact on the Target RPD. This means that no logical calculations are used with the requests being cloned, so the target repository does not need to be modified. There may be Answers calculations in the requests, but those calculations are addressed in the Presentation Catalog, not the repository. CAF will recreate the exact same Answers' calculations in the target requests. Therefore only substitutes for the objects in the Answers’ formulas are required in the CAF mappings. |
| 6. | Click Finish to open the Log Messages screen. In this screen, CAF displays the detailed log information of the cloning process, which is also saved in the path indicated at top of the screen. Each cloning session generates a unique log file. The log sequentially displays the following: column mapping information; changes in the repository per each cloned request; changes in the target Presentation Catalog; and results of the consistency check for the repository, if one was performed. In this example there are no changes to the repository and no consistency check was performed. You see examples of these log entries later in this tutorial. 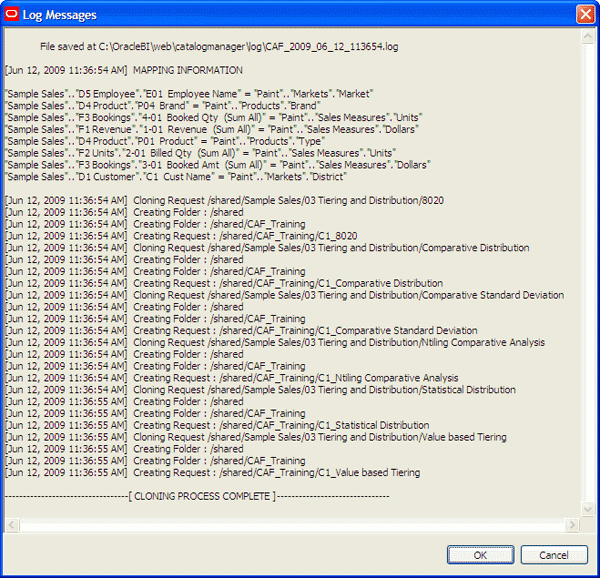 |
| 7. | Verify that you receive the message CLONING PROCESS COMPLETE and click OK to close the log file. |
| 8. | Leave Catalog Manager open. |
Verifying Cloning Results
In this subtopic you use OBI Presentation Services to verify the results of the cloning process.
| 1. | Select Start > All Programs > Oracle Business Intelligence > Presentation Services. |
| 2. | Log in as Administrator with password Administrator. |
| 3. | Verify that you are accessing the Paint application.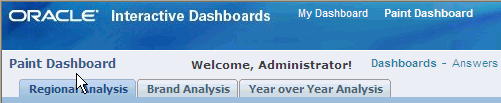 |
| 4. | Click the Answers link. |
| 5. | If necessary, click the Catalog tab. |
| 6. | In the left pane, expand Shared Folders > CAF_Training. Notice that a new folder, CAF_Training, has been created in the target Presentation Catalog, the six cloned requests are available in this folder, and each request has the C1_ prefix. |
| 7. | In the right pane notice that the descriptions for the requests include the original description and also identify the cloning process time and date. This provides the ability to look up the unique log file and identify the details of each cloning process, such as source-to-target column mappings.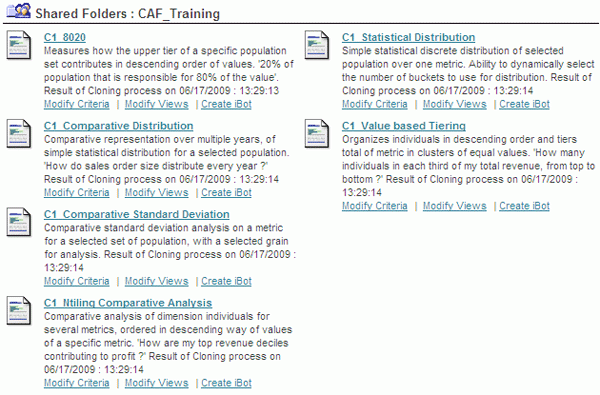 |
| 8. | Click the C1_8020 request to open it. Notice that the Paint request has the same views, layout, and formatting as the Sample Sales request, but now contains Paint data. For example, instead of C1 Cust Name data the request now has District data. This is because you mapped Sample Sales.C1 Cust Name to Paint.Markets.District during the cloning process.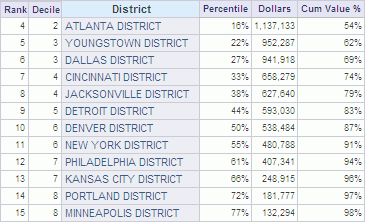 |
| 9. | Click Modify to view the request criteria for C1_8020.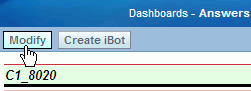 |
| 10. | Notice that the request now uses Paint columns. |
| 11. | Click the Edit Formula button to open the formula for the Rank calculation column.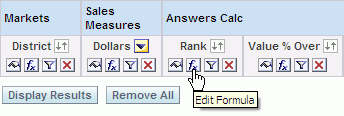 |
| 12. | Notice that the formula is now using a Paint column: Sales Measures.Dollars. Recall that in the Sample Sales version of the request, the rank formula used a Sample Sales column: F1 Revenue.1-01 Revenue (Sum All).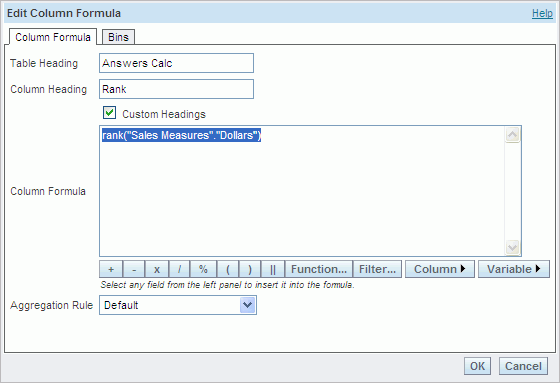 |
| 13. | Click Cancel to close the Edit Column Formula dialog box. |
| 14. | Leave Answers open for the next topic. |
Cloning Dashboards
The goal of this topic is to use CAF to clone a dashboard from a source Presentation Catalog to a target Presentation Catalog.
Similar to cloning requests, you can clone dashboards by choosing either a single dashboard or multiple dashboards. When you clone a dashboard, the complete layout, including pages, sections, views, columns, and formatting, is copied to the target environment. Requests and prompts that are embedded within the dashboard are also cloned into the target environment according to the path provided by the user.
To clone dashboards, perform the following steps:Similar to cloning requests, you can clone dashboards by choosing either a single dashboard or multiple dashboards. When you clone a dashboard, the complete layout, including pages, sections, views, columns, and formatting, is copied to the target environment. Requests and prompts that are embedded within the dashboard are also cloned into the target environment according to the path provided by the user.
| Selecting the Source Dashboard for Cloning | ||
| Mapping the Required Columns | ||
| Identifying a Path for the Target Dashboard | ||
| Verify Cloning Results | ||
Selecting the Source Dashboard for Cloning
In this subtopic you learn how to use Catalog Manager and the CAF Wizard to select the dashboard pages you want to clone in the source Presentation Catalog.
| 1. | Return to Catalog Manager, which should still be open to the Sample Sales Presentation Catalog in offline mode. |
| 2. | Expand shared > Sample Sales > _portal > 03 Tiering and Distribution to view the dashboard pages.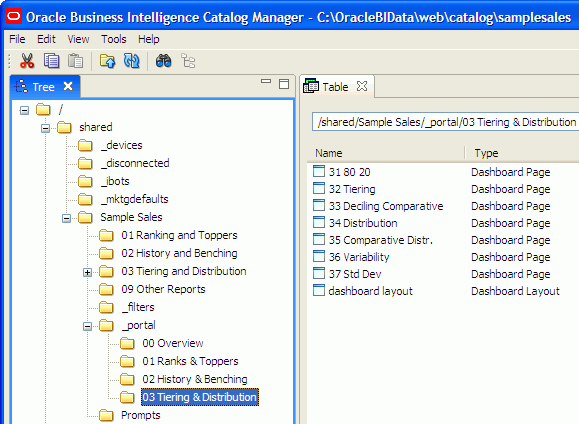 |
| 3. | Select all of the dashboard pages in the right pane except for 36 Variability. Do not select dashboard layout. The dashboard layout object is present in every dashboard folder and should not be cloned. This object holds metadata information about the dashboards and is not a dashboard page. It is automatically generated by the target OBIEE environment during cloning. |
| 4. | Right-click and select Clone to open the CAF wizard. |
| 5. | Verify that samplesales.rpd is still selected as the Source Rpd.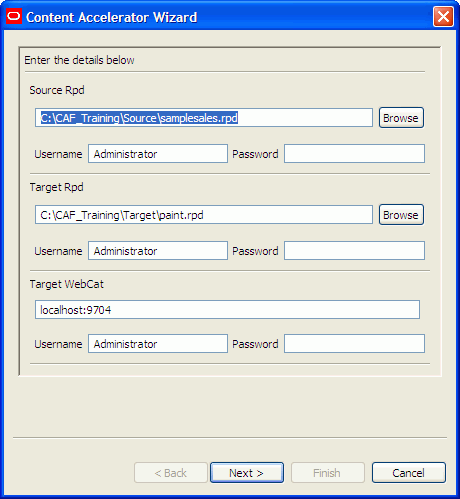 |
| 6. | Enter Administrator as username and password for the Source Rpd. |
| 7. | Verify that paint.rpd is still selected as the Target Rpd.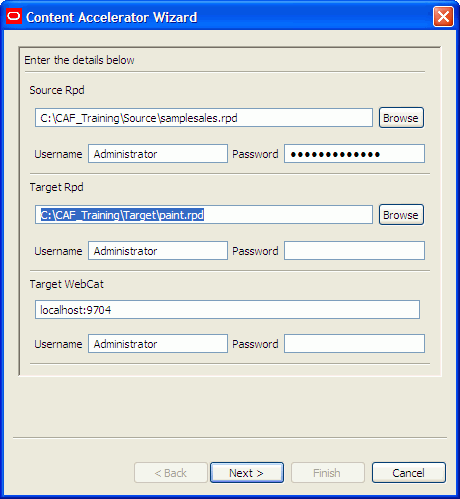 |
| 8. | Enter Administrator as username and password for the Target Rpd. |
| 9. | Verify that the Target Webcat is the online Presentation Catalog (Paint). In this tutorial the address islocalhost:9704. |
| 10. | Enter Administrator as username and password for the Target Webcat. |
| 11. | Click Next. |
| 12. | Select Paint as the target subject area. |
| 13. | Click Next to open the Required object mappings screen.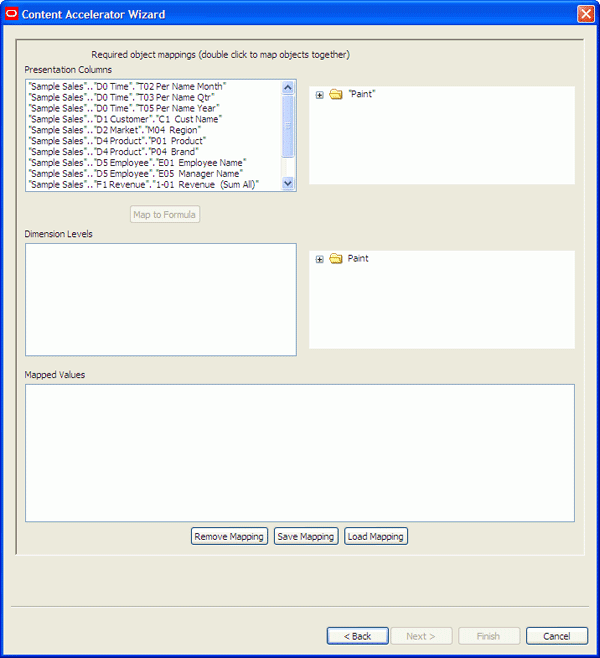 |
Mapping the Required Columns
In this subtopic you learn how to map dashboard columns in the source Presentation Catalog to columns in the target Presentation Catalog.
| 1. | Click Load Mapping and select the saved mapping training_map.txt.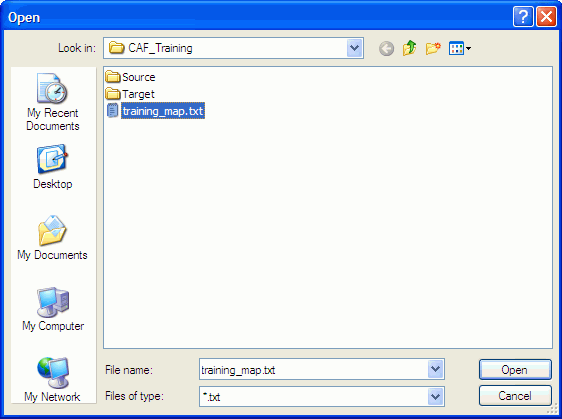 |
| 2. | Notice that most of the mapped values are automatically added to the Mapped Values pane. Because most of the required object mappings are fundamentally the same in the requests and dashboards, you are able to load the mapping you saved earlier when cloning requests, rather than manually selecting each mapping.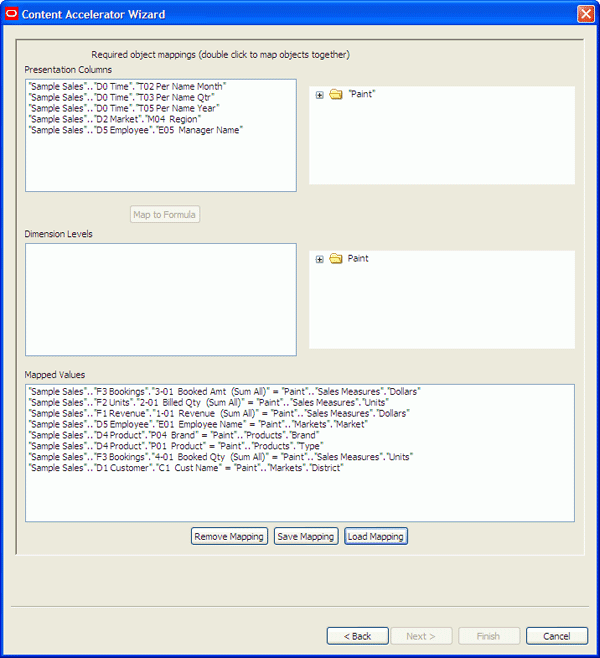 |
| 3. | Map the remaining presentation columns: T02 Per Name Month = Products > UPC T03 Per Name Qtr = Products > UPC T05 Per Name Year = Products > UPC M04 Region = Markets > Region E05 Manager Name = Markets > Market 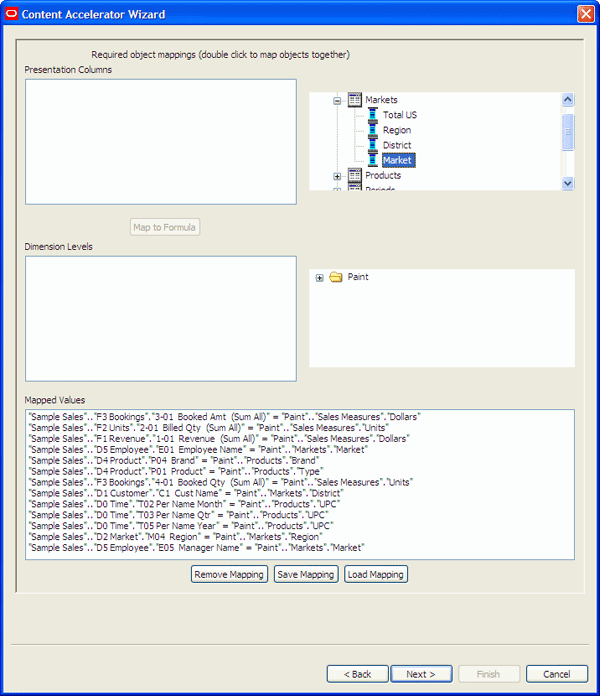 |
| 4. | Click Next to open the Optional object mappings screen.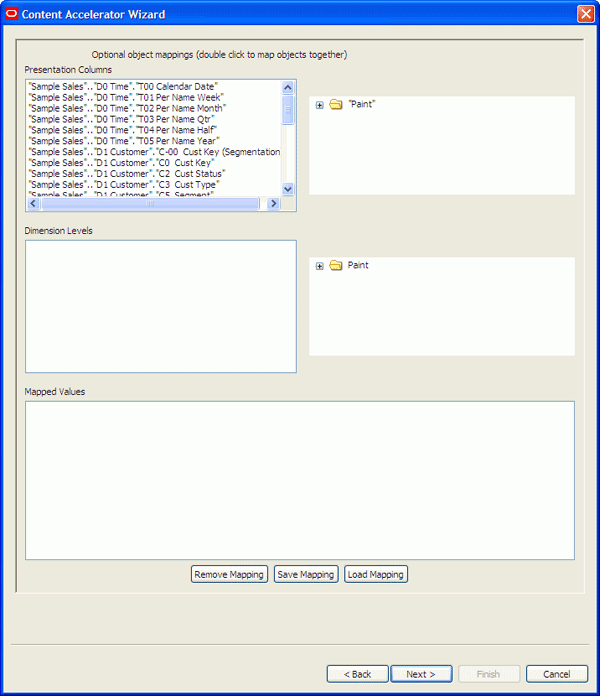 |
| 5. | Ignore the optional object mappings and click Next to open the Path for Target Request(s) screen.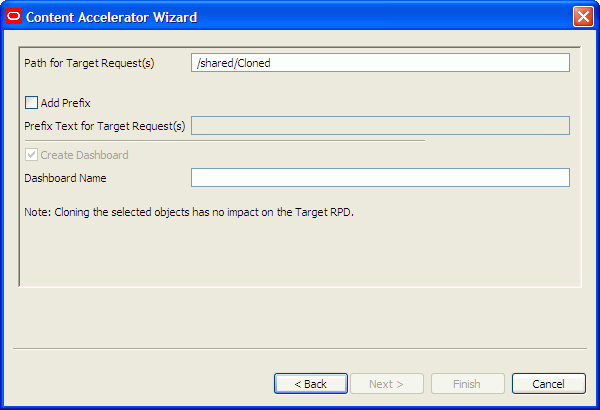 |
Identifying a Path for the Target Dashboard
In this subtopic you learn how to identify the location in the target Presentation Catalog where the cloned dashboard and associated requests will be stored.
| 1. | Leave the Path for Target Request(s) set to /shared/Cloned.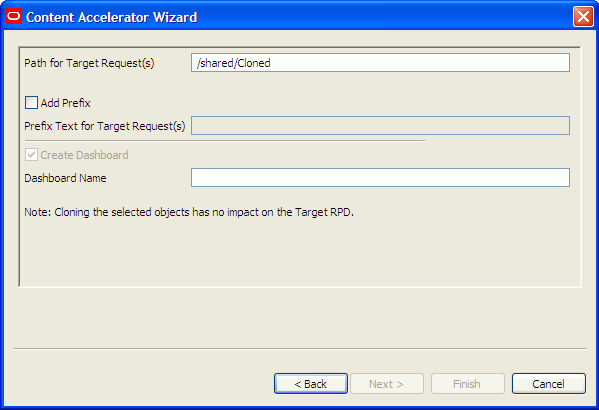 |
| 2. | Click Add Prefix and enter C2_ as the prefix for the target requests. |
| 3. | In the Dashboard Name field enter new_dashboard. Notice the message that cloning the selected objects has no impact on the Target RPD.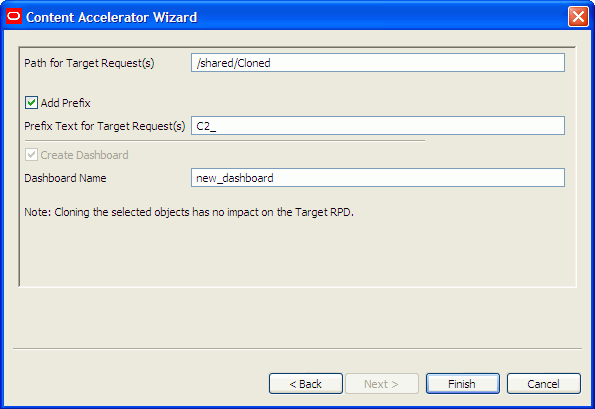 |
| 4. | Click Finish to open the Log Messages screen. Review the log, which includes mapping information and the step-by-step sequence of tasks performed by CAF. The screenshot shows only a partial view of the Log Messages screen. |
| 5. | Verify that you see the message CLONING PROCESS COMPLETE at the bottom of the log and then click OK to close the Log Messages window. |
Verifying Cloning Results
In this subtopic you use OBI Presentation Services to verify the results of the dashboard cloning process.
| 1. | Return to Presentation Services, which should still be open to Paint. |
| 2. | Click Dashboards. Notice that there is now a new dashboard named new_dashboard. |
| 3. | Click new_dashboard to open the dashboard.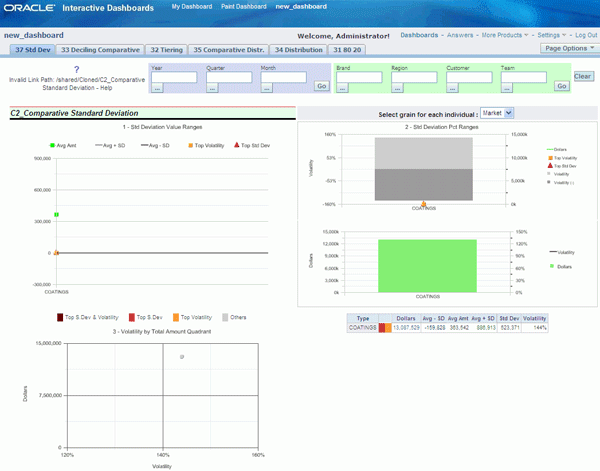 |
| 4. | Navigate through the dashboard pages and notice that the new dashboard contains all of the cloned pages, but now with Paint data instead of Sample Sales data. When a dashboard is cloned, all of its content is replicated in the target environment. Dashboard pages, columns, sections, and all formatting are copied to the target Presentation Catalog. |
| 5. | Click the 37 Std Dev tab to open the dashboard page. Notice there is an Invalid Link Path. This is because cloning the dashboard did not resolve the path of content that does not exist in Paint. Navigation and direct target paths are not handled by the cloning tool. CAF does not include a hierarchy of everything that this dashboard navigates to. It only clones objects that are directly contained in the cloned dashboard. |
| 6. | Click the Answers link, navigate to the Cloned folder, and observe that all of the cloned objects (requests and prompts) are now visible in the Presentation Catalog folder. Requests and prompts that are included in the dashboard are also cloned automatically and saved to the target environment.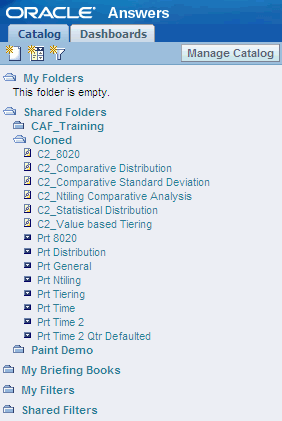 |
Cloning Repository Logical Objects
The goal of this topic is to use CAF to clone repository objects with logical calculations from a source repository to a target repository.
The CAF utility also handles duplication of logical calculations from one repository to another. In this topic you use the CAF_EXP_1 request you created earlier in this tutorial to demonstrate how CAF exports and imports logical constructs from one OBIEE environment to another
To clone repository logical objects, perform the following steps:Selecting the Source Request for Cloning
| 1. | Return to Catalog Manager, which should still be open to the Sample Sales Presentation Catalog in offline mode. |
| 2. | Expand shared > Sample Sales. |
| 3. | In the right pane, right-click the CAF_EXP_1 request you created earlier and select Clone.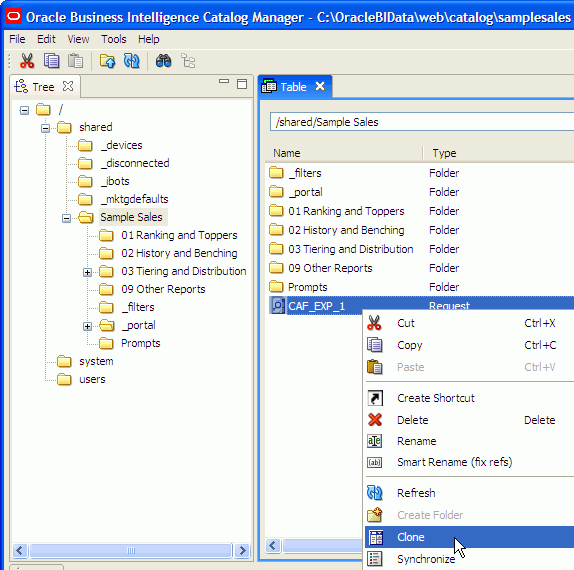 |
| 4. | Accept the same details for the source and target repositories, and the target webcat, and enter Administrator as the usernames and passwords.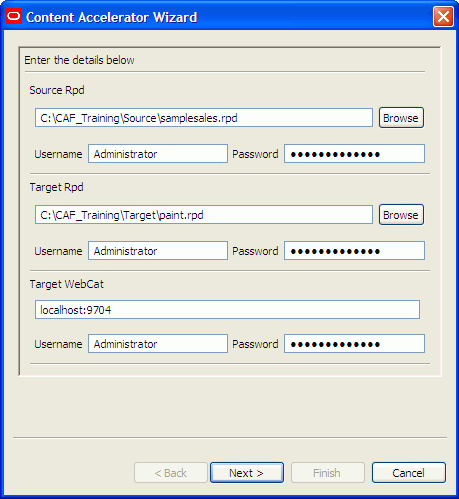 |
| 5. | Click Next. |
| 6. | Select Paint and click Next to navigate to the required object mappings screen.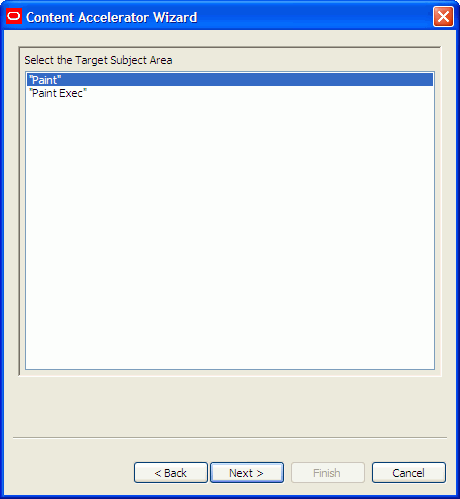 |
Mapping the Required Columns
| 1. | Create the following mappings: "Sample Sales".."D0 Time"."T05 Per Name Year" = "Paint".."Periods"."Year" "Sample Sales".."D2 Market"."M04 Region" = "Paint".."Markets"."Region" "Sample Sales".."F1 Revenue"."1-01 Revenue (Sum All)" = "Paint".."Sales Measures"."Dollars" Sample Sales".."F3 Bookings"."3-01 Booked Amt (Sum All)" = "Paint".."Forecast Measures"."Forecasted Dollars" 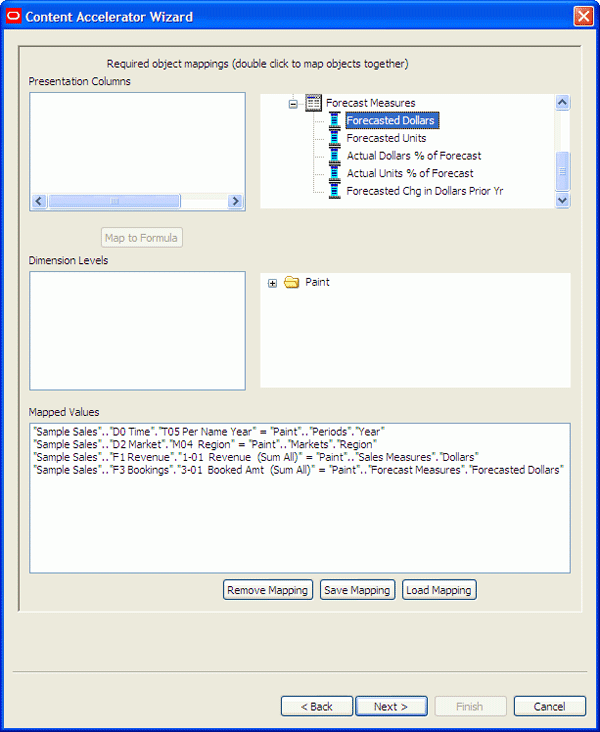 |
| 2. | Click Next to open the Optional mappings screen. This screen shows the P02 Product Type column that is included in the filter, but not in the request. In this example, do not map the filter column.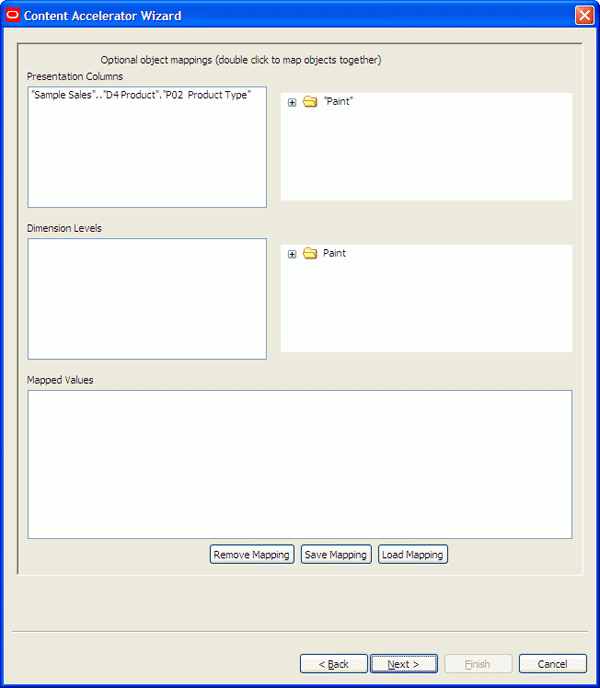 |
| 3. | Click Next to override the optional mappings and open the Path for Target Request(s) screen.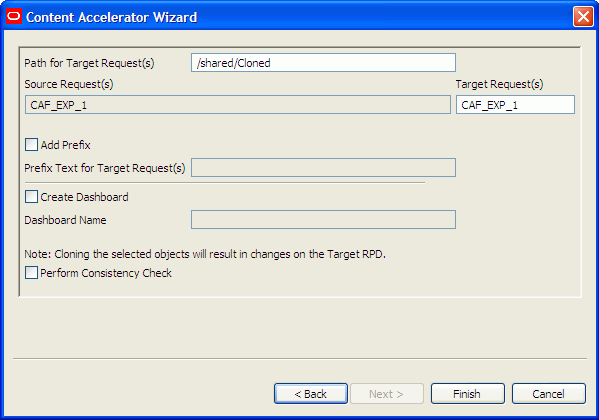 |
Identifying a Path for the Target Request
| 1. | Leave the Path for Target Requests set to /shared/Cloned. |
| 2. | Notice there is a message indicating that there will be an impact on the repository: “Cloning the selected objects will result in changes to the Target Rpd”.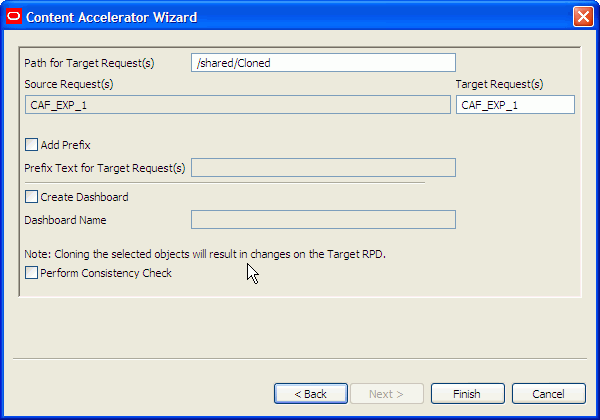 |
| 3. | Because the target repository will be modified by CAF, check Perform Consistency Check to perform a consistency check on the target repository.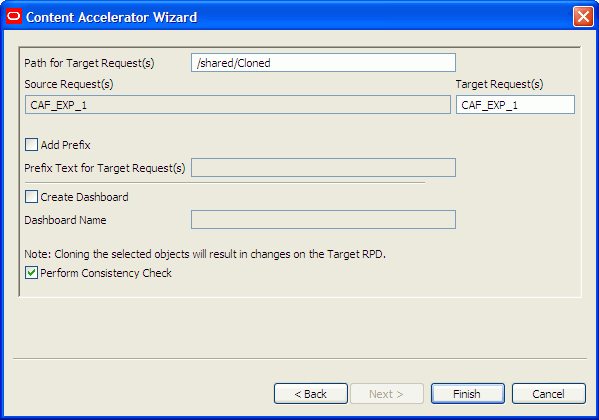 |
| 4. | Click Finish. |
| 5. | Review the log, which includes mapping information and the step-by-step sequence of tasks performed by CAF. It indicates that CAF created the cloned request with the selected mappings, but it also created new logical objects in the target repository. It created a logical folder named Auto Gen Folder, and a logical column named Auto Gen 1 for the 8-X1 book to Bill Ratio column. It also created a corresponding presentation column. Because CAF modified the target repository it also created a backup of the target rpd. The log also indicates that a consistency check was run and that there are no errors.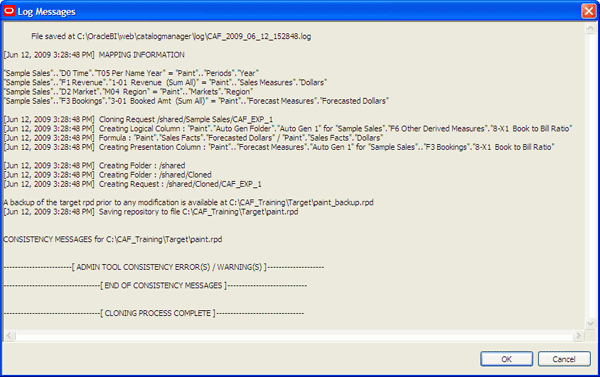 |
| 6. | Click OK to close the Log Messages window. |
Verifying Cloning Results
| 1. | Return to Presentation Services, which should still be open to Paint. |
| 2. | Click Answers to navigate to the Answers start page. |
| 3. | Expand Shared Folders > Cloned and verify that the CAF_EXP_1 request now exists in the Cloned folder.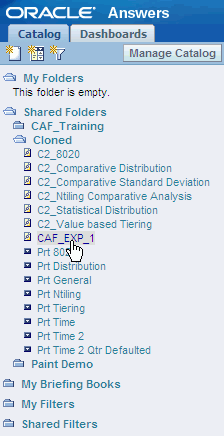 |
| 4. | Click on CAF_EXP_1 to open the request. Notice that the request cannot be displayed. This is because the modified target Paint repository is still located in C:\CAF_Training. In a subsequent step you copy the modified repository to the correct Oracle BI Server repository folder and verify results.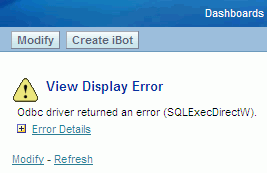 |
| 5. | Click Modify to view the request criteria in Paint. Notice that the request is using the new logical column Auto Gen 1 that was generated by CAF. |
Modifying the Target Repository
Because the cloning process impacted the target repository you must modify the target repository in preparation for the next step, which is synchronizing the target Presentation Catalog with the target repository.
| 1. | Navigate to C:\CAF_Training\Target. Notice there is a paint_backup.rpd that was created during the cloning process.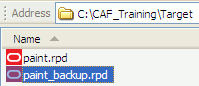 |
| 2. | Double-click the paint.rpd repository file to open it in offline mode. Recall that this is the offline repository that was modified during the cloning process. |
| 3. | Enter Administrator as the username and password.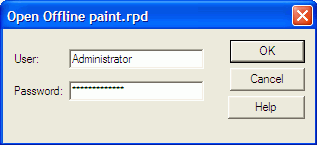 |
| 4. | Expand the Paint business model in the Business Model and Mapping layer.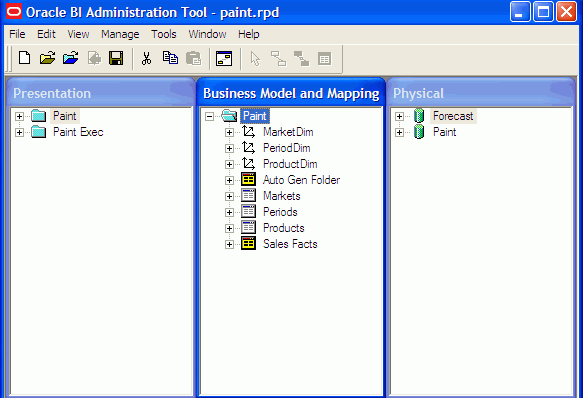 |
| 5. | Notice there is an Auto Gen Folder with an Auto Gen 1 column. Logical objects created by CAF are automatically grouped with sequential naming (Auto Gen 1, Auto Gen 2, etc) under a logical layer folder named Auto Gen Folder. Note that Auto Gen Folder has no logical table source. This is because this folder only carries logical calculations, that is, objects sourced from other existing logical objects.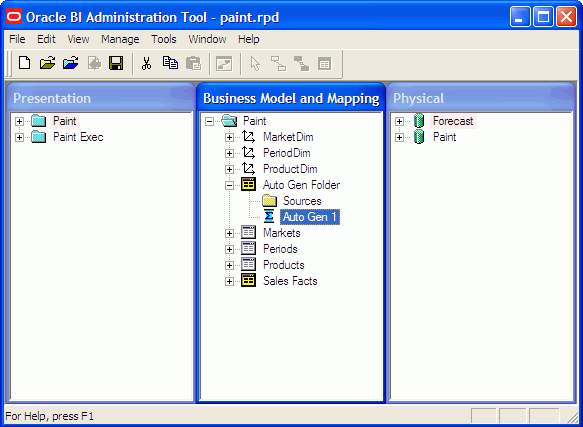 |
| 6. | Double-click the Auto Gen 1 column to open its properties dialog box. |
| 7. | Click the General tab.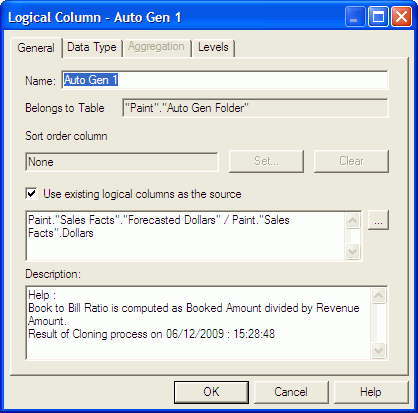 |
| 8. | Notice that the Auto Gen 1 column uses Paint objects in its logical calculation.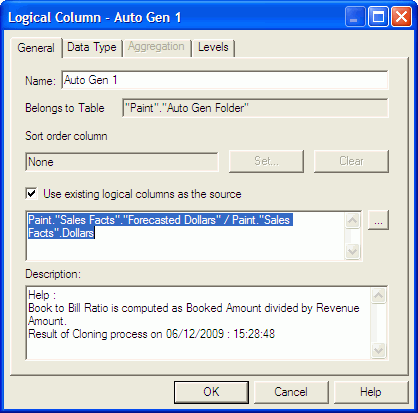 |
| 9. | Notice also that the description contains information about the cloning process. For each created object, CAF replicates the description that is present in the source repository and adds a cloning message. |
| 10. | Click Cancel to close the Logical Column dialog box. |
| 11. | Expand Paint > Forecast Measures in the Presentation layer and notice that CAF created a corresponding Auto Gen 1 column in the Presentation layer.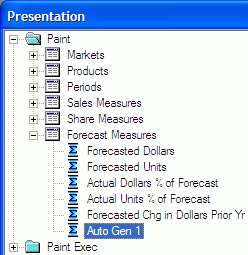 |
| 12. | In the Business Model and Mapping layer, rename Auto Gen 1 to Forecast to Sales Ratio.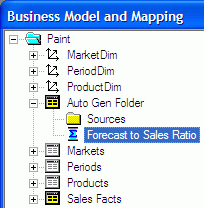 |
| 13. | Notice that the Presentation column is automatically updated in Paint > Forecast Measures. |
| 14. | In the Business Model and Mapping layer, drag Forecast to Sales Ratio from the Auto Gen Folder to the Sales Facts folder. |
| 15. | Delete Auto Gen Folder in the Business Model and Mapping layer. |
| 16. | Select File > Check Global Consistency to open the Consistency Check Manager. |
| 17. | Verify that the repository is consistent before continuing. The repository is consistent if there are no errors or warnings displayed in the Consistency Check Manager.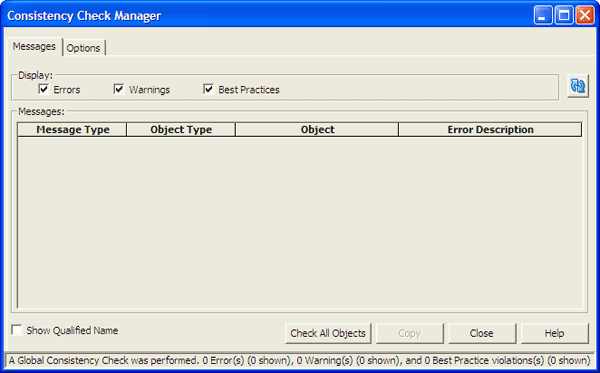 |
| 18. | Close Consistency Check Manager. |
| 19. | Leave the repository open. |
Synchronizing Presentation Catalogs and Repositories
The goal of this topic is to use the CAF Synchronizer to synchronize the target Presentation Catalog with the target repository after the cloning process is complete.
After the cloning process, requests in the target Presentation Catalog use names of objects that exist in the target repository. However, as you saw in the previous set of steps, the cloning process that creates new logical objects in target repositories may also result in poor functional naming of the new objects. For example, after cloning, columns are named Auto Gen 1, Auto Gen 2, and so on. Therefore, you must rename these objects with good functional names to complete the CAF process and to make the request columns intuitive to functional users.
Furthermore, any additional re-arranging or renaming of objects in the target repository impacts its Presentation layer and may therefore “break” Answers requests that use the renamed objects. This is where the CAF Synchronizer helps. It allows you to automatically fix Answers requests with any updated repository object names. CAF Synchronizer ensures that the target repository objects are properly renamed and synchronized with the target Presentation Catalog.
To synchronize Presentation Catalogs and repositories, perform the following steps:
Modifying the Target Repository
In this subtopic you perform additional modifications to the target repository.
| 1. | To further “confuse” the repository, in the Business Model and Mapping layer, rename Sales Facts > Dollars toNew Name for Dollars. |
| 2. | Notice that the corresponding presentation layer column is also modified.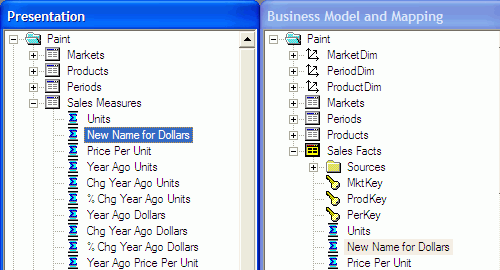 |
| 3. | In the Presentation layer, move Forecast to Sales Ratio from the Forecast Measures folder to the Share Measures folder.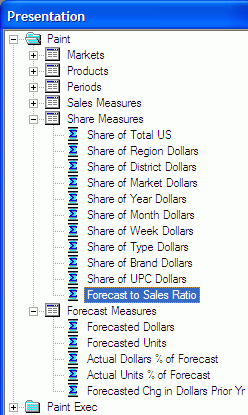 |
| 4. | Save the repository as paint2.rpd in C:\CAF_Training\Target. In order to run the CAF Synchronizer, you must keep a copy of the original target repository. Synchronizer needs the original target repository as a starting point to be able to detect the changes that happened between the original target repository (paint.rpd) and the modified target repository (paint2.rpd) that requires synchronization. |
| 5. | Click Yes to check consistency and verify that the repository is consistent.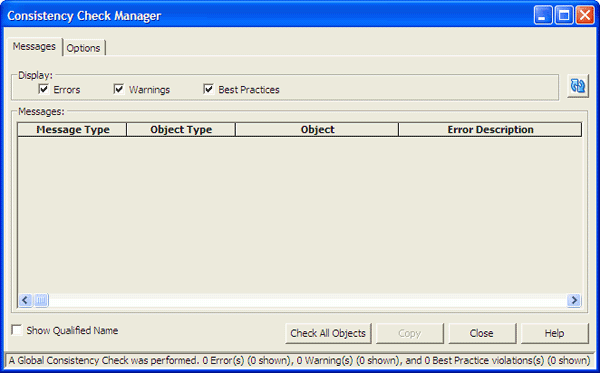 |
| 6. | Close Consistency Check Manager. Please note that although the repository is consistent, it is not yet in synch with the cloned Presentation Catalog due to the name changes you made in the repository. Recall that you renamed the Dollars object in the repository. At this point, if you were to load this repository and try to open any requests that include this object, they would not work. |
| 7. | Close the paint2 repository and the Administration Tool. |
Synchronizing the Presentation Catalog with the Modified Repository
In this subtopic you learn how to use Catalog Manager and the CAF Synchronizer to synchronize the target Presentation Catalog with the modified repository.
| 1. | Return to Catalog Manager and select File > Close Catalog to close the samplesales source catalog. |
| 2. | Select File > Open Catalog. |
| 3. | In the Type field, select Online.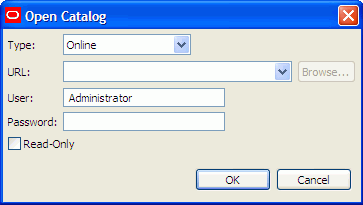 |
| 4. | In the URL field, enter the address of the online Presentation Catalog. In this tutorial the address ishttp://localhost:9704/analytics/saw.dll.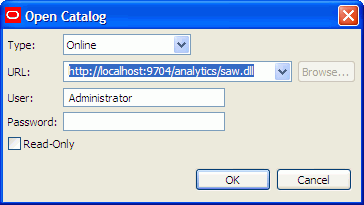 |
| 5. | Enter Administrator as the username and password.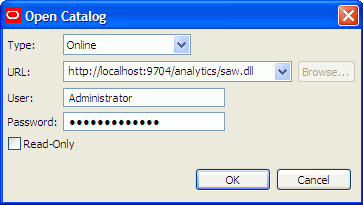 |
| 6. | Click OK. This opens the online localhost catalog where you have all of the cloned objects as a result of running CAF. |
| 7. | Navigate to shared > Cloned. |
| 8. | Select all of the cloned requests including CAF_EXP_1. Do not select the dashboard prompts.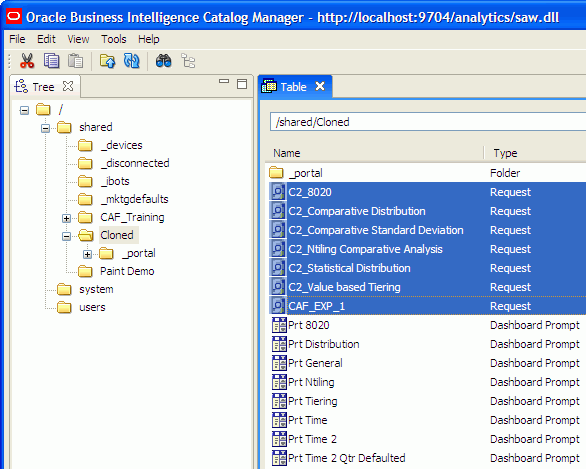 |
| 9. | Right-click and select Synchronize to open the Synchronize Wizard. |
| 10. | In the Original Rpd field, browse to C:\CAF_Training\Target\paint.rpd.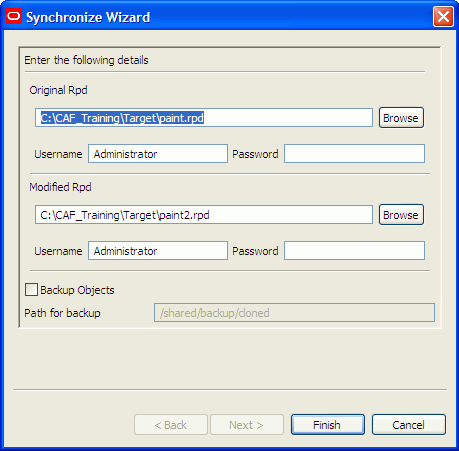 |
| 11. | Enter Administrator as username and password.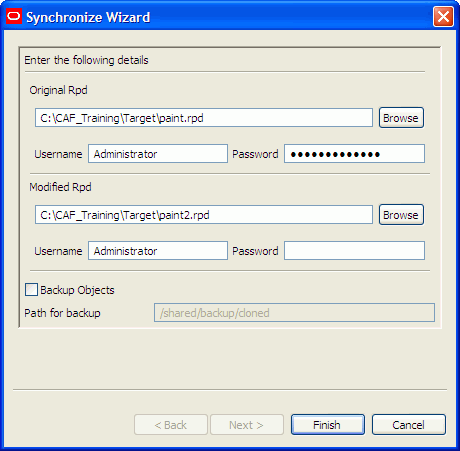 |
| 12. | In the Modified Rpd field, browse to C:\CAF_Training\Target\paint2.rpd.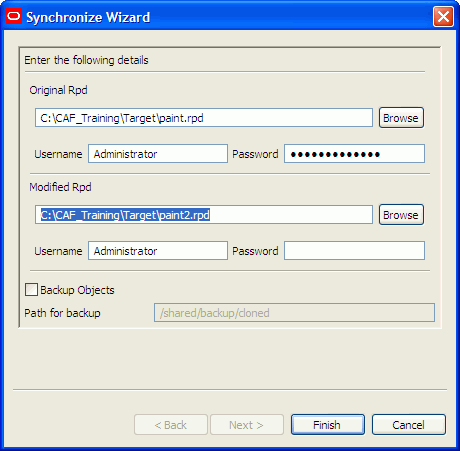 |
| 13. | Enter Administrator as username and password. At his point you could select Backup Objects, but for the purposes of this training, leave this unchecked.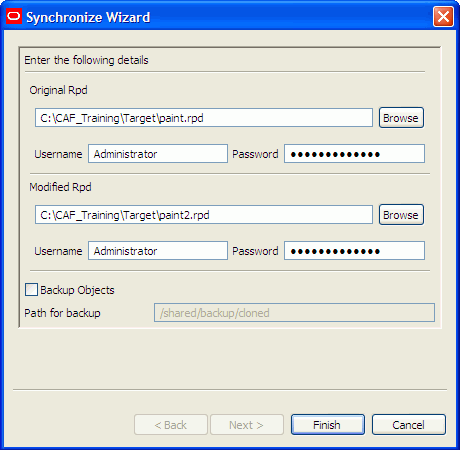 |
| 14. | Click Finish. |
| 15. | Check the log. CAF parses both repositories and detects the modifications between the repositories. For example,Dollars has been modified to New Name for Dollars and Auto Gen 1 has been modified to Forecast to Sales Ratio. CAF then synchronizes any of the requests that use the modified objects and provides the correct name.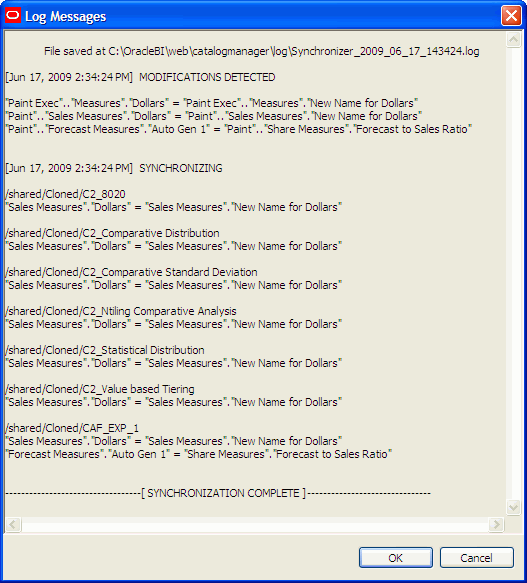 |
| 16. | Verify that you receive a SYNCHRONIZATION COMPLETE message and click OK to close the log. |
| 17. | Select File > Close Catalog to close the online catalog. |
| 18. | Close Catalog Manager. |
Verifying Synchronization Results
| 1. | Stop the Oracle BI Server service. |
| 2. | Copy paint2.rpd from C:\CAF_Training\Target to \OracleBI\server\Repository. |
| 3. | Double-click \OracleBI\server\Repository\paint2.rpd to open in offline mode. |
| 4. | Enter Administrator as the username and password. |
| 5. | Select Manage > Variables to open Variable Manager.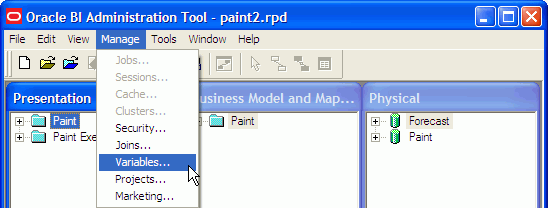 |
| 6. | Navigate to Repository > Variables and double-click the BI_EE_HOME variable to open the Static Repository Variable dialog box.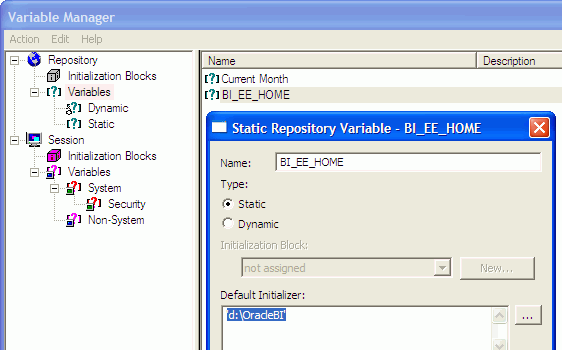 |
| 7. | If necessary, change the Default Initializer to the OBIEE home directory. The default is 'd:\OracleBI'. In this training it is changed to 'C:\OracleBI'. This ensures that the repository connection pool points to the correct location of the paint xml files.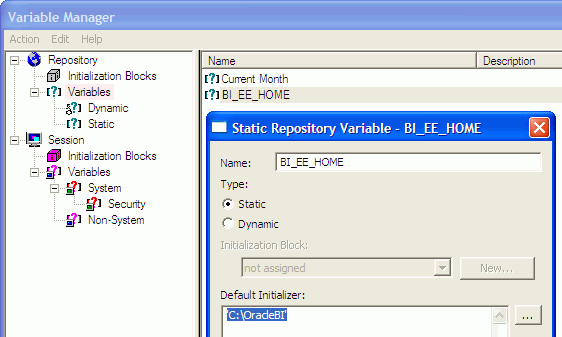 |
| 8. | Click OK to close the Static Repository Variable dialog box. |
| 9. | Close Variable Manager. |
| 10. | Save and close the paint2 repository. There is no need to check consistency. |
| 11. | Open \OracleBI\server\Config\NQSConfig.ini, modify the repository section to open the paint2 repository, and save and close NQSConfig.ini. |
| 13. | Start the Oracle BI Server service and restart the Oracle BI Presentation Server service. |
| 14. | Return to the Paint application which should still be open in Presentation Services. |
| 15. | If prompted, log in as Administrator and click Answers to return to the Answers Start Page. |
| 16. | Click Reload Server Metadata.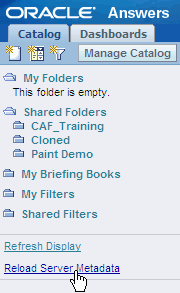 |
| 17. | Navigate to Shared Folders > Cloned.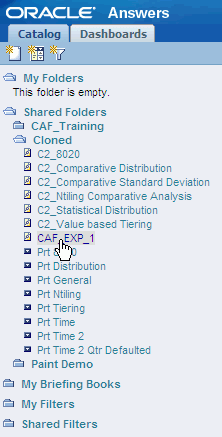 |
| 18. | Click the CAF_EXP_1 request and verify that you see results. Notice that the two new columns are displayed. Auto Gen1 has been renamed to Forecast to Sales Ratio. Dollars has been renamed to New Name for Dollars. This confirms that CAF synchronization is successful.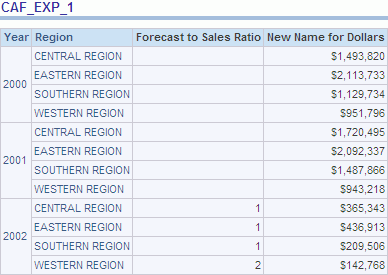 |
| 19. | Click the C2_8020 request. |
| 20. | Click Modify and verify the request criteria appear as expected. Dollars has been renamed to New Name for Dollars. |
Summary
In this tutorial, you should have learned how to:| Use the Content Accelerator Framework to clone OBIEE requests | |
| Use the Content Accelerator Framework to clone OBIEE dashboards | |
| Use the Content Accelerator Framework to clone logical objects in an OBIEE repository | |
| Use the Content Accelerator Framework to synchronize OBIEE Presentation Catalogs and repositories | |
| Verify Content Accelerator Framework cloning and synchronization processes using Oracle BI Answers and Oracle BI Catalog Manager |