Go to Control Panel -> Administrative Tools -> Data Sources (ODBC) ->Add -> Oracle BI Server (N) -> Finish -> Provide enter BI Server details when prompted
This section explains how to create an ODBC DSN for the Oracle BI Server on Windows to enable remote client access. You use the Oracle BI Server DSN Configuration Wizard to set up an ODBC DSN that you can use to connect to a repository through the Oracle BI Server.
The Oracle BI Server ODBC driver is a 32-bit application. Use the 32-bit version of ODBC Data Source Administrator located at C:\Windows\SysWOW64\odbcad32.exe.
The 64-bit version of the ODBC Data Source Administrator (located at C:\Windows\system32\odbcad32.exe) does not show the Oracle BI ODBC driver.
To create a DSN for the Oracle BI Server on Windows:
- Open the Windows Control Panel by selecting Start > Settings > Control Panel, double-click Administrative Tools, and then double-click Data Sources (ODBC).
- In the ODBC Data Source Administrator dialog, click the System DSN tab, and then click Add.
- In the Create New Data Source dialog, select the driver Oracle BI Server 11g_OHid_number (where id_number is a number specific to an installed Oracle home), and then click Finish. The first page of the Oracle BI DSN Configuration wizard is displayed.
- Type a name for the data source in the Name field.
Note: Do not change the name of the centrally managed default DSN for Presentation Services and the Administration Tool. - Optionally, enter a description in the Description field.
- To connect to a single Oracle BI Server that is not part of a cluster, in the Server field, select the computer on which the Oracle BI Server is running.
If the server name does not appear in the list, then type the computer name in the Server field.
Note: This field is not used for the default DSN created for Presentation Services, because the Oracle Business Intelligence system is clustered by default. - To connect to a set of clustered Oracle BI Servers through the Cluster Controllers, do the following:
- Select Clustered DSN.
- Enter information for the primary and secondary Cluster Controllers, as follows:
- In the Primary Controller field, enter the name of the computer that is specified as the primary Cluster Controller. Then, enter the port number for the Primary Controller in the appropriate Port field.
- If a secondary Cluster Controller has been set up, then type the name of the host where the Secondary Controller is running in theSecondary Controller field. Then, enter the port number for the Secondary Controller in the appropriate Port field.
- To test the connection to the Cluster Controllers, click Test Cluster Connect.
If the test is not successful, then correct any errors identified in the message and test the connection again.
- Select Route Requests To Physical Layer to create a dedicated physical connection to the Oracle BI Server for clients using this DSN. All
SELECTqueries over this connection will be treated asSELECT_PHYSICALqueries.
SELECT_PHYSICALqueries directly query objects in the Physical layer of the metadata repository, bypassing the Presentation layer and the Business Model and Mapping layer. - Select Use Forward Only Cursor to change the ODBC cursor from its default scrollable mode to forward only.
- To configure this DSN to communicate over SSL, select Use SSL.
To configure advanced settings for SSL, see "Configuring the ODBC DSN for Advanced SSL Settings" for additional instructions. - Click Next. The second page of the Oracle BI DSN Configuration wizard is displayed.
- Optionally, for Login ID and Password, enter a user name and corresponding password for the Oracle BI Server.
- To save the user name in the Windows registry for this client, select Save login ID. If you select this option, you will not have to enter your user name each time you connect. You will still have to enter a password.
- Enter a port number for the Oracle BI Server in the Port field. This option is enabled when Clustered DSN has not been selected on the first page of the wizard.
You can find information about the Oracle BI Server port on the Availability tab of the Capacity Management page in Fusion Middleware Control. - If you want to connect to a repository other than the default repository, then select Change the default repository to, and then type the logical name of the repository to which you want to connect.
You can only use this setting if you have configured the Oracle BI Server to host multiple repositories. Note that hosting multiple repositories on a single Oracle BI Server is not recommended for production deployments.
Note:For Presentation Services clients, each Presentation Services instance can only access a single repository. To configure multiple Presentation Services instances to access multiple repositories, follow these steps:- Install Presentation Services on one computer for each repository instance. For example, if you have three repositories running on your Oracle BI Server, install three Presentation Services instances on three separate computers.
- Adjust the setting Change the default repository to in the DSN for each Presentation Services instance.
- As a Web client end user, you can choose which repository to access from your client browser by substituting the appropriate Web server computer name or IP address in the URL for the Presentation Services instance that points to the repository you want to work with:
http://host_name_or_IP_address/analytics/saw.dll?
- Optionally, select Connect to obtain default settings for the additional configuration options.
If you select this option, the wizard will attempt to connect to the server to obtain default values for the configuration settings on the next screen. If you do not select this option, then you can still configure the DSN by manually entering the information in the next screen.
If you select this option, you must provide values for Login ID and Password. - Click Next. The third page of the Oracle BI DSN Configuration wizard is displayed.
- To change the name of the default subject area, select Change the default subject area to and then enter the name of the subject area. If you selected the Connect option in the previous screen, you can choose a name from the list.
Do not select this option for the DSN used by Oracle BI Presentation Services.
If you do not select this option, the default subject area is the one defined in the internal call query metadata. You can use theDATABASESQL function to determine the default subject area; see Oracle Fusion Middleware Metadata Repository Builder's Guide for Oracle Business Intelligence Enterprise Editionfor more information. - To change the default error message language, select Change the default error message language to and then select the language you want to use for error messages. See Oracle Fusion Middleware System Administrator's Guide for Oracle Business Intelligence Enterprise Edition for more information about choosing the error message language.
- If needed, select Use Regional Settings when outputting dates and times. When this option is enabled, data in Date, Time, or DateTime format is displayed using Windows regional settings, rather than the default format for the Oracle BI Server. To see the Windows regional settings, open the Control Panel and double-click Regional and Language Options.
- If the repository has been set up for database-specific login IDs and passwords, you can enter the user names and passwords for the underlying databases. The database-specific credentials allow privileged users to connect to the underlying databases at the level of authority granted to those users in the databases. To enter user names and passwords for the underlying databases, follow these steps:
- Select the database for which you want to enter a user name and password and click Edit.
- Enter the login ID and password corresponding to the database you selected and click OK.
- Repeat these steps for other databases if necessary.
- Click Finish to save the DSN configuration.
To find BI Server Name and Port , login to http://server:7001/em(Business Intelligence -> coreapplication -> Capacity Management -> Availability -> Value under column port against row coreapplication_obis1 in BI Servers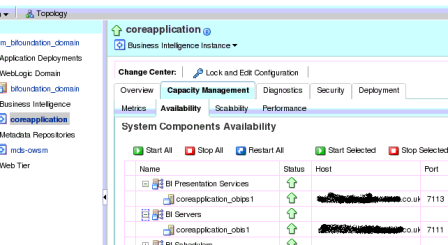
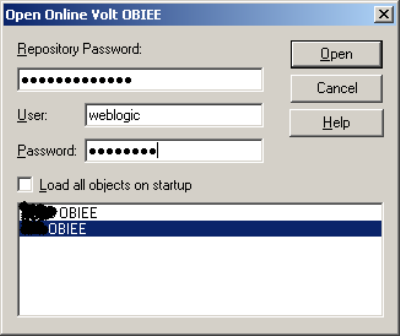
.3. Start OBIEE Client Tool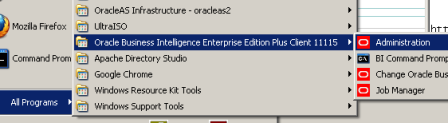 4. Open RPD in online mode , File -> Open -> Online5. Enter Repository Password (from 11g onwards there is password set for RPD), weblogic password and select ODBC created in above step