Thursday, February 28, 2013

Remember Username and Password in Obiee11g


Go to your BIPS config path, for example like below,
D:\Oracle\instances\instance1\config\OracleBIPresentationServicesComponent\coreapplication_obips1 and the search Security tab in your instanceconfig file and add<AllowRememberPassword>true</AllowRememberPassword>
Then save it and restart bips servervices.
Include the elements and their ancestor elements as appropriate, as shown in the following example:
<Security>
<!--This Configuration setting is managed by Oracle Enterprise Manager Fusion Middleware Control-->
<ClientSessionExpireMinutes>210</ClientSessionExpireMinutes>
<AllowRememberPassword>true</AllowRememberPassword>
<CookieDomain>value</CookieDomain>
<CookiePath>/analytics</CookiePath>
<InIFrameRenderingMode>prohibit</InIFrameRenderingMode>
</Security>
Save your changes and close the file.
Restart Oracle Business Intelligence Presentation Services via OPMN
Then Test it,
Just click on yes and then it will load in BI Home page ..then next logout and login OBIEE page it will remember your Username and Password then load in BI home page.
For More please refer,

Change Locale in OBIEE 11g

How to change locale for all users there are 2 things that need to be done

i am assuming that you want to make en-au as the standard locale for every user

a. add the following tags in the instanceconfig.ini located at <MiddlewareHome>/instances/instance1/config/OracleBIPresentationServicesComponent/coreapplication_obips1/
<ServerInstance>

<Localization> 

<AllowedLanguages>en</AllowedLanguages>

<AllowedLocales>en-au</AllowedLocales>

</Localization>

</ServerInstance> 
  
b. edit the localemappings.xml file located in <MiddlewareHome>/Oracle_BI1/bifoundation/web/display/ 
  
and change the line 
  
<when matches="en*"><localeDefinition name="en-us"/></when> 
  
to 
  
<when matches="en*"><localeDefinition name="en-au"/></when> 
  
also note that if you want to make further customization to the locale like if you want a - in the date format instead of the / then the file to edit is 
  
<MiddlewareHome>/instances/instance1/config/OracleBIPresentationServicesComponent/coreapplication_obips1/localedefinations.xml

Change Password in BI Publisher 111.1.6.0

I just noticed an interesting screen in BI-Publisher 11g (11.1.1.6) while looking at the screenshots in

Getting Started with Oracle BI Publisher 11.1.1.6.0

Using the "My Account" link, OBIEE 11g end-users can change their passwords without having to go through the not-so elegant approach documented in my previous blog entries.I might have missed this feature in 11.1.1.5, I remember seeing a screenshot in the help link, but the "Password" tab was missing in the app. 
- Log into BIP : http://HOST:PORT/xmlpserver/
- Select My Account

Wednesday, February 27, 2013

OBIEE 11g - Change the Date Format/ Evaluate Function


In this post I will show three different methods of representing the Date formats and a final screen show casing the final comparison of the three methods.

I am pulling four columns-
First is the original Date column
Second is the Evaluate Date column
Third is the Custom Date column
Fourth is the Cast Date column


First method- EVALUATE Function.


Second method- Changing with custom Date format in the Data format.


Third method- Casting with Date format.


And the final comparison of the above three methods.


And also try the below formatting in the RPD side-

-In the physical layer in the schema general properties-try to change the types after searching for DATE.
-the execute on connect of the connection pool write the below code-
ALTER SESSION SET NLS_DATE_FORMAT = 'MON-YYYY'

OBIEE 11g - Enabling Sorting order for more than 1000 rows

I have a report which a normal table view where customer wants to show 1000 rows per page with a sorting order enabled.Normally,if we have (>=)1000 rows per page the sorting order option will not work because by default MaxHydercubeRecords =1000 we need to reset in InstanceConfig.xml (OracleBIData/Web/Config/InstanceConfig.xml)
    Add following tag 

>Hypercube< >MaxTableViewRecords>12000<MaxTableViewRecords< >Hypercube <
Replace the above tag with correct close and end tags
Restart your Presentation Services


OBIEE 11g - Changing the NodeManager and weblogic Port numbers

If you want to change the Node Manger Listen Port first bring down the " Oracle Weblogic NodeManager" services to down .Next go to 

Driver\11g_Installedfolder\wlserver_10.3\common\nodemanager\nodemanager.properties

"ListenPort=9550" change this port number and restart the node manager,

For the weblogic : D:\Middleware\user_projects\domains\bifoundation_domain\config\config.xml there u can find the port number between "Server" tag


PS: Take a backup of original nodemanager.properties and config .xml files

OBIEE 11g - Description ID column

OBIEE 11g rpd we have new feature to show double columns value using a single one (column) – Description ID double click on any of the BMM column in general tab you can see Description ID column


As shown below let say product is our column I want to show the product names with their product key’s in dashboard prompt


Advantage : While generating the query WHERE clause will now use ID instead of descriptive values query performance will be good

 Open RPD – BMM layer – Product Key (Column) – Double click – General tab Description ID Column – Set -- > Product Type Key


Create a new column prompt and select “Enable user to select by Code Column”

So product Type comes with product type key (Description ID)


 If you want to show it on filters(answers/analysis) check "Select by Product Type Key"


Note : Above filter option will not work in case of  Operator other than is equal/not equal/between

Fact and Dimension from single source Table

Normally in OLTP systems to generate a adhoc report may get a single source table which should act as Fact and Dimension.

For example a table contains Order Status, Order Date and its value ,cost.

We can achieve this in three ways.

1 ) Create Alias of main table and make it as dim and fact and join it both 
(self join).

2) Import the table to physical layer and create two logical tables where source is above table and join it accordingly

3) Create a opaque view write your own sql which should have key column to join (self join - same as 1) 


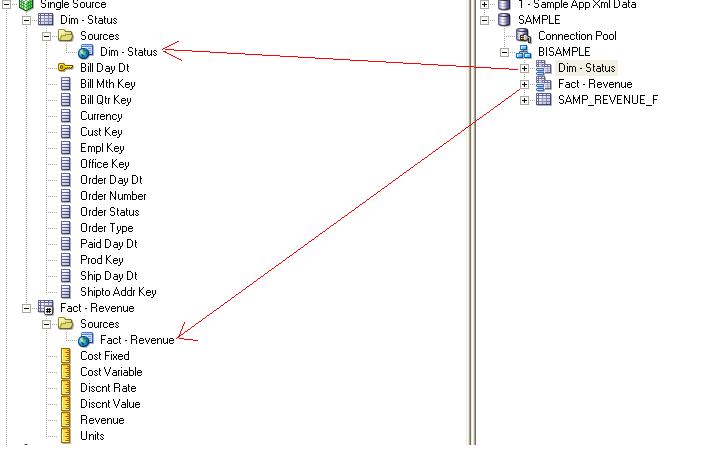
1)  In below example I have taken SAMP_REVENUE which has both dim and fact columns created  alias   Dim - Status and  Fact - Revenue and joined these in physical layer based on key  'Bill Day Dt' pull to BMM layer.


Lets create a report and check the obiee generated query  which takes the source SAMP_REVENUE_F and joining it based on bill_day_dt (self join) 


Above method will have performance issues to do self-join between the same table.


2) In this example don't create any alias of table(Dim - Fact) . 

Create new logical table Dim - Status and pull the dimension columns from physical table SAMP_REVENUE_F

Create new logical table Fact- Revenue and pull measure columns from same physical table SAMP_REVENUE_F


Create the same report as above now check the sql generated

OBIEE 11g - Denormalizing physical tables in BMM layer(Snowflake)

In general logical  tables can be demoralized by joining the Dim's and Fact's in general tab of Logical Table in BMM layer.

Let's take example of HR schema physical looks like


Employees and JOBS table has metrics Salary , MAX , MIN Salary


Above figure shows you how I joined the tables in physical layer

Regions -- Countries-- Locations -- Departments -- Employees - Job History - Jobs


BI Server doesn't know whether we have joined the Dim - Fact in physical layer the Cardinality 1 : N and Join Type will be in BMM layer using Complex Join

I would like to get the all the dimension related columns/tables under a new Logical table

So,we are going de-normalize the physical tables in BMM layer as shown below


1 . Create a new logical table right click on BMM folder


2. Give a 'name' and click on OK.

3. Drag and drop 'Regions'/'countries' Physical table to BMM layer(depends on how you joined in physical layer) under newly created 'Logical Table'

4 . Double click on LTS in general tab click on ADD it will show the physical table relationship (How the tables joined in PK-FK)


once you select the table it will add in Joins section as shown below


Repeat the above step to add all the tables


If you remember Employees table has metric Salary which is fact we haven't pulled it over New logical dimension table.


Now join both the Dim - Fact(de-normalized)


Create custom tables(folders) in presentation layer 


 Sample obiee report 


OBIEE generated query where it joined the way how  we mentioned in General Tab -> Physical tables


select T95.CITY as c1,
     sum(T69.SALARY) as c2
from 
     EMPLOYEES T69,
     JOBS T82,
     JOB_HISTORY T88,
     DEPARTMENTS T63,
     LOCATIONS T95,
     COUNTRIES T58,
     REGIONS T103
where  ( T69.EMPLOYEE_ID = T88.EMPLOYEE_ID and 
T58.COUNTRY_ID = T95.COUNTRY_ID and
 T58.REGION_ID = T103.REGION_ID and 
T63.DEPARTMENT_ID = T69.DEPARTMENT_ID and
 T63.LOCATION_ID = T95.LOCATION_ID and 
T82.JOB_ID = T88.JOB_ID ) 
group by T95.CITY
order by c1