Saturday, June 22, 2013

Informatica - Aggregate Transformation

  • Connected and Active Transformation
  • The Aggregator transformation allows us to perform aggregate calculations, such as averages and sums.
  • Aggregator transformation allows us to perform calculations on groups.

Components of the Aggregator Transformation 
1.   Aggregate expression 
2.   Group by port 
3.   Sorted Input 
4.   Aggregate cache
1) Aggregate Expressions
  • Entered in an output port.
  • Can include non-aggregate expressions and conditional clauses.
The transformation language includes the following aggregate functions:
  • AVG, COUNT, MAX, MIN, SUM
  • FIRST, LAST
  • MEDIAN, PERCENTILE, STDDEV, VARIANCE

Single Level Aggregate Function: MAX(SAL) 
Nested Aggregate Function: MAX( COUNT( ITEM ))

Nested Aggregate Functions
  • In Aggregator transformation, there can be multiple single level functions or multiple nested functions.
  • An Aggregator transformation cannot have both types of functions together.
  • MAX( COUNT( ITEM )) is correct.
  • MIN(MAX( COUNT( ITEM ))) is not correct. It can also include one aggregate function nested within another aggregate function

Conditional Clauses 
We can use conditional clauses in the aggregate expression to reduce the number of rows used in the aggregation. The conditional clause can be any clause that evaluates to TRUE or FALSE.
  • SUM( COMMISSION, COMMISSION > QUOTA )
Non-Aggregate Functions 
We can also use non-aggregate functions in the aggregate expression.
  • IIF( MAX( QUANTITY ) > 0, MAX( QUANTITY ), 0))
2) Group By Ports
  • Indicates how to create groups.
  • When grouping data, the Aggregator transformation outputs the last row of each group unless otherwise specified.

The Aggregator transformation allows us to define groups for aggregations, rather than performing the aggregation across all input data.
For example, we can find Maximum Salary for every Department.
  • In Aggregator Transformation, Open Ports tab and select Group By as needed.

3) Using Sorted Input 
  • Use to improve session performance.
  • To use sorted input, we must pass data to the Aggregator transformation sorted by group by port, in ascending or descending order.
  • When we use this option, we tell Aggregator that data coming to it is already sorted.
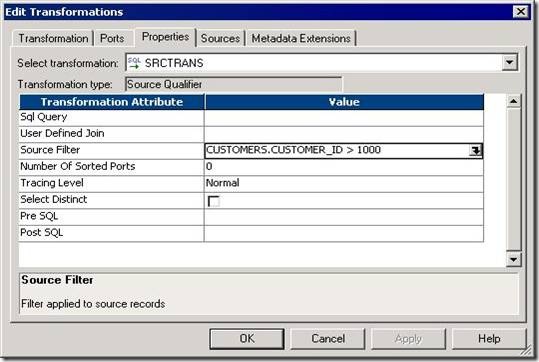
  • We check the Sorted Input Option in Properties Tab of the transformation.
  • If the option is checked but we are not passing sorted data to the transformation, then the session fails.

4) Aggregator Caches 
  • The Power Center Server stores data in the aggregate cache until it completes Aggregate calculations.
  • It stores group values in an index cache and row data in the data cache. If the Power Center Server requires more space, it stores overflow values in cache files.

Note: The Power Center Server uses memory to process an Aggregator transformation with sorted ports. It does not use cache memory. We do not need to configure cache memory for Aggregator transformations that use sorted ports.
1) Aggregator Index Cache:
The index cache holds group information from the group by ports. If we are using Group By on DEPTNO, then this cache stores values 10, 20, 30 etc.
  • All Group By Columns are in AGGREGATOR INDEX CACHE. Ex. DEPTNO

2) Aggregator Data Cache: 
DATA CACHE is generally larger than the AGGREGATOR INDEX CACHE.
Columns in Data Cache:
  • Variable ports if any
  • Non group by input/output ports.
  • Non group by input ports used in non-aggregate output expression.
  • Port containing aggregate function


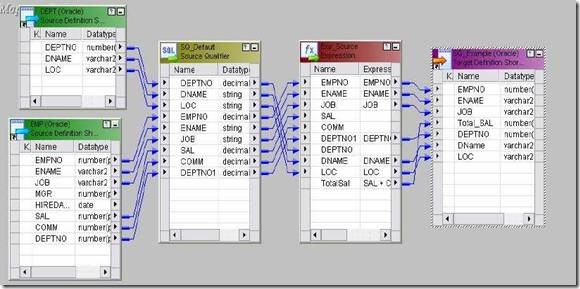
1) Example: To calculate MAX, MIN, AVG and SUM of salary of EMP table. 
  • EMP will be source table.
  • Create a target table EMP_AGG_EXAMPLE in target designer. Table should contain DEPTNO, MAX_SAL, MIN_SAL, AVG_SAL and SUM_SAL
  • Create the shortcuts in your folder.
Creating Mapping:
1. Open folder where we want to create the mapping. 
2. Click Tools -> Mapping Designer. 
3. Click Mapping-> Create-> Give mapping name. Ex: m_agg_example 
4. Drag EMP from source in mapping. 
5. Click Transformation -> Create -> Select AGGREGATOR from list. Give name and click Create. Now click done. 
6. Pass SAL and DEPTNO only from SQ_EMP to AGGREGATOR Transformation. 
7. Edit AGGREGATOR Transformation. Go to Ports Tab
8. Create 4 output ports: OUT_MAX_SAL, OUT_MIN_SAL, OUT_AVG_SAL,
OUT_SUM_SAL 
9. Open Expression Editor one by one for all output ports and give the
calculations. Ex: MAX(SAL), MIN(SAL), AVG(SAL),SUM(SAL) 
10. Click Apply -> Ok. 
11. Drag target table now. 
12. Connect the output ports from Rank to target table. 
13. Click Mapping -> Validate 
14. Repository -> Save 
  • Create Session and Workflow as described earlier. Run the Workflow and see the data in target table.
  • Make sure to give connection information for all tables.

Informatica - Source Qualifier Transformation

  • Active and Connected Transformation.
  • The Source Qualifier transformation represents the rows that the Power Center Server reads when it runs a session.
  • It is only transformation that is not reusable.
  • Default transformation except in case of XML or COBOL files.


Tasks performed by Source Qualifier:
  • Join data originating from the same source database: We can join two or more tables with primary key-foreign key relationships by linking the sources to one Source Qualifier transformation.
  • Filter rows when the Power Center Server reads source data: If we Include a filter condition, the Power Center Server adds a WHERE clause to the Default query.
  • Specify an outer join rather than the default inner join: If we include a User-defined join, the Power Center Server replaces the join information Specified by the metadata in the SQL query.
  • Specify sorted ports: If we specify a number for sorted ports, the
  • Power Center Server adds an ORDER BY clause to the default SQL query.
  • Select only distinct values from the source: If we choose Select Distinct,the Power Center Server adds a SELECT DISTINCT statement to the default SQL query.
  • Create a custom query to issue a special SELECT statement for the Power Center Server to read source data: For example, you might use a Custom query to perform aggregate calculations. The entire above are possible in Properties Tab of Source Qualifier t/f.


SAMPLE MAPPING TO BE MADE:   


  • Source will be EMP and DEPT tables.
  • Create target table as showed in Picture above.
  • Create shortcuts in your folder as needed.


Creating Mapping:
  1. Open folder where we want to create the mapping.
  1. Click Tools -> Mapping Designer.
  1. Click Mapping-> Create-> Give mapping name. Ex: m_SQ_example
  1. Drag EMP, DEPT, Target.
  1. Right Click SQ_EMP and Select Delete from the mapping.
  1. Right Click SQ_DEPT and Select Delete from the mapping.
  1. Click Transformation -> Create -> Select Source Qualifier from List -> Give Name -> Click Create
  1. Select EMP and DEPT both. Click OK.
  1. Link all as shown in above picture.
  1. Edit SQ -> Properties Tab -> Open User defined Join -> Give Join condition EMP.DEPTNO=DEPT.DEPTNO. Click Apply -> OK
  1. Mapping -> Validate
  1. Repository -> Save
  • Create Session and Workflow as described earlier. Run the Workflow and see the data in target table.
  • Make sure to give connection information for all tables.


SQ PROPERTIES TAB 
1) SOURCE FILTER: 
We can enter a source filter to reduce the number of rows the Power Center Server queries. 
Note: When we enter a source filter in the session properties, we override the customized SQL query in the Source Qualifier transformation. 

Steps:
  1. In the Mapping Designer, open a Source Qualifier transformation.
  1. Select the Properties tab.
  1. Click the Open button in the Source Filter field.
  1. In the SQL Editor Dialog box, enter the filter. Example: EMP.SAL)2000
  1. Click OK.

Validate the mapping. Save it. Now refresh session and save the changes. Now run the workflow and see output. 


2) NUMBER OF SORTED PORTS: 
When we use sorted ports, the Power Center Server adds the ports to the ORDER BY clause in the default query. 
By default it is 0. If we change it to 1, then the data will be sorted by column that is at the top in SQ. Example: DEPTNO in above figure.
  • If we want to sort as per ENAME, move ENAME to top.
  • If we change it to 2, then data will be sorted by top two columns.


Steps:
  1. In the Mapping Designer, open a Source Qualifier transformation.
  1. Select the Properties tab.
  1. Enter any number instead of zero for Number of Sorted ports.
  1. Click Apply -> Click OK.


Validate the mapping. Save it. Now refresh session and save the changes. Now run the workflow and see output. 

3) SELECT DISTINCT: 
If we want the Power Center Server to select unique values from a source, we can use the Select Distinct option.
  • Just check the option in Properties tab to enable it.


4) PRE and POST SQL Commands 


  • The Power Center Server runs pre-session SQL commands against the source database before it reads the source.
  • It runs post-session SQL commands against the source database after it writes to the target.
  • Use a semi-colon (;) to separate multiple statements. 


5) USER DEFINED JOINS
Entering a user-defined join is similar to entering a custom SQL query. However, we only enter the contents of the WHERE clause, not the entire query.
  • We can specify equi join, left outer join and right outer join only. We Cannot specify full outer join. To use full outer join, we need to write SQL Query.

Steps:
  1. Open the Source Qualifier transformation, and click the Properties tab.
  1. Click the Open button in the User Defined Join field. The SQL Editor Dialog Box appears.
  1. Enter the syntax for the join.
  1. Click OK -> Again Ok.


Validate the mapping. Save it. Now refresh session and save the changes. Now run the workflow and see output. 

Join Type
Syntax
Equi Join
DEPT.DEPTNO=EMP.DEPTNO
Left Outer Join
{EMP LEFT OUTER JOIN DEPT ON DEPT.DEPTNO=EMP.DEPTNO}
Right Outer Join
{EMP RIGHT OUTER JOIN DEPT ON DEPT.DEPTNO=EMP.DEPTNO}


6) SQL QUERY 
For relational sources, the Power Center Server generates a query for each Source Qualifier transformation when it runs a session. The default query is a SELECT statement for each source column used in the mapping. In other words, the Power Center Server reads only the columns that are connected to another Transformation. 
In mapping above, we are passing only SAL and DEPTNO from SQ_EMP to Aggregator transformation. Default query generated will be:
  • SELECT EMP.SAL, EMP.DEPTNO FROM EMP


Viewing the Default Query
  1. Open the Source Qualifier transformation, and click the Properties tab.
  1. Open SQL Query. The SQL Editor displays.
  1. Click Generate SQL.
  1. The SQL Editor displays the default query the Power Center Server uses to Select source data.
  1. Click Cancel to exit.

Note: If we do not cancel the SQL query, the Power Center Server overrides the default query with the custom SQL query. 
We can enter an SQL statement supported by our source database. Before entering the query, connect all the input and output ports we want to use in the mapping.
Example: As in our case, we can’t use full outer join in user defined join, we can write SQL query for FULL OUTER JOIN: 

SELECT DEPT.DEPTNO, DEPT.DNAME, DEPT.LOC, EMP.EMPNO, EMP.ENAME, EMP.JOB, EMP.SAL, EMP.COMM, EMP.DEPTNO FROM EMP FULL OUTER JOIN DEPT ON DEPT.DEPTNO=EMP.DEPTNO WHERE SAL>2000 
  • We also added WHERE clause. We can enter more conditions and write More complex SQL.
We can write any query. We can join as many tables in one query as Required if all are in same database. It is very handy and used in most of the projects.

Important Points:
  • When creating a custom SQL query, the SELECT statement must list the port names in the order in which they appear in the transformation.

Example: DEPTNO is top column; DNAME is second in our SQ   mapping.
So when we write SQL Query, SELECT statement have name DNAME first, DNAME second and so on. SELECT DEPT.DEPTNO, DEPT.DNAME 
  • Once we have written a custom query like above, then this query will Always be used to fetch data from database. In our example, we used WHERE SAL>2000. Now if we use Source Filter and give condition SAL) 1000 or any other, then it will not work. Informatica will always use the custom query only.
  • Make sure to test the query in database first before using it in SQL Query. If query is not running in database, then it won’t work in Informatica too.
  • Also always connect to the database and validate the SQL in SQL query editor


Informatica - SQL Transformation

When you create an SQL transformation, you configure the following options:

Mode:-The SQL transformation runs in one of the following modes:
  • Script mode. The SQL transformation runs ANSI SQL scripts that are externally located. You pass a script name to the transformation with each input row. The SQL transformation outputs one row for each input row.
  • Query mode. The SQL transformation executes a query that you define in a query editor. You can pass strings or parameters to the query to define dynamic queries or change the selection parameters. You can output multiple rows when the query has a SELECT statement.
  • Passive or active transformation. The SQL transformation is an active transformation by default. You can configure it as a passive transformation when you create the transformation.
  • Database type. The type of database the SQL transformation connects to.
  • Connection type. Pass database connection information to the SQL transformation or use a connection object.
Script Mode

An SQL transformation running in script mode runs SQL scripts from text files. You pass each script file name from the source to the SQL transformation Script Name port. The script file name contains the complete path to the script file.

When you configure the transformation to run in script mode, you create a passive transformation. The transformation returns one row for each input row. The output row contains results of the query and any database error.

Rules and Guidelines for Script Mode

Use the following rules and guidelines for an SQL transformation that runs in script mode:
  • You can use a static or dynamic database connection with script mode.
  • To include multiple query statements in a script, you can separate them with a semicolon.
  • You can use mapping variables or parameters in the script file name.
  • The script code page defaults to the locale of the operating system. You can change the locale of the script.
  • The script file must be accessible by the Integration Service. The Integration Service must have read permissions on the directory that contains the script.
  • The Integration Service ignores the output of any SELECT statement you include in the SQL script. The SQL transformation in script mode does not output more than one row of data for each input row.
  • You cannot use scripting languages such as Oracle PL/SQL or Microsoft/Sybase T-SQL in the script.
  • You cannot use nested scripts where the SQL script calls another SQL script.
  • A script cannot accept run-time arguments.

Query Mode
  • When you configure the SQL transformation to run in query mode, you create an active transformation.
  • When an SQL transformation runs in query mode, it executes an SQL query that you define in the transformation.
  • You pass strings or parameters to the query from the transformation input ports to change the query statement or the query data.

You can create the following types of SQL queries in the SQL transformation:

  • Static SQL query. The query statement does not change, but you can use query parameters to change the data. The Integration Service prepares the query once and runs the query for all input rows.
  •  Dynamic SQL query. You can change the query statements and the data. The Integration Service prepares a query for each input row.

Rules and Guidelines for Query Mode

Use the following rules and guidelines when you configure the SQL transformation to run in query mode:

  • The number and the order of the output ports must match the number and order of the fields in the query SELECT clause.
  • The native data type of an output port in the transformation must match the data type of the corresponding column in the database. The Integration Service generates a row error when the data types do not match.
  • When the SQL query contains an INSERT, UPDATE, or DELETE clause, the transformation returns data to the SQL Error port, the pass-through ports, and the Num Rows Affected port when it is enabled. If you add output ports the ports receive NULL data values.
  • When the SQL query contains a SELECT statement and the transformation has a pass-through port, the transformation returns data to the pass-through port whether or not the query returns database data. The SQL transformation returns a row with NULL data in the output ports.
  • You cannot add the "_output" suffix to output port names that you create.
  • You cannot use the pass-through port to return data from a SELECT query.
  • When the number of output ports is more than the number of columns in the SELECT clause, the extra ports receive a NULL value.
  • When the number of output ports is less than the number of columns in the SELECT clause, the Integration Service generates a row error.
  • You can use string substitution instead of parameter binding in a query. However, the input ports must be string data types.

SQL Transformation Properties

After you create the SQL transformation, you can define ports and set attributes in the following transformation tabs:

  •  Ports. Displays the transformation ports and attributes that you create on the SQL Ports tab.
  •  Properties. SQL transformation general properties.
  •  SQL Settings. Attributes unique to the SQL transformation.
  •  SQL Ports. SQL transformation ports and attributes.

Note: You cannot update the columns on the Ports tab. When you define ports on the SQL Ports tab, they display on the Ports tab.

Properties Tab

Configure the SQL transformation general properties on the Properties tab. Some transformation properties do not apply to the SQL transformation or are not configurable.

The following table describes the SQL transformation properties:


Property
Description
Run Time Location
Enter a path relative to the Integration Service node that runs the SQL transformation session.
If this property is blank, the Integration Service uses the environment variable defined on the Integration Service node to locate the DLL or shared library.
You must copy all DLLs or shared libraries to the run-time location or to the environment variable defined on the Integration Service node. The Integration Service fails to load the procedure when it cannot locate the DLL, shared library, or a referenced file.
Tracing Level
Sets the amount of detail included in the session log when you run a session containing this transformation. When you configure the SQL transformation tracing level to Verbose Data, the Integration Service writes each SQL query it prepares to the session log.
Is Partition able
Multiple partitions in a pipeline can use this transformation. Use the following options:
- No. The transformation cannot be partitioned. The transformation and other transformations in the same pipeline are limited to one partition. You might choose No if the transformation processes all the input data together, such as data cleansing.
- Locally. The transformation can be partitioned, but the Integration Service must run all partitions in the pipeline on the same node. Choose Locally when different partitions of the transformation must share objects in memory.
Across Grid. The transformation can be partitioned, and the Integration Service can distribute each partition to different nodes.
Default is No.
Update Strategy
The transformation defines the update strategy for output rows. You can enable this property for query mode SQL transformations.
Default is disabled.
Transformation Scope
The method in which the Integration Service applies the transformation logic to incoming data. Use the following options:
- Row
- Transaction
- All Input
Set transaction scope to transaction when you use transaction control in static query mode.
Default is Row for script mode transformations.Default is All Input for query mode transformations.
Output is Repeatable
Indicates if the order of the output data is consistent between session runs.
- Never. The order of the output data is inconsistent between session runs.
- Based On Input Order. The output order is consistent between session runs when the input data order is consistent between session runs.
- Always. The order of the output data is consistent between session runs even if the order of the input data is inconsistent between session runs.
Default is Never.
Generate Transaction
The transformation generates transaction rows. Enable this property for query mode SQL transformations that commit data in an SQL query.
Default is disabled.
Requires Single
Thread Per Partition
Indicates if the Integration Service processes each partition of a procedure with one thread.
Output is Deterministic
The transformation generate consistent output data between session runs. Enable this property to perform recovery on sessions that use this transformation.
Default is enabled.


Create Mapping :

Step 1: Creating a flat file and importing the source from the flat file.
  • Create a Notepad and in it create a table by name bikes with three columns and three records in it.
  • Create one more notepad and name it as path for the bikes. Inside the Notepad just type in (C:\bikes.txt) and save it.
  • Import the source (second notepad) using the source->import from the file. After which we are goanna get a wizard with three subsequent windows and follow the on screen instructions to complete the process of importing the source. 


Step 2: Importing the target and applying the transformation.

In the same way as specified above go to the targets->import from file and select an empty notepad under the name targetforbikes (this is one more blank notepad which we should create and save under the above specified name in the C :\).

  • Create two columns in the target table under the name report and error.
  • We are all set here. Now apply the SQL transformation.
  • In the first window when you apply the SQL transformation we should select the script mode.
  • Connect the SQ to the ScriptName under inputs and connect the other two fields to the output correspondingly.


Snapshot for the above discussed things is given below.


Step 3: Design the work flow and run it.
  • Create the task and the work flow using the naming conventions.
  • Go to the mappings tab and click on the Source on the left hand pane to specify the path for the output file.


Step 4: Preview the output data on the target table.

Informatica - Update Strategy Transformation

Example: If Address of a CUSTOMER changes, we can update the old address or keep both old and new address. One row is for old and one for new. This way we maintain the historical data. 

Update Strategy is used with Lookup Transformation. In DWH, we create a Lookup on target table to determine whether a row already exists or not. Then we insert, update, delete or reject the source record as per business need. 

In Power Center, we set the update strategy at two different levels:

1.   Within a session
2.   Within a Mapping

1. Update Strategy within a session: 

When we configure a session, we can instruct the IS to either treat all rows in the same way or use instructions coded into the session mapping to flag rows for different database operations. 

Session Configuration:

Edit Session -> Properties -> Treat Source Rows as: (Insert, Update, Delete, and Data Driven). Insert is default. Specifying Operations for Individual Target Tables:


You can set the following update strategy options:

Insert: Select this option to insert a row into a target table.
Delete: Select this option to delete a row from a table.
Update: We have the following options in this situation:

  •  Update as Update. Update each row flagged for update if it exists in the target table.
  •  Update as Insert. Inset each row flagged for update.
  •  Update else Insert. Update the row if it exists. Otherwise, insert it.
Truncate table: Select this option to truncate the target table before loading data. 


2. Flagging Rows within a Mapping

Within a mapping, we use the Update Strategy transformation to flag rows for insert, delete, update, or reject. 


Operation
Constant
Numeric Value
INSERT
DD_INSERT
0
UPDATE
DD_UPDATE
1
DELETE
DD_DELETE
2
REJECT
DD_REJECT
3


Update Strategy Expressions: 

Frequently, the update strategy expression uses the IIF or DECODE function from the transformation language to test each row to see if it meets a particular condition. 

IIF( ( ENTRY_DATE > APPLY_DATE), DD_REJECT, DD_UPDATE )
Or
IIF( ( ENTRY_DATE > APPLY_DATE), 3, 2 ) 
  • The above expression is written in Properties Tab of Update Strategy T/f.
  • DD means DATA DRIVEN
Forwarding Rejected Rows: 

We can configure the Update Strategy transformation to either pass rejected rows to the next transformation or drop them.

Steps:
1.   Create Update Strategy Transformation
2.   Pass all ports needed to it.
3.   Set the Expression in Properties Tab.
4.   Connect to other transformations or target. 

Performance tuning:

1.   Use Update Strategy transformation as less as possible in the mapping.
2.   Do not use update strategy transformation if we just want to insert into target table, instead use direct mapping, direct filtering etc.
3.   For updating or deleting rows from the target table we can use Update Strategy transformation itself