People who are familiar with passing multiple parameter values to drill down reports using the GO-URL can now take a breath of fresh air.
In OBIEE 11g this is an in-built feature that obiee takes care of on deciding what parameters/columns are passed down to the sub report.
In OBIEE 11g this is an in-built feature that obiee takes care of on deciding what parameters/columns are passed down to the sub report.
In order experience this feature we would first be creating a sub-report with two “is-prompted” prompts then secondly create a master/main report which will call the sub-report by passing the values to these two prompts.
- The first sub-report creation is per below steps:
- Go to your web analytics page: http://localhost:9704/analyticsand login using your username and password.
- On the OBIEE Menu select New->Analysis->Select Subject Area->Sample Sales.
- On the left Subject Area screen select the four columns and drag it to the right “Selected Columns” area as below:

- Click the “Save Analysis” Icon at the top-right and enter “SubGOReport” under “Shared Folders”, “Sample Sales” directory as shown below:

- Select the “Per Name Year” column options and select “Filter” and for the “Operator” select “is prompted” and click OK button.
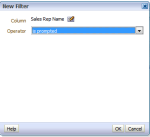
- Select the “Sales Rep Name” column options and select the “Filter” and for the “Operator select “is prompted” and click OK button.
- Verify with screenshots as shown below:

- haeajgfb
- hajfeggh
- Now we go on to creating the prompts for the above created filters.
- Select the “Prompts” tab and then click the ” + ” , then select the “Column Prompt”, then the “Time”.”Per Name Year”.
- When the “New Prompt” windows open make sure the below Operator and all the checkboxes are checked as below:

- Click the ” + ” icon again, then select the “Column Prompt”, then the “Sales Rep”.”Sales Rep Name”.
- When the “New Prompt” windows open make sure the below Operator and all the checkboxes are checked are as below:

- After the two prompts have been created, click the “Save Analysis” icon to save the analysis and verify with below screenshot:

- Click the “Results” tab and click on the “Show how results will look on a Dashboard”
 link, to make sure that your report is working.
- Now we are done creating the Sub-report.
- Now on to creating the second Main report which will call the sub-report.
- Select New->Analysis->Select Subject Area->Sample Sales. to create a new report with the 3 columns as show below:

- Click the “Save Analysis”
 icon to save your analysis with the name “MainGOReport” as show below:
- Select “Revenue” column options, then “column properties” top open the “Column Properties” window.
- Select the “Interaction” tab and then click the ” + ” icon to add “Add Action Link”.
- When the “New Action Link …” window opens, click on the “Create New Action” icon and select “Navigate to BI Content”.
- When the “Select BI Content For Action” window opens, go down to the “Shared Folders”, “Sample Sales” folder and select the “SubGOReport”.

- Then click the OK button on all the 3 open windows to show your action links as below:

- Click on the “OK” button to close the “Column Properties”.
- Then click on the “Save Analysis” button to save your analysis.
- Now click the “Results” Tab to see your report.
- You can observe that the “Revenue” column now shows as links.
- When you click on the dollar amount next to “Helen Mayes” in the Year “2008″ you will see a Pop-Up showing you an option “SubGOReport”.
- Click on the “SubGOReport”

- Click OK button when asked to navigate away from this page:

- Now should be able to see your “SubGOReport” report and “2008″ selected for “Per New Year” prompt and “Helen Mayes” selected for “Sales Rep Name” prompt.


Summary:
From this exercise you can observe that the MainGOReport’s “Per Name Year” and “Sales Rep Name” values were sent down to the SubGOReport’s prompts and this
option can be used instead of the GO-URL option that was used earlier versions of OBIEE.
From this exercise you can observe that the MainGOReport’s “Per Name Year” and “Sales Rep Name” values were sent down to the SubGOReport’s prompts and this
option can be used instead of the GO-URL option that was used earlier versions of OBIEE.