Tuesday, April 23, 2013

OBIEE 11g - Migration steps in OBIEE11g


 I used the SampleAppLite application in OBIEE 11g. In my Dev environment, I created some new content. I added a new Presentation Layer subject area called SampleAppLite, which represents a change to the RPD file that will have to be migrated to Prod
Presentation subject area
I also created a new dashboard page on the main Quickstart dashboard called Revenue, and added a new graph report view to the dashboard page:
New standard report
At the same time, on the production environment, I created a new revenue report (I’m really interested in Revenue) and saved it to My Folders, and added it to My Dashboard:
My dashboard
So to sum it up: I have new standard reports in the Dev environment that need to make their way to the Prod environment… but at the same time, I have my own reports in Prod that I have saved in my own folder structure that need to maintain through the migration.
The easiest way to support this new requirement with the fewest changes to their current process is to simply “save” all the content on the Prod server before moving the entire web catalog over. Though, from a pure SCM perspective this might seem like “cheating”, I would argue that this is not the case. These adhoc analyses should not be seen as development artifacts in the standard SDLC methodology, but instead, as “content”: the usual residue that get’s generated from standard interactions with an application of any kind. This is the whole reason OBIEE supports the My Folder and My Dashboard paradigms.
We have some new options for doing migrations in 11g, but for this test case I’ll simply use Catalog Manager to save the “users” folder on Prod before wiping the entire Prod web catalog and replacing it with a new version from Dev. I have to connect to the web catalog in offline mode because the contents of the users folder is only available that way: even the super user account, in my case “weblogic”, cannot see the contents of My Folders for another user while connecting online:
Archive prod users
After I Archive the users folders, I’m free to to do the filesystem-level copy in exactly the same manner that my customer was doing it. To do this in 11g, I use the Overview tab of the Fusion Middleware Control (FMC) to stop all the BI services. I then delete the entire contents of the SampleAppLite directory in the web catalog path, and then copy the contents in from the SampleAppLite directory on the Dev server. After the filesystem copy is complete, I use the Catalog Manager to Unarchive the users directory from Prod back into the web catalog.
Unarchive user file
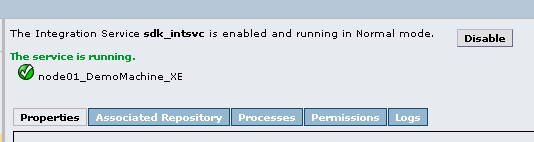
I then use the Deployment tab of FMC to upload the RPD file from the Dev server, and then restart the services:
Upload RPD file
When the services start again, I can see the new dashboards from Dev, as well as the content on My Dashboard that was developed in Prod:
Side by side
I probably wouldn’t prescribe this approach to an organization starting from scratch; I demonstrated it because it was the easiest way to add permanence to the users folder for a client that was already doing filesystem copies as a method for migration. Another easier, more attractive approach is to abandon the filesystem copy altogether and use the Catalog Manager to facilitate the movement of only the shared folder, or some portion of it, from Dev to Prod. A new enhancement in 11g is the ability to do web catalog Archive and Unarchive operations from within Answers. I choose the “Catalog” option and then highlight the portion of the Shared Folders that I want to Archive: in this case, only the SampleAppLite folder. I then select “Archive”, and I can see the download file very easily in Chrome:
Archive thin client
Once I have the archive file, I can connect to Answers in Prod and Unarchive the file. As you can see from the screenshot below, we have quite a few options around matching artifact names, and also around permissions migration with this method.
Unarchive thin client

Friday, April 19, 2013

Column Indent Background Color Changing in Pivot Tables


1. open your report --> Go to Criteria --> Click Result --> Add Static text view and apply the below html code and click the html option in the static view.
 
<style>.PTCC {background-color:white;border-top:white;border-bottom:white;border-left:white;border-right:white}</style>


Save the Dashboard and see the output like below.
 

Tuesday, April 9, 2013

Disabling Right Click on OBIEE with javascript


I had disabled the right click button of mouse in obiee

<script language=JavaScript>
<!--
var message="Function Disabled!";

function clickIEbrowser4(){
if (event.button==2){
alert(message);
return false;
}
}
function clickNSbrowser4(e){
if (document.layers||document.getElementById&&!document.all){
if (e.which==2||e.which==3){
alert(message);
return false;
}
}
}
if (document.layers){
document.captureEvents(Event.MOUSEDOWN);
document.onmousedown=clickNSbrowser4;
}
else if (document.all&&!document.getElementById){
document.onmousedown=clickIEbrowser4;
}
document.oncontextmenu=new Function("alert(message);return false")
</script>

Friday, April 5, 2013

DAC Error Message – No Physical folder information found for PLP


Working on a OBI Apps project, I was getting the DAC configurations ready and bumped into the following error message, stating “Error whle calculating build information!”.  The message stated “MESSAGE:::No physical folder information found for PLP”.   This occured when I was trying to build my newly created execution plan.
Solution
I had created a new execution plan and added my subject area(s) but forgot to click the “Generate” button on the Parameters sub-tab after I had selected the subject areas that I wanted built for that particular execution plan.  To fix the error, I just highlighted the newly created execution plan, clicked the Parameters sub-tab and clicked “Generate ”

Informatica PowerCenter Server Status URL


Here is a really easy way to verify information about an Informatica PowerCenter’s current status.  You need not be an administrator or even logged into any part of the Informatica PowerCenter environment.  Using the default or custom port of Informatica PowerCenter, enter the following URL:
  • http://localhost:6001/coreservices/DomainService
    • i.e.: http://<INFA_SERVER>:6001/coreservices/DomainService
The result will be similar to the image below:

Informatica Error Calling PMREP or PMCMD – Libraries Issue


Recently digging into the strategy and best practice of installing the OBIEE Applications, mainly the DAC and Informatica  components, I see two common issues arise more often that any others.  One has to do with the Informatica Integration Service not matching the correct locale such at UTF-8 or MS Windows Latin, etc. preventing it from starting and the other has to do with the Informatica or DAC user not able to call the core integration tools pmrep and pmcmd.  This issue is common on Linux/Unix environments but not so much on a Windows server environment.
Basically these are installation concerns but they cause a lot of newbies to waste time on really straightforward pieces of the puzzle, especially when there is a deadline and the rest of the team is waiting on the installation to be completed.  This blog will take a quick look at how to resolve the following error that you may get when attempting to access the pmrep or pmcmd line either from the command line or from the DAC call to the server:
pmrep: error while loading shared libraries: libACE.so.5.4.7: cannot open shared object file: No such file or directory
pmcmd: error while loading shared libraries: libpmasrt.so: cannot open shared object file: No such file or directory

Solution

Ensure that the Informatica Library (../server/bin/) Path variable is available in both the LD_LIBRARY_PATH and the PATH variables is really the key.   I gave a brief mention of this solution on an older Oracle Forum post and wanted to do a little more with it so here is the full solution with some loose conversation around the topic.
A few steps need to be accomplished after installing the DAC and Informatica Server.
1. Ensure that your Informatica user can correctly execute the pmrep or pmcmd from the home directory or any directory outside of the INFA_HOME/server/bin directory.  If the Informatica user cannot then chances are the DAC user will not be able to either.  Either way for the DAC or Informatica user verify or create the next two items.
2. Ensure that the the full path to the INFA_HOME/server/bin directory is placed in the PATH variable.
3. Ensure that the the full path to the INFA_HOME/server/bin directory is placed in the LD_LIBRARY_PATH variable.
Edit the bash_profile, etc. profile file for each respective user needing access to these Informatica commands and then execute each profile file as that user (if sudo’d or logged in as that user) after saving the file by executing,
. ~/.bash_profile
or similar from the command line.  If using a different user to modify the file then the next time the user in question logs in the profile file will take affect.
Re-attempt the execution of pmrep or pmcmd and you should have no more issues.
In addition, if the DAC user is having this problem, the user profile file or the dac_env.sh file may require the above profile var settings as well to correctly connect to pmrep and pmcmd.  If you edit the profile file you will need to re-execute it.  If you modify the dac_env.sh file you will need to restart the DAC server if it is/was running while you were making changes.

Configure Informatica Integration Services to Consistently Use the Same Port


One of the interesting aspects that is often overlooked by Informatica integrators is the fact that each PowerCenter Integration Service actually listens on a single port. When Informatica PowerCenter server is installed it seeks to have the available/usable port range defined by the server administrator. This default range sits in the 6000′s (see the Informatica PC documentation for precise details), but if one is so inclined, one could change the default range.  Ultimately since most people accept the defaults the admin console is accesses on port 6001, etc.  The rub here is that when you create and start an Informatica PC Integration Service by default that service gets assigned a random port to listen on for incoming requests.  Typically the random port isn’t so random and usually the assignment is one of the lower ports on the range selected during the installation. But what if you always want to know the port one should reference for an Integration Service specifically created for single integration?  Don’t worry this is possible.
Many of those involved with Oracle Business Intelligence (OBIEE) know that a setting is configured when setting up the Informatica OEM component for the pre-built analytic applications.  Most of these implementers don’t bother to understand what is being accomplished when setting this specific custom property, ServerPort.  Regardless of the implementation or integration by accessing the Integration Service’s properties, and creating a Custom Property called ServerPort and assigning an available port value, the integration service when it starts up (or restarted after initial creation of this custom property) will be assigned this port value to listen.
Here are a few short steps to follow in order to configure and test so that you can see how it works and use on your next project.
Run Netstat -a -n from a command prompt before configuring the custom property to see the random port your service is listening on.
Assign the Custom Property and Available Port value and restart the Integration Service by disabling and enabling the Integration Service.
Run netstat -a -n to verify that your Integration Service is listening on the port you’ve configured with the Custom Property value for ServerPort.

OBIEE 11g Pre-Requisites Kernel Failure


 install OBI 11g and during the pre-requisites check one of the sections fail, you choose to ignore it, and then a week later your OBI server goes down because you forgot to flip a switch or change a setting from the very beginning?  This post attempts to help alleviate that from becoming your fate by speaking to the only part of the OBIEE 11g pre-requisite on Linux that continually fails during my installations.  I’m speaking about the Kernel parameters pre-req check:
You can Google the hard/soft nofiles kernel parameters and their purpose because I will not explain it here.
Ultimately these configuration settings are stored in the /etc/security/limits.config file.  You will need to work your VI editor skills to add two lines for the linux user you are conducting the OBI 11g install with.  If you look at my screenshot below you see that I had previously updated this file for the “oracle” user.  That is the user that I used to install the Oracle 11gR2 RDBMS on that machine prior to my OBI 11g install.  Update the file similar to mine – at least meet the limit for which the pre-req check seeks.
Rebooting the machine is the easiest way I found to ensure the settings get impacted.  I’ve tried just refreshing (clicking the back button on the install wizard) the pre-req check while in-stride but that didn’t work after the change was made.  That left me with the quick reboot option which wasn’t a big deal in my environment.
After the machine came back up, I restarted the OBIEE 11g installation and as you can see below all pre-reqs passed at 100% which nice glowing green check marks.  The install continued and all was good.

OBIEE 11g - Linux User and Groups Setup for OBI11g Install


Typically setting up the user base and groups for an install is rather straightforward.  Setting up the users and groups for OBIEE 11g on a Linux box is really no different.  I am attempting to use this post as a reference document so feel free to use it that was as well.  I foresee small changes and updates oto it over the next year so feel free to comment if you have conducted an install and noticed any variations are simpler methods.  Again, the initial user/group setup is really basic, I am just outlining some code here.
Check existing users by entering the following to see what already exists:
1.users
2. 
3.groups
Enter the following in a terminal window as “root” or similar privileged user.
01.groupadd oinstall
02. 
03.groupadd FMW
04. 
05.useradd -g FMW -G oinstall,FMW obi11g
06. 
07.passwd obi11g
08. 
09.mkdir -p /u01/app
10. 
11.mkdir -p /u01/FMW
12. 
13.chown -R obi11g:oinstall /u01/
14. 
15.chown -R obi11g:FMW /u01/FMW
16. 
17.chmod -R 775 /u01