Overview
This tutorial is intended for the users who want to create and schedule reports by using BI Publisher 11.1.1.6.0 and later versions. The tutorial covers the regular features of the Oracle BI Publisher 11g (11.1.1.6.0 and later versions), such as creating simple reports from various data sources, creating layouts, scheduling reports, and managing them.
Software Requirements
The following is a list of software requirements:
- Oracle BI EE 11.1.1.6.0 or later version is installed.
- It is recommended to use the browser Mozilla Firefox 3.6.3 (or later versions).
- Oracle Database 11g
Prerequisites
Before starting this tutorial, you should:
| 1. | Download the Salary Report Datamodel. zip file to your local machine and unzip it. This contains a predefined data model Salary Report Datamodel.xdmz. You will use this file in the tutorial practice to upload a resource object to the catalog folder. |
|---|---|
| 2. | Have access to an Oracle Database11g with the sample schema OE installed and unlocked. This tutorial uses the OE schema included in the Oracle Database. |
General Navigation and Preferences
This topic will cover logging in to the BI Publisher and navigating through the Home page, using the catalog objects, managing the favorites, and viewing the user account settings. This will also cover configuring JDBC connection against the Oracle Database.
Logging in to Oracle BI Publisher and Navigating Through the Home Page
| 1. | a. Enter the URL for BI Publisher in the browser window in the following format: http://<hostname>: <port >/xmlpserver/. The examples covered in this tutorial usehttp:/localhost:7001/xmlpserver/ This opens the Oracle BI Publisher Enterprise login page. 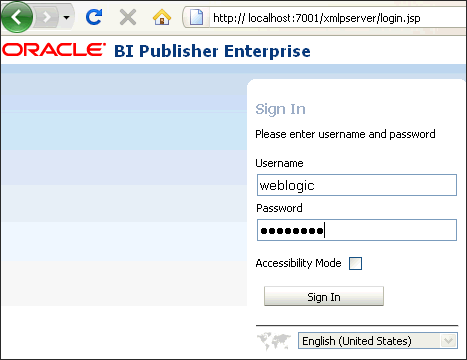 b. Enter your credentials. Click Sign In. The Oracle BI Publisher Home page is displayed. |
|---|---|
| 2. | The Oracle BI Publisher Home page provides a task-based entry into Oracle BI Publisher's functionalities (greatly enhanced in the 11g release to enable the users to get started quickly with BI Publisher). It is divided into various sections enabling you to quickly begin a specific task, locate an object, or access help documentation.
|
Browsing the Catalog and Viewing Reports
The Browse/Manage section provides quick access to the catalog, where you can browse and manage reports and other catalog objects.
It also has links to the Report Jobs and the Report Jobs History pages, where you can view and manage scheduled, running, and completed report jobs.
It also has links to the Report Jobs and the Report Jobs History pages, where you can view and manage scheduled, running, and completed report jobs.
| 1 . | The Catalog page is displayed as a tree structure on the left side of the page with the details on the right. The catalog stores the BI Publisher objects, such as reports, data models, and style templates.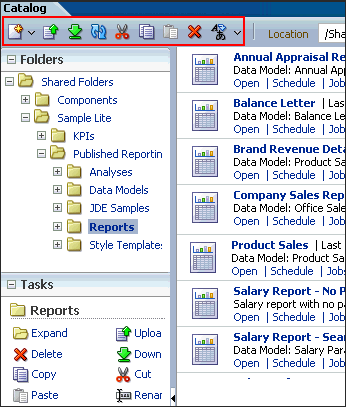 The catalog page has a tool bar with various task icons such as New, Upload, Copy, Cut, Paste, and other options that can be used when creating or managing the catalog objects such as data models and reports. |
|---|---|
| 2 . | Use the Folders pane of the Catalog page to display and navigate the content. To open the report Salary Report - No Parameters, select the report under the Shared Folders/Sample Lite/Published Reporting/Reports folder, and then click Open.  This will open the selected report in the Report Viewer as shown below. 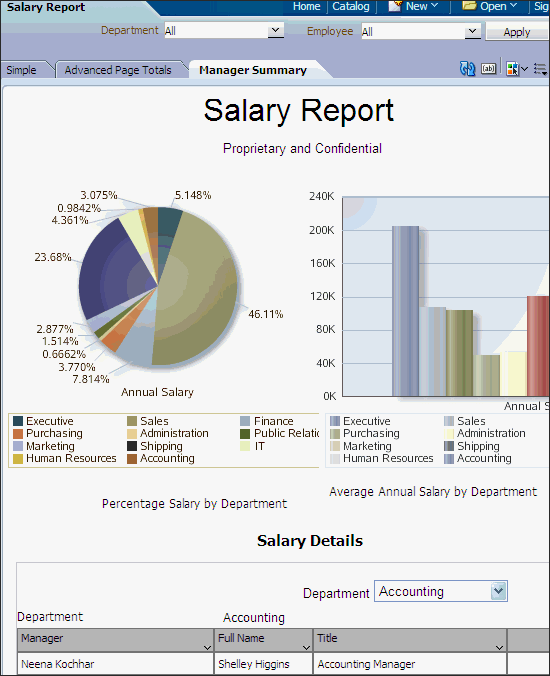 |
Managing Favorites
The Favorites region enables you to manage your own list of objects for quick access.
From the Favorites region, you can Schedule, Configure, Remove, and See Job History or Edit the objects that you have placed there.
From the Favorites region, you can Schedule, Configure, Remove, and See Job History or Edit the objects that you have placed there.
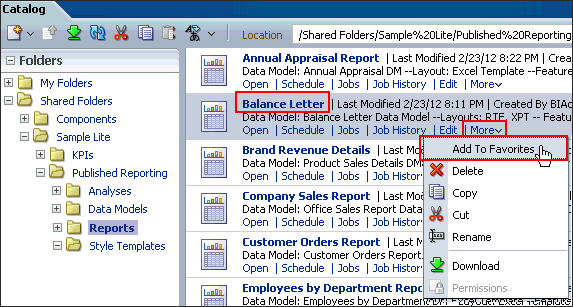
| 1 . | There are several ways to add objects to the Favorites region:
|
|---|


Creating a New Folder
In this topic, you will learn how to create a new folder in the catalog. You will use this folder to store/save all the objects that you create in this tutorial.
To create a new folder called Learn, do the following:
To create a new folder called Learn, do the following:
| 1 . | Click Catalog from the global header. This will display the Catalog page. |
|---|---|
| 2 . | Navigate to My Folders folder. |
| 3 . | Click Folder from the New drop-down list. Create dialog box is displayed. |
| 4 . | In the Create dialog box, provide a folder name - Learn, and provide the description if necessary. Then, clickCreate. The created folder is displayed in the catalog now. You will use this folder to save the files, reports, and other objects that you create for the tutorial practices.  |
Uploading a Resource to the Catalog
In this topic, you will learn how to upload a predefined object or a resource to the catalog.
This example will show how to upload a predefined data model to the catalog.
Follow the steps given below to upload the data model from your local machine to the Learn folder.
This example will show how to upload a predefined data model to the catalog.
Follow the steps given below to upload the data model from your local machine to the Learn folder.
Recollect that you have downloaded and unzipped the Salary Report Datamodel.zip folder to your local machine.
Now, you will upload the Salary Report Datamodel.xdmz file into the Learn folder in the catalog. Follow the steps given below:
Now, you will upload the Salary Report Datamodel.xdmz file into the Learn folder in the catalog. Follow the steps given below:
| 1 . | On the Catalog page, navigate to the Learn folder, and then click Upload Resource icon. |
|---|---|
| 2 . | In the File Upload dialog box, browse and select the Salary Report Datamodel.xdmz file from your local machine. |
| 3 . | Click Upload after selecting the relevant resource. .  The uploaded resource Salary Report Datamodel is available under the Learn folder now.  This concludes the topic of uploading a predefined data model to the catalog folder. This feature is useful if you have to use any predefined object such as data model, template, or report. |
Setting My Account Preferences
| 1 . | To set and view the account preferences for your user credentials, use the My Account option for your login. In this example the user name is weblogic. Click My Account under the Signed In As user account to:
|
|---|---|
| 2 . | By default, the General tab is selected. A locale is a language and territory combination. BI Publisher uses the Report Locale selection to determine translation and currency, date formatting that are to be applied on a report. In this example, the locale is set as English (United States). Note: If a particular report does not have a translation for the selected locale, BI Publisher applies a locale fallback logic to select the most appropriate layout available. BI Publisher applies localized number, date, and currency formatting independently of the layout translation.  The UI language is the language in which the user interface displays. The language that you selected at login is selected as the default. Select from the languages that are available for your installation. In this example, it is set as English(United States). Reports display the time according to the time zone preference selected here. You can override this setting when creating a scheduled report job, which is discussed in the later topic. In this example, the Time zone is set to[GMT+00:00] Casablanca. Note: The time displayed on the user interface and reflected in report processing times is governed by the BI Publisher server time zone. When BI Publisher is running in an integrated mode (installed with OBI EE), the Report Local, UI Language, and Time Zone drop-downs are grayed out. If you need to change these preferences for the BI Publisher running in the integrated mode, you should log in from the BI Analytics page. |
| 3 . | Click the Password tab to reset the password. Note: If your account password settings are inherited from another application such as Oracle BIEE, then you cannot update your password here. 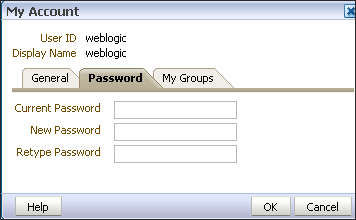 |
| 4 . | Click the My Groups tab to view a list of the application roles to which you are assigned. You cannot modify this list. Click OK to close the My Account window. |
Configuring the Data Sources
Through JDBC connections Oracle BI Publisher supports various types of Data Sources such as Oracle Database. Before you create a data model based on these data sources, you need to configure a connection to these data sources. In this topic, you will learn how to configure a JDBC connection to Oracle Database sample schema. (OE Schema)
| 1 . | To define a JDBC connection, click the Administration link on the global header. In the Administration page, click the JDBC Connection link found under the Data Sources section.  |
|---|---|
| 2 . | This displays the Data Sources page. Observe the available Data Source list. Oracle BI EE is configured out of the box, if Oracle BI Publisher is not a stand-alone install, but part of the OBI EE install. On the JDBC tab, click Add Data Source to create a JDBC connection to connect to Oracle Database. 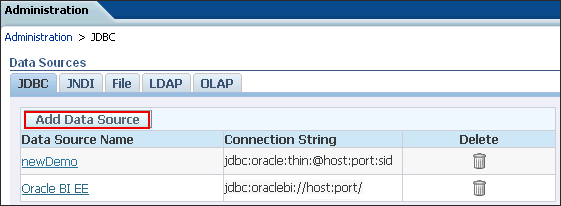 |
| 3 . | On the Add Data Source page that is displayed, enter the details as given below:
 Do not click Apply or Cancel after defining the above details. Click Test Connection. |
| 4 . | If the connection to the database is established, a confirmation message is displayed indicating the success.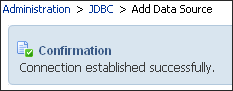 Then, click Apply. You can see the newly defined connection, Demo, in the list. 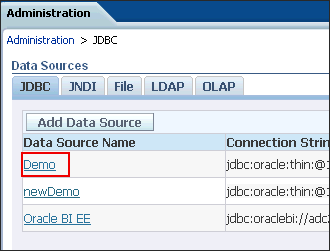 |
| 5 . | BI Publisher ships with a repository of various sample files and reports. You can view these file data sources by clicking the File tab on the BI Publisher Administration page. The screenshot shows a predefined File data source with the name demofiles.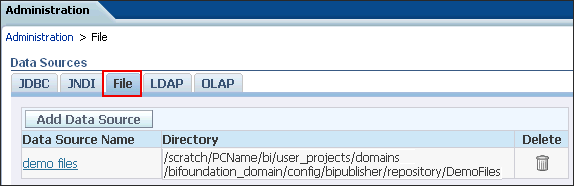 |
Creating a Data Model
Overview
A Data Model defines data that is used by a report. Creating a new data model or selecting an existing/predefined data model is the first step in creating a BI Publisher report. A Data Model may contain multiple data sets and it defines how data fields are structured in relation to each other. It may also contain parameters with lists of values, bursting definitions and other structures or properties that determine how data is provided to a report. Oracle BI Publisher has a Data Model Editor, a graphical user interface for building data models within the BI Publisher interface.
In this topic, you will learn how to create a Data Model based on SQL query using the JDBC connection that you have defined in the previous topic. Also, you will learn how to add parameters to the data model. You will use this data model for the new report that you are going to create in the next topic.
Creating a Data Model
| 1 . | From the global header, click New and then select Data Model. You can also use the Create section and Data Model link.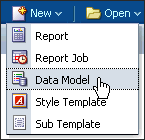 The Data Model Editor window is opened. |
|---|---|
| 2 . | In Data Model Editor, observe the Data Model Properties section that is displayed on the right. Select a Default Data Source (that points to the database that you have been earlier connected to). In this example, you will use Demo. Optionally, you can add a description to the data model. 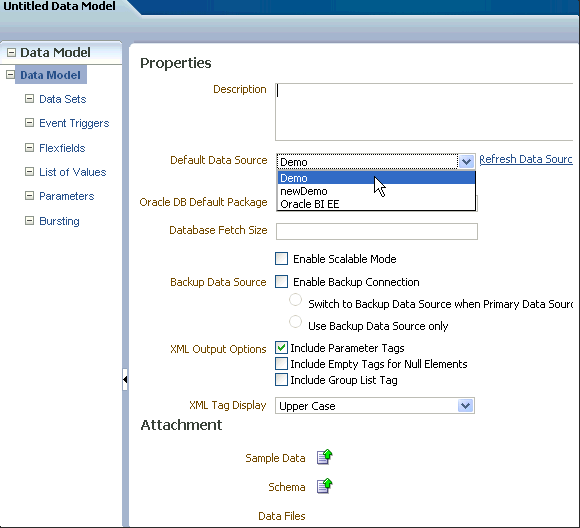 Note: Ensure that in the XML Output Options, the Include Parameter Tags is checked, and the Include Empty Tags for Null Elements and Include Group List Tag check boxes are not checked. |
| 3 . | In this example, you will create a data set by using a SQL query for the report. a. Click Data Sets on the Left side pane. This will display the Data Set Editor section.  b. In the Data Set Editor section under the Diagram tab, click New Data Set Menu and select SQL Query as the type of data set.  |
| 4 . | Create Data Set -SQL dialog box is displayed. a. Enter an appropriate name for the data set (in this example, it is employees).  b. Accept the default data set option (as you have already defined it in the Data Model), and click Query Builder to create a query. |
| 5 . | The Query Builder window displays the OE schema objects on the left side. Click DEPARTMENTS and EMPLOYEES tables to add them to the Model canvas on the right.  |
| 6 . | The selected tables are displayed in the Model section. Now, define a join between these two tables as follows: a. Click the box beside DEPARTMENT_ID column in the DEPARTMENTS table. b. Similarly, click the box beside DEPARTMENT_ID column in the EMPLOYEES table. (These boxes, when marked for joins turn light gray.) Also note that a fine line joining the tables appears in the Model canvas.  c. Select the following columns from the tables (by selecting the check boxes beside the column names):
 |
| 7 . | Click the Conditions link. Change the column names and remove "_" to have more appropriate aliases. Change the aliases for the columns as below:
 Note: The aliases and display names can be changed in the Data Model page, either in the Diagram or in the Structure. |
a. Enter "IN (:Dept)" in the Condition field for the department name column, as shown in the screen below. This will define a Dept parameter on the department name column. Note: The IN condition is being used here for the parameter to accept All or Multiple values for the department name column. You will edit this parameter later to add list of values. b. Click Results to see how the query results appear in Query Builder. | |
This will prompt you to enter a department name for the parameter, enter Sales and click OK. Results are displayed. | |
View results. Click Save to save the query.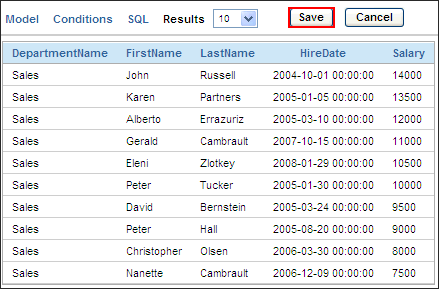 | |
| 8 . | a. This takes you back to the Create Data Set -SQL dialog box. Observe that the query that you created is reflected in the SQL Query area. Click OK to add this data set to your data model. b. A confirmation message asks whether you want to create a bind variable. Click OK to create the parameter.  c. An informative alert confirms parameter listing. Click OK.  This newly created data set is displayed under the Data Sets node in the left side pane of the Data Model Editor. Also, the Data Set diagram is displayed in the Data Set Editor pane. Observe that the Dept parameter is also listed under the Parameters node. 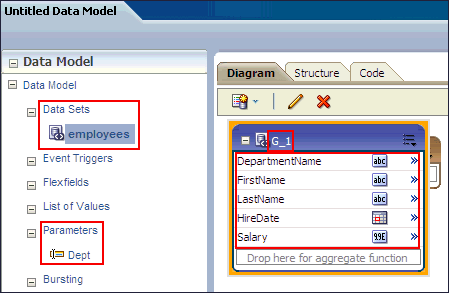 |
| 9 . |
You will now add List of Values and add/edit parameters for this data set.
In the Data Model pane, click List of Values node. In the List of Values pane, click the + sign to create new List of Values.
Select the following Options:
|
| 10 . |
In the Query Builder page, select DEPARTMENT_NAME from the DEPARTMENTS table. Click Save.

The query for the LOV should look like this:
 |
| 11 . | a. Add another LOV (list of values) EmpName, following similar steps. You will use the Employees table from the data, in the query builder. 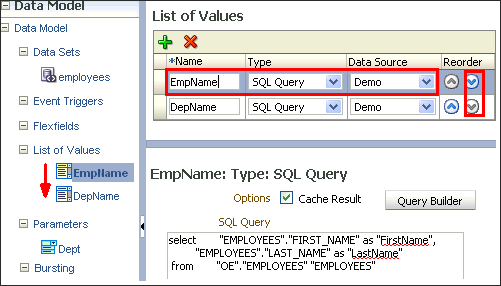 b. After creating the LOV, reorder the list by using the Reorder buttons. |
| 12 . |
Now, edit the existing parameter, and add another parameter to use the list of values that you have created.
In the Data Model pane, click Dept under the Parameters node. In the Parameters pane, edit the properties by providing the following information:
Leave the Name as Dept and the Data Type as String.
Provide Default Value as * , and select Menu as the Parameter Type.
 |
| 13 . |
Ensure that DepName LOV is selected as the List of Values for the parameter.
Ensure that Multiple Selection, Can select all, and All Values Passed options are selected. (These options allow you to select all or multiple values for the department.)
Also, change the Display Label as appropriate, such as Department Name.
 |
| 14 . | Add another parameter Emp. Use the Add icon to create a new parameter. Follow the previous steps to define the parameter properties. You will need to use the EmpName LOV created previously for this parameter.  Note that the newly added parameter always displayed first. Use the Reorder buttons to list the parameters as shown in the data model pane. |
| 15 . | Click the Save Icon to save the Data Model. |
| 16 . | Save the Data Model as Salary Report Parameters under the Learn folder. |
| 17 . | Click the XML icon in the Data Model Editor window to run the data as XML output. |
| 18 . | In the XML Output window, observe that the Department and the Employee Parameters are available with the menu options. Click Run. The XML output is displayed.  |
| 19 . | To save this as sample data, click the Open Menu drop-down list icon, and select Save As Sample Data. |
You can see that the sample.xml is listed in the Sample Data section of the Data Model (as shown below):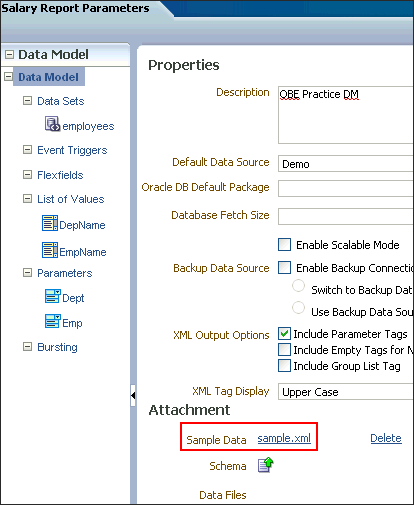 Note: It is very important to save sample data for a data model. Otherwise, when creating Layouts, the previews do not appear correctly. This concludes the topic of creating a new Data Model with Parameters and List of Values. You will use this data model in the next topic to create a new report. |

Creating Reports
Overview
A BI Publisher report is made of data model, layout, properties, and translation (optional). Creating a New Report involves selecting the source of the data for the report, selecting the data columns to be displayed in the report, and then adding a meaningful layout for this data, defining the properties for the report parameters, and scheduling the report.
|
Creating a New Report
You will create a New Report with the existing Data Model Salary Report Parameters, and choose to create the report by using the Report Editor Option.
In the previous topic, you have created and saved this data model Salary Report Parameters in the Learn folder.
In the previous topic, you have created and saved this data model Salary Report Parameters in the Learn folder.
You will be creating a new layout using the Layout Editor, and use it to view the reports. You will also edit parameters and view them in the Report Viewer.
| 1 . | Click New>>Report in the global header. You will be asked to select the data source for the new report. Select the Use Existing Data Model option.  You will use the Salary Report Parameters data model that you have created previously. |
|---|---|
| 2 . | Select the previously created data model Salary Report Parameters from the Learn folder. Click Next.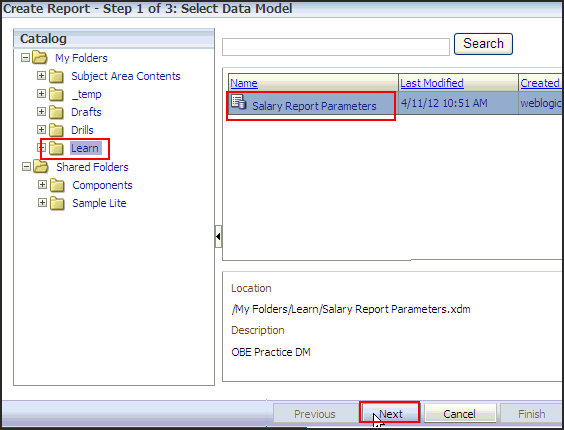 |
| 3 . | Select the option to Use Report Editor, and then, click Finish. This will lead you to saving the report before proceeding further. Selecting the Guide Me option guides you through selecting specific columns from your data source for this report and viewing a simple tabular layout. By using this wizard, you can quickly view the data, create a simple tabular report, and be guided to the layout editor. |
| 4 . | Save the Report as Salary Report with Parameters under the Learn folder. |
| 5 . | The Report Editor window is displayed with the saved report, where you can edit the layout, parameters, and other properties, and also a link to view the report. BI Publisher Layout Templates are created by using the BI Publisher Layout Editor – a design tool that provides a WYSIWIG, drag and drop interface for creating pixel perfect reports in PDF, RTF, Excel, Power Point, and HTML. It also provides dynamic HTML output that supports lightweight interaction through a browser. BI Publisher layouts that are created online are best suited for reports of simple to medium complexity that do not require custom coding. Because the dynamic HTML view is only available for BI Publisher layouts, these layouts must be used when there is a requirement to enable a Report Consumer to interact with the report.
 Note: Boilerplates or shared templates make creating reports easy and efficient. You can use the standard shared templates or can create your own predefined templates based on your work requirements. |
| The report is opened with an untitled layout in the Layout Editor. Observe the various sections, Data Source, Components, and Properties, that enable you to create a pixel perfect layout. The Data Source displays the data available. Because this is a predefined layout with a chart and a table structure in place, you will see the grid sections to guide you to add text items, charts, and data tables. You will start adding the data from the data source to make this a meaningful report.  | |
| 6 . | Change the text items in the layout to suit the Report, Chart, and Table that you are going to create. Double-click the default text item to continue with the same format. You can format the text according to your requirement with the Text properties displayed on top of the editor. In this example, the selected Salary by Departments section title is left aligned. |
| 7 . | Select the default chart object in the layout grid, and choose appropriate type and style for the chart. This example has used Bar Chart and Earth Style. Cancel the 3D effect and keep the chart simple. |
| 8 . | Drag and drop the Salary and DepartmentName elements to the chart as shown below: Change the aggregation property of Salary to Average.  A Bar chart is generated for the selected data.  |
| 9 . | Now you will add the data table for Salary by Departments. You will use "Repeating Sections" and "Data table" elements. a. Under the Salary by Departments grid cell, click Insert>Repeating Section. 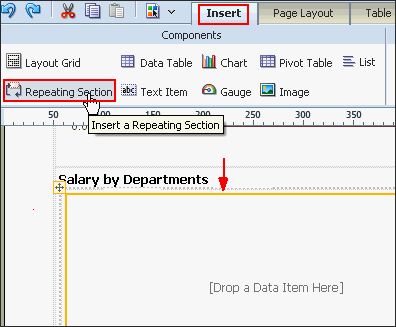 b. In the Insert a Repeating Section editor window, select Element, Row, and DepartmentName. Click OK.  The Repeating section is inserted.  |
| 10 . | Select the repeating section area and click Insert>Data Table. |
| 11 . | Drag the data elements from the Data Source to the Layout pane. Observe that DepartmentName is outside the data table. |
| 12 . | Adjust the column width by editing the column property as shown in the image. You will have to select the column to be edited, and then change the properties. You can also edit the columns by adjusting the column directly in the table. |
| 13 . | a. Format the Hire Date column by the Data Formatting option. Select an appropriate date format. b. Format the Salary column by using the Data Formatting option. Select the Currency format.  c. Format the total row for the salary column with currency formatting. You will have to select this cell separately for the formatting. The formatted table is displayed as shown below.  d. Check for any empty data elements that are not defined in the template. In this newly created layout there is an empty data table. Because you have inserted a new data table under the repeating section, the default data table element that was part of the chosen boilerplate template remains empty. Select and delete it from the layout. Empty data elements will result in errors in the report views. |
| 14 . | Click the Save icon to save the layout. Save the layout with the name New Formatted.  |
| 15 . | Observe that the saved Layout is displayed in the Layout Editor with the name New Formatted. Click the Viewer menu and select the Interactive view to view the report in a browser window.  |
| 16 . | The Report is previewed in Interactive Viewer in a browser window. Close the browser window to get back to the Layout Editor. |
| 17 . | Click Save and then click Return to close the Layout Editor. You can create Report templates online as described in this topic. You can also create various other templates such as RTF, EXCEL, PDF, Flash, and eText. Additional information:
|
| 18 . | The Report Editor window displays the newly created New Formatted Layout. Click the Save icon, and then click View Report. |
| 19 . | The report is displayed in the Report Viewer window. Observe that the parameters are displayed horizontally, and with the display type as menus. You will learn to change this display in the next few steps. This is a recently added enhancement. Click Edit Report from the actions menu.  |
| 20 . | This will bring you back to the Report Editor. Parameters are defined in the data model. The report editor enables you to configure the parameter settings. Click the Parameters link in the report editor window. The Parameters dialog is displayed as shown below. Observe that the parameter display is set to Horizontal Region, label location is Place label on side, and theShow Apply Button is set to Default. Also, the type of the option for parameters are Menu. |
| 21 . | Now, change the display options as shown below and click OK.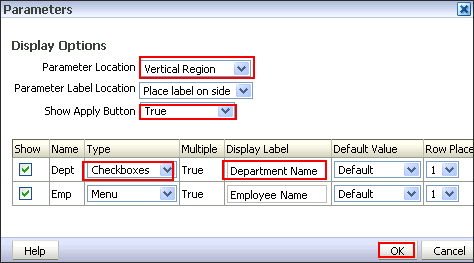 Save the report and view it in the Report Viewer. |
| 22 . | The Report is displayed in the Report Viewer window with the newly set display options for the parameters. You can select the various departments, and employee name combinations to view the respective report data. This adds greater flexibility and interactivity to the BI Publisher reports. You can also change the display for the Show Apply Button option to false in the parameter settings for the same report, and observe the change in the display. Use the Report Editor to edit the parameters as explained previously. Now, Return to the Report Editor from the Actions menu, and change the parameter display back to menu. You will use this display and the layout in the next topic of Scheduling Reports. |
Creating Report Jobs / Scheduling Reports
Overview
Scheduling is a very important feature for any reporting system, which enables you to schedule long-running reports, to be run at a specified time and date.
This enables you to select a time and date at which the load on the system is low, to run your daily/weekly and/or monthly reports.
In this topic, you will learn to schedule a report job, and view and manage the scheduled jobs and job history.
You will also be able to edit a scheduled job and run it or resubmit and run again. This is a new enhancement in the current release.
Note: The current version has an enhancement to execute the scheduled report job based on conditional triggers. You will need to include a Schedule Trigger in the Data Model of the report. When the report job is scheduled to run, the trigger is executed. Schedule triggers are of SQL Query type. When a report job is scheduled to run, the schedule trigger executes the SQL statement defined for the trigger. If the data is returned, then the report job is submitted.
If no data is returned from the SQL query, the report job is skipped. This feature is not covered in this tutorial.
If no data is returned from the SQL query, the report job is skipped. This feature is not covered in this tutorial.
Creating a Report Job
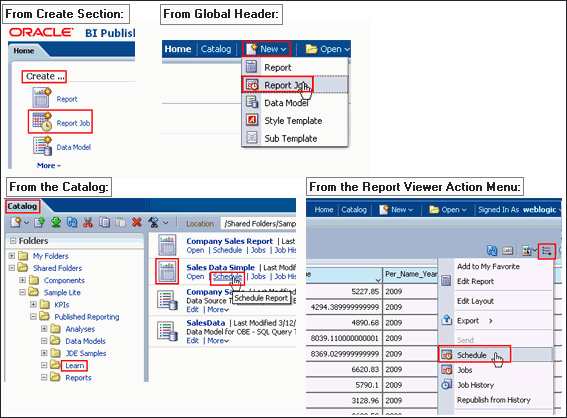
| 1 . | You can schedule a Report Job in any of the following ways:
 |
|---|---|
| 2 . | In this example, you will schedule the previously created Salary Report with Parameters report. Select the report from the catalog and click Schedule.  The Schedule Report Job window is displayed. It contains four tabs to define the options for your report job: General, Output, Schedule, and Notification. |
| 3 . | The Schedule Report Job window displays the General tab by default. You can either leave the default selected parameters as it is, or change it to suit your requirement. In this example, you can see the selected report for scheduling in the general tab, and default parameters. |
| 4 . | Click the Output tab. Select the options as shown below.
 Note: Email, a typical destination type, is not configured. This feature is covered in the Advanced Features tutorial. |
| 5 . | a. Click Schedule tab. b. Select the options as given below:
 : :You can use the Notification tab to send notification to the recipient via Email. This is an optional step. c. Click Submit. |
| 6 . | Provide an appropriate name to the Report Job in the Submit dialog box, and then click OK. In this example, the Report Job name is Sal Report Job 1. You will get an alert message that the Report Job is successfully submitted. Click OK.  This concludes the topic of Creating a Report Job. |
Managing Report Jobs
| 1 . | The Manage Report Jobs page displays information about future scheduled and recurring report jobs and enables you to take actions on these jobs. You can edit the running or future scheduled report jobs here. For this, you will need a running or future scheduled report job. You will now edit the previously scheduled job, which was set to run daily. Click Open>Report Jobs from the global header.  |
|---|---|
| 2 . | The Manage Report Jobs page is displayed with the scheduled reports. You can delete, pause, resume, or edit report jobs from this page using the icons as shown in the image. Select and click the Report Job Name. In this example, click Sal Report Job 1 to view the Report Job details. |
| 3 . | You can also edit the report job from the Report Jobs Detail page. Click the Edit icon next to the job name as shown below:  This will take you to the Schedule Report Job Page. |
| 4 . | a. Edit the Report Job to change the parameters displayed. Select Shipping, Sales, and Finance departments from the Department Name drop-down list. Keep the Employee Name as is wih the All option. b. Under the Output tab, change the format to PDF.  c. Click Submit. This will submit the same job with the previously set frequency. Keep the name of the job same as before and click OK.  d. After you get the confirmation that the job is submitted successfully, click Return to return to the Manage Report Jobs page. |
| 5 . | Observe the changes in the Manage Report Jobs window. The edited and submitted job is listed under the previously chosen Job name Sal Report Job1. Click the Job Name to view the details as explained at the beginning of this topic. In the displayed report Sal Report Job 1, observe that the values for the departments are reflected as defined by you during the editing. The output format change is reflected too. Scheduling frequency is left unchanged. You will edit this report job again to change the frequency of the schedule and submit the job as a new one and see the scheduled report output.  Click the Edit icon to edit the report job. You will be taken to the Report Job/Scheduling page. |
| 6 . | a. Now, change Schedule Frequency for the same job to Once, and select the Run Now option. Keep all other criteria unchanged from the previous schedule. b. Click Submit As New. Name this Report Job as Sal Report Job 2 and click OK. c. Click OK in the submission confirmation message. |
| 7 . | Now, click Open>Report Job History from the global header. You will need to use the Job History to view the Jobs that are executed already. The Report Job History page displays information about running and completed report jobs.  Observe that the newly scheduled report is successfully submitted. Click the report job - Sal Report Job 2 to view the details. |
| 8 . | The Report Job History for Sal Report Job 2 is displayed as shown below. The parameters display and output options are as set by you. Click Output 1 link in the list to see how the scheduled report is displayed.  The report is displayed in the browser window in the PDF format. Use the browser back button to return to the BI Publisher.  This concludes the topic Managing Report Jobs. |
Summary
This tutorial covered the regular navigation features and operations for Oracle BI Publisher 11.1.1.6.0 and later versions.
In this tutorial, you have learned how to:
- Launch and Log in to the BI Publisher
- Set Preferences
- Define Data Sources
- Create a Data Model
- Create a Report using Report Editor
- Use Layout Editor
- Schedule Reports (Create Report Jobs)
- View and Manage Report Jobs