Oracle BI EE, BI Publisher 10.1.3.4 & Hyperion Essbase Connectivity – Security Integration
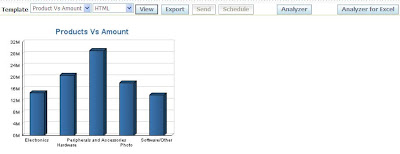
One of the major letdowns (if i can call that) of the BI EE and Essbase connectivity is the security integration between the 2 components. Currently, BI EE cannot leverage the Essbase security. Though i had stated here that it does work, that test was done for a specific use case. But the same does not work for all the other major scenarios. This blog entry basically gives a brief on all my findings on the BI EE and Security Integration. We shall take the same Demo->Basic cube for all our testing. To start with let us use below report on the Demo->Basic cube.
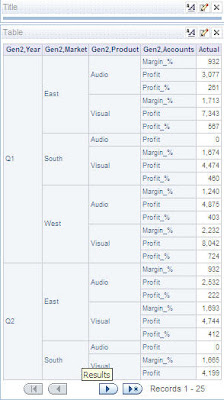
As you see it is a very simple report containing all the dimensions in the Demo->Basic Cube. Now, let us create a new user in Essbase called as Demo1. And this user would only be given a filter access to this cube.
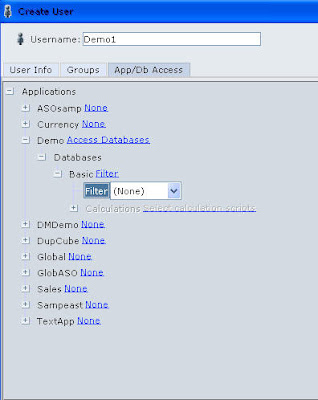
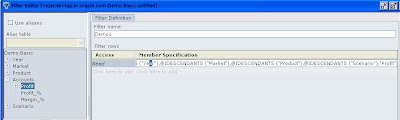
Let us create a new filter in Essbase which would have access to only the Profit Account and all the other members of other dimensions. So the filter specification would be as shown below
1 | @IDESCENDANTS ("Year"),@IDESCENDANTS ("Market"),@IDESCENDANTS ("Product"),@IDESCENDANTS ("Scenario"),"Profit" |
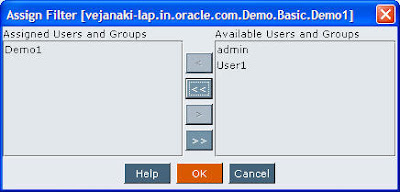
Then assign this filter to the Demo1 user.
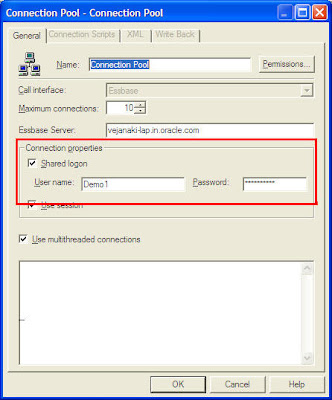
Lets change the user in the connection pool to Demo1.
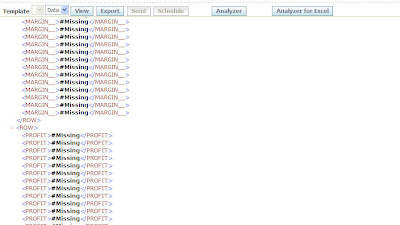
Once this is done, let us take a look at the report.
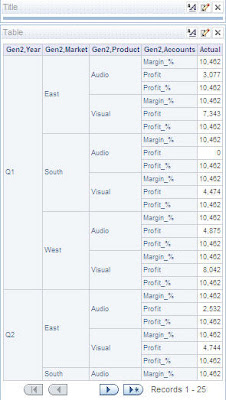
If you look at the report closely, the data itself is completely wrong. We are not supposed to get any data for accounts other than Profit. But in our case not only are we getting data, it is juxtaposed with numbers from prior members. Now, let us take a look at the MDX to see whether the filter that we setup above works correctly.
1 | With |
2 | set [Accounts2] as '[Accounts].Generations(2).members' |
3 | set [Market2] as '[Market].Generations(2).members' |
4 | set [Product2] as '[Product].Generations(2).members' |
5 | set [Year2] as '[Year].Generations(2).members' |
6 | select { [Scenario].[Actual] } on columns, |
7 | NON EMPTY {crossjoin ({[Accounts2]},crossjoin ({[Market2]},crossjoin ({[Product2]},{[Year2]})))} properties ANCESTOR_NAMES, GEN_NUMBER on rows |
8 | from [Demo.Basic] |
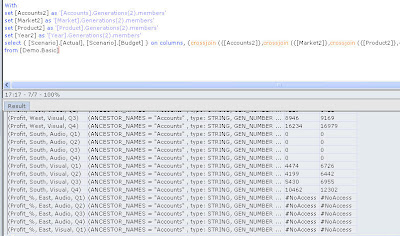
Now, let us fire the above MDX query directly in Essbase as the Demo1 user. This will let us know whether the filter has been applied properly on the cube.

As you see above, the MDX does generate No Access label for all the Non-Profit account intersections. Hence the problem actually lies in the BI EE Server wherein the conversion from this MDX output to a BI EE specific answers output does not happen correctly. I believe this is probably because, since the ACTUAL measure is numeric, the UI expects only numeric values in the output MDX. But if there is any non-numeric output then rendering of the output would be wrong. This prompted me to understand another important question. How does BI EE handle the #Missing label? If you see, BI EE will always pass the NON EMPTY clause in your MDX output. Hence there is no way #Missing can come in the output. The only thing that i can conclude as of now is that #No Acces label in not handled in the BI EE Server and hence it is bound to produce wrong results. Now, lets investigate further to see whether this is actually due to the BI EE UI. One is to test the MDX directly in BI Publisher and the other is to fire the logical SQL directly. Let us take the BI Publisher approach first. Let us log into BI Publisher first and then fire the same MDX Query as the admin user first.
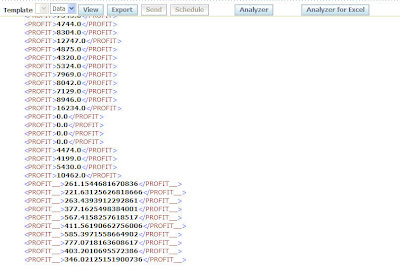
As you see we get all the accounts including Profit and Non-Profit accounts. But in the above output we do not have the dimensions as part of the rowset. To investigate this in itself is a seperate blog entry which i shall do later. But for now, we are sure that the above works for the admin user. Now, lets try the same report as the Demo1 user.
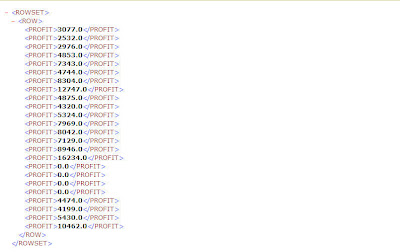
So far so good. Looks like BI Publisher does understand the No Access label as it has filtered all the no-access rows. I believe this is either getting filtered in the UI or BI Publisher engine modifies the MDX queries in such a way that it does not display the No Access Rows. This is again a bit strange as there are no out of the box properties to filter the No Access rows in BI EE. In order to test this completely, let us remove the NON EMPTY property and also add one more scenario to the query as shown below
1 | With |
2 | set [Accounts2] as '[Accounts].Generations(2).members' |
3 | set [Market2] as '[Market].Generations(2).members' |
4 | set [Product2] as '[Product].Generations(2).members' |
5 | set [Year2] as '[Year].Generations(2).members' |
6 | select { [Scenario].[Actual], [Scenario].[Budget] } on columns, {crossjoin ({[Accounts2]},crossjoin ({[Market2]},crossjoin ({[Product2]},{[Year2]})))} properties ANCESTOR_NAMES, GEN_NUMBER on rows |
7 | from [Demo.Basic] |
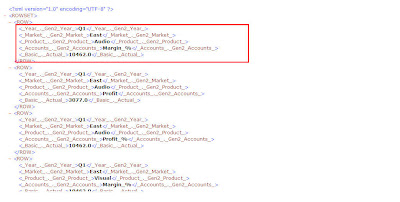
Though we thought the security did work fine above, this is not the case anymore when we added the Budget scenario as well to the query. So, what has happened is BI Publisher has converted all the No Access labels to #Missing label. But again this is not applicable everywhere as we get #Missing for the second rowset. One thing that i can conclude is that security integration to Essbase is very primitive in this current release of both BIP and BI EE.(i just hope someone proves me wrong here). And, I just hope that this is addressed properly in 11g.
As a last effort let us try to pull in the data from the same report in answers to BI Publisher.
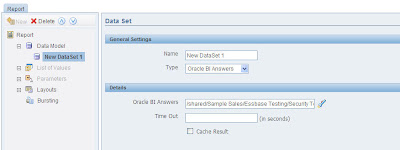
As you see, we still get wrong data. So, the only way to handle secure Essbase data sources is from within BI EE using the same approach as relational data sources.
Oracle BI EE 10.1.3.4 – Calling BI EE WSDL from BI Publisher
Another very important and very good feature of BI Publisher 10.1.3.4 is the support for Complex Web Services. Support for Web Services in BI Publisher,i believe, was introduced in 10.1.3.2. But the major problem with that was the support was limited to very simple web services like Yahoo Stock quotes etc. But now with the support for complex web services, one can achieve more complex integration with BI EE as well as other reporting toolsets. One direct correlation of this support is the ability of BI Publisher now to have BI EE WSDL as a data source. Yes, BI Publisher now can call BI EE WSDL’s directly. Till the previous release, the only way to achieve this was by converting the complex WSDL to a simple one through servlets. Lets try this new feature out today by means of a simple report. We shall start with a new report with Web Service as the data source.
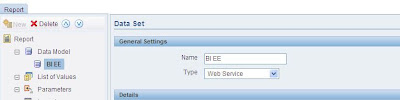
When we choose Web Service as our data source, we can now see there are 2 types of Web Services. Simple or Complex.

Lets choose complex. And in the WSDL URL lets enter the BI EE WSDL.
1 | http://localhost:9704/analytics/saw.dll?WSDL |
As soon as we enter the above WSDL, we should now be able to choose any one of the web services. Remember BI EE WSDL is a multi binding web service. That is, a single WSDL can provide a combination of multiple web services. For now lets choose SAWSession Service.
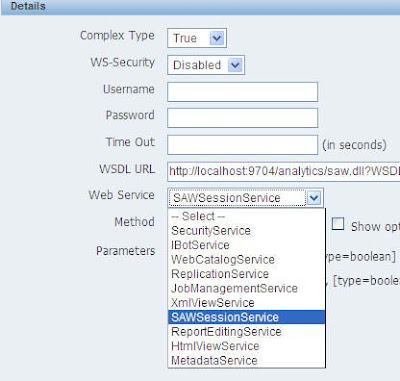
Lets choose the Logon method and enter the username and password parameters.

Now, lets see what happens when we look at the report output.

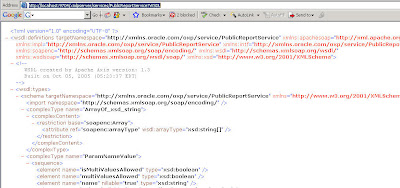
Strange. I was expecting the Web Service to return back the SessionID. But unfortunately it does not look to be straightforward. So far, i have not been able to get this to work (even when i try to pass the parameters from BIP parameters using ${Parameter_name}). Now, if you see the OC4J command window, you would see the actual SOAP envelope that has been fired by BI Publisher.

Now, lets copy the above SOAP envelope and fire it from SOAP UI to test whether this envelope actually works.

Well, it does work. So, I am not sure what else is required to get the login method to work from within BI Publisher. I believe the above behavior is probably due to the fact that BI Publisher actually tried to fire the SOAP envelope using a dummy parameter first and then with the actual parameters i,e your OC4J would actually show you the 2 SOAP envelopes being fired from BI Publisher
01 | 08/08/12 20:04:45 WebServiceCall::callComplexClient SOAP Message = <soap:Envelope xmlns:soap="http://schemas.xmlsoap.org/soap/envelope/"> |
02 | <soap:Body xmlns:ns1="com.siebel.analytics.web/soap/v5"> |
03 | <ns1:logon> |
04 | <ns1:name>%LABEL_1%</ns1:name> |
05 | <ns1:password>%LABEL_2%</ns1:password> |
06 | </ns1:logon> |
07 | </soap:Body> |
08 | </soap:Envelope> |
09 | 08/08/12 20:04:45 After WSS soapMessage = <soap:Envelope xmlns:soap="http://schemas.xmlsoap.org/soap/envelope/"> |
10 | <soap:Body xmlns:ns1="com.siebel.analytics.web/soap/v5"> |
11 | <ns1:logon> |
12 | <ns1:name>Administrator</ns1:name> |
13 | <ns1:password>Administrator</ns1:password> |
14 | </ns1:logon> |
15 | </soap:Body> |
The authentication failed message that we obtained is probably due to the first envelope. Not sure what more is required to get this to work. A very interesting feature but something i have not been able to test successfully so
BI EE 10.1.3.4 – BI Publisher and MDX – Essbase Connectivity
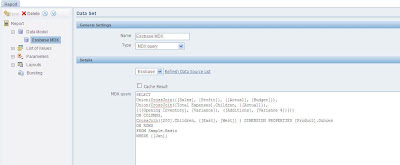
One of the new features of the BI EE 10.1.3.4 release is the new connectivity to Essbase from BI Publisher. Lets see how this works today. As a first step, lets set up the OLAP Connection to Essbase from within BI Publisher.
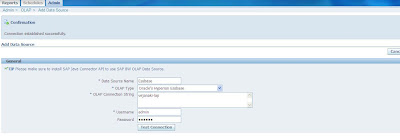
The connection is pretty straight forward. All one would have to do is to enter the Essbase server name. Now lets, go into BI Publisher and create a simple report.
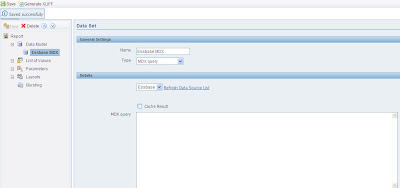
As you see, there is no level or generation selection that is possible in a wizard interface. One would have to manually enter the MDX Query. This is a bit of a downer since i was atleast expecting a wizard interface to choose the levels (if not members). But anyway lets try entering a simple MDX query as shown below
1 | SELECT |
2 | {[100-10], [100-20]} |
3 | ON COLUMNS, |
4 | {[Qtr1], [Qtr2], [Qtr3], [Qtr4]} |
5 | ON ROWS |
6 | FROM Sample.Basic |
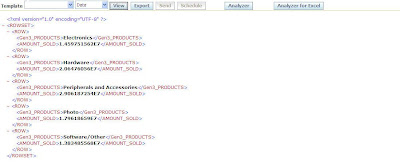
Lets save the above report. Now, lets click on data and see what happens. As you see below, the data is properly retrieved which is very good.

Now, lets try a complex MDX query as shown below
1 | SELECT |
2 | Union(CrossJoin({[Sales], [Profit]}, {[Actual], [Budget]}), |
3 | Union(CrossJoin([Total Expenses].Children, {[Actual]}),{([Opening Inventory], [Variance]), ([Additions], [Variance %])})) |
4 | ON COLUMNS, |
5 | CrossJoin([200].Children, {[East], [West]} ) |
6 | DIMENSION PROPERTIES [Product].Ounces |
7 | ON ROWS |
8 | FROM Sample.BasicWHERE {[Jan]} |

This is something that BI Server lacks currently as one cannot enter MDX queries directly in the “Direct Database Requests”. If you are not sure what i mean, lets enter the same query above in the direct database requests page in BI Answers.
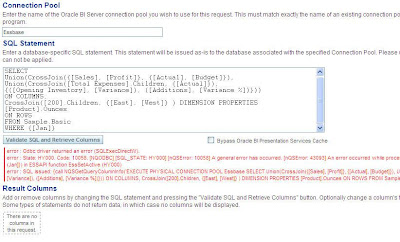
As you see, the above errors out as BI Server expects only columnar data through the MDX. The support for MDX is very limited from a BI EE standpoint. Now with the support of BI Publisher, the MDX support is more enhanced. But the drawback still is the lack of a wizard driven interface and also lack of true multi dimensional aware reporting.
Hyperion Essbase 9.3.1 and BI Publisher Connectivity – Using BI EE as a data Bridge
As i was testing the BI EE and Hyperion Essbase connectivity yesterday, i thought i would test out the connectivity of BI Publisher and Hyperion Essbase through BI EE metadata and Answers. I started out under the impression that the performance would either be slow or there would be some hiccups on the way. But to my surprise, the connectivity was so seamless that it gave me the impression that BIP itself is using XMLA to connect to Essbase( i am not sure whether there are plans for supporting XMLA directly from BIP). I used the same cube that i had built yesterday here which contained a ragged hierarchy on the products dimension. As you would probably know, there are 2 ways of connectivity from BI Publisher to BI EE. One is by firing a query on the BI Server and the other is by using an existing Answers report. Lets try both of them today to find out how the connectivity actually works. Lets start first with the BI Server connectivity. So, create a simple BI Publisher report and in the data source use “Oracle BI EE”. And in the query use “Sql Query”.

Click on the Query builder and choose your Subject Area ( in our case the SA containing the Hyperion objects). Choose the 3rd level and the measure

If you notice, you would get a query like this
1 | select PRODUCTS.Gen3,PRODUCTS as Gen3,PRODUCTS, |
2 | Shblog.AMOUNT_SOLD as AMOUNT_SOLD |
3 | from SH_BSO1.Shblog Shblog, |
4 | SH_BSO1.PRODUCTS PRODUCTS |
Unfortunately, BI Publisher is not aware of Hyperion Essbase modelling in BI Server and hence does not encapsulate all the columns within double quotes. The above query would only give an error. So, change the above query to the one below
1 | select "PRODUCTS"."Gen3,PRODUCTS" as "Gen3,PRODUCTS", |
2 | Shblog.AMOUNT_SOLD as AMOUNT_SOLD |
3 | from SH_BSO1.Shblog Shblog, |
4 | SH_BSO1.PRODUCTS PRODUCTS |
5 | where "PRODUCTS"."Gen4,PRODUCTS" is not null |
Now, try viewing the data. So far so good.
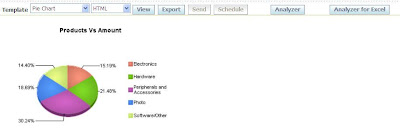
Now all we need to do is to add templates to this report and it works like a breeze.
Lets try the other means of connectivity which is by using an Answers request as the data source.

Add a template to this data source and there you go. A simple BIP report using Essbase as the data source.

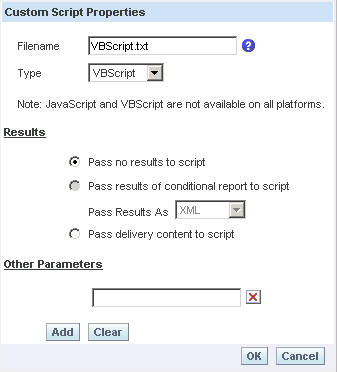
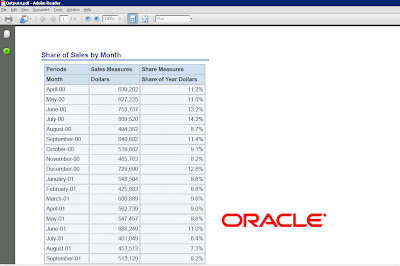
Oracle BI EE 10.1.3.3/2 – Sending Reports to Non-OBI Users – Delivery Manager API of BI Publisher
Another common question that generally comes from end users is “How do we make OBI EE Delivers to email the reports to users who are not part of a Delivery profile?”. Well, there are a variety of ways to achieve this. Let us first list those down
1. Create a dummy user and assign as many email ids as possible to this dummy user’s delivery profile. While using Delivers, send the reports out to all these users.
2. Create SA system subject area in BI Administrator and let the subject area be populated from database using Init Blocks. In this case, all the email ids would come from the database.
3. Use BI Publisher Delivery Manager API to accept multiple email ids as its parameter and send the report to various users.
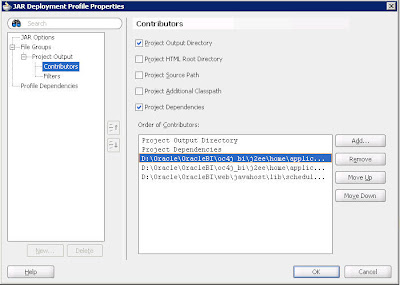
Today, we shall be looking at the 3rd approach which is easier to implement. Also, this provides us with much more flexibility in delivering the reports to the end users. In order to use this approach, you need to go through the basics of calling Java Classes from Delivers in my blog entry here. For the Delivery Manager API of BI Publisher to work, we need to have the following jars.
a. Activation.jar – You can get this jar from {OracleBI}\oc4j_bi\j2ee\home\lib
b. Mail.jar – You can get this jar from {OracleBI}\oc4j_bi\j2ee\home\lib
c. xdocore.jar – You can get this jar from {OracleBI}\oc4j_bi\j2ee\home\applications\xmlpserver\xmlpserver\WEB-INF\lib
d. versioninfo.jar – You can get this jar from {OracleBI}\oc4j_bi\j2ee\home\applications\xmlpserver\xmlpserver\WEB-INF\lib
e. schedulerrpccalls.jar – You can get this jar from {OracleBI}\web\javahost\lib\scheduler
Now open JDeveloper and include the above jars in your classpath. Also, create a Java Class to enter the below code.
package bieesoap;import java.io.FileInputStream;
import java.io.FileNotFoundException;
import oracle.apps.xdo.delivery.DeliveryException;
import oracle.apps.xdo.delivery.DeliveryManager;
import oracle.apps.xdo.delivery.DeliveryPropertyDefinitions;
import oracle.apps.xdo.delivery.DeliveryRequest;
import com.siebel.analytics.scheduler.javahostrpccalls.SchedulerJavaExtension;
import com.siebel.analytics.scheduler.javahostrpccalls.SchedulerJobException;
import com.siebel.analytics.scheduler.javahostrpccalls.SchedulerJobInfo;import java.io.File;import javax.activation.CommandMap;
import javax.activation.MailcapCommandMap;import oracle.apps.xdo.delivery.local.LocalPropertyDefinitions;public class burstEmail implements SchedulerJavaExtension{
public burstEmail() {
}public void run(SchedulerJobInfo jobInfo) throws SchedulerJobException {
try
{
FileInputStream fis = new FileInputStream(jobInfo.getResultSetFile());
DeliveryManager dm = new DeliveryManager();
DeliveryRequest req = dm.createRequest(DeliveryManager.TYPE_LOCAL);
req.addProperty(LocalPropertyDefinitions.LOCAL_DESTINATION, “D:\\Output.pdf”);
req.setDocument(fis);
req.submit();if (req.getStatus() == DeliveryRequest.STATUS_SUCCESSFUL)
{
MailcapCommandMap mc = (MailcapCommandMap)CommandMap.getDefaultCommandMap();
mc.addMailcap(“text/html;; x-java-content-handler=com.sun.mail.handlers.text_html”);
mc.addMailcap(“text/xml;; x-java-content-handler=com.sun.mail.handlers.text_xml”);
mc.addMailcap(“text/plain;; x-java-content-handler=com.sun.mail.handlers.text_plain”);
mc.addMailcap(“multipart/*;; x-java-content-handler=com.sun.mail.handlers.multipart_mixed”);
mc.addMailcap(“message/rfc822;; x-java-content-handler=com.sun.mail.handlers.message_rfc822″);
CommandMap.setDefaultCommandMap(mc);
req = dm.createRequest(DeliveryManager.TYPE_SMTP_EMAIL);
req.addProperty(DeliveryPropertyDefinitions.SMTP_SUBJECT, “Mail from BI Delivers”);
req.addProperty(DeliveryPropertyDefinitions.SMTP_HOST, jobInfo.parameter(1));
req.addProperty(DeliveryPropertyDefinitions.SMTP_FROM, “BIEEDelivers-Admin@oracle.com”);
req.addProperty(DeliveryPropertyDefinitions.SMTP_TO_RECIPIENTS, jobInfo.parameter(0) );
req.addProperty(DeliveryPropertyDefinitions.SMTP_CONTENT_TYPE,”application/pdf”);
req.addProperty(DeliveryPropertyDefinitions.SMTP_CONTENT_FILENAME,”Output.pdf”);
req.setDocument(“D:\\Output.pdf”);
req.submit();
req.close();
}
}
catch(Exception ex)
{
throw new SchedulerJobException(1, 1, ex.getMessage());
}}public void cancel() {
}}
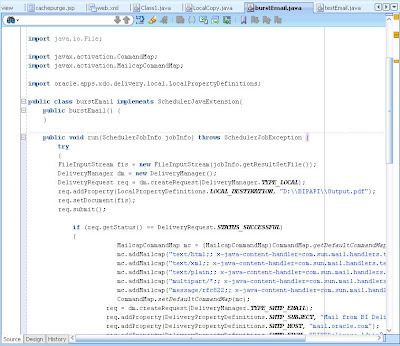
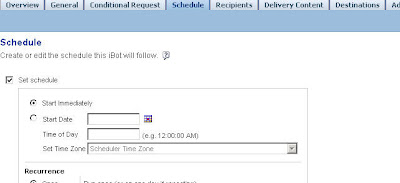
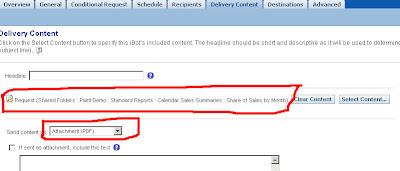
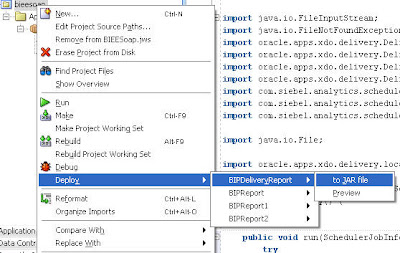
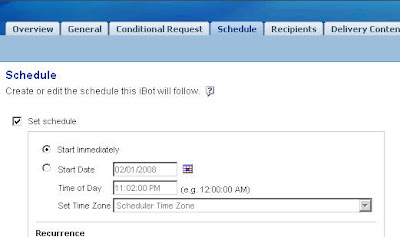
As you see, what the above code basically does is, it first stores the report in a local destination and then sends that report out to all the users. jobInfo.parameter(0) can accept comma seperated email ids as parameter. Compile the above code and bundle it into a jar file (including all the above 4 jars). Now, put this deployed jar file in {OracleBI}\web\javahost\lib. This will make the jar file to be accessible by delivers. Once this is done, create a simple ibot with PDF as the attachment
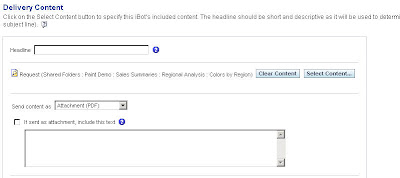
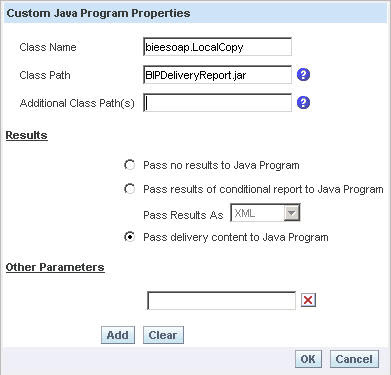
Now, in the advanced tab of this ibot, call the above class as shown below. This will accept 2 parameters
1. Comma Seperated Email ids to which you want to send the report to
2. Your SMTP mail Server
2. Your SMTP mail Server
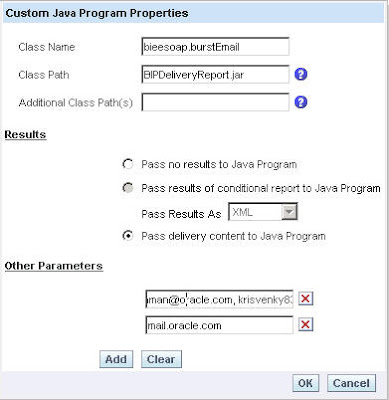
Now, you should be able to send emails out to multiple users. You can use it or customize the above code to your convenience. Let me know if anyone needs the jar file, i will post it here.
Oracle BI EE 10.1.3.3/2 – Combining Multiple Excel Report Outputs(Workbooks) to a Single Excel Report – Using BI Delivers, BI Publisher APIs and VB Scripts
I received this question a couple of days back. The question was “Is there any way to combine say 2 or more number of Report Outputs into a single Excel File automatically, instead of manual exports and copy paste?”. This question keeps coming a lot many times but there is no out of the box solution for this. Lets look at one possible approach today. Remember that this is not an easy way and would involve a call to a lot of components. I am blogging about it just to demonstrate the extensibility of BI EE. In order to achieve this we shall be using 2 reports. Our aim is to use BI Delivers and BI Publisher APIs to export both the reports in Excel 2000 format to a folder. And then use another ibot to call a VBScript to combine all the exported reports to a single excel file. All the ibots will be called one after the other.
1. So, lets start with the Java Code to export the reports in the form of Excel 2000. This Java Code has to be called from an ibot. For more details on how to go about calling Java Classes from ibots check my blog entry here. The code is given below
package bieesoap;import java.io.FileInputStream;
import java.io.FileNotFoundException;
import oracle.apps.xdo.delivery.DeliveryException;
import oracle.apps.xdo.delivery.DeliveryManager;
import oracle.apps.xdo.delivery.DeliveryPropertyDefinitions;
import oracle.apps.xdo.delivery.DeliveryRequest;
import com.siebel.analytics.scheduler.javahostrpccalls.SchedulerJavaExtension;
import com.siebel.analytics.scheduler.javahostrpccalls.SchedulerJobException;
import com.siebel.analytics.scheduler.javahostrpccalls.SchedulerJobInfo;import java.io.File;import oracle.apps.xdo.delivery.local.LocalPropertyDefinitions;public class ExcelOutput implements SchedulerJavaExtension{
public ExcelOutput() {
}public void run(SchedulerJobInfo jobInfo) throws SchedulerJobException {
try
{
String OutputFileName;
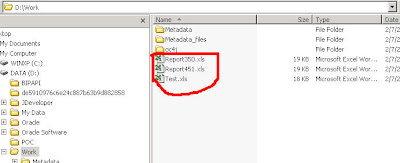
OutputFileName = “D:\\Work\\Report” + jobInfo.jobID() + jobInfo.instanceID() + “.xls”;
FileInputStream fis = new FileInputStream(jobInfo.getResultSetFile());
DeliveryManager dm = new DeliveryManager();
DeliveryRequest req = dm.createRequest(DeliveryManager.TYPE_LOCAL);
req.addProperty(LocalPropertyDefinitions.LOCAL_DESTINATION, OutputFileName);
req.setDocument(fis);
req.submit();
req.close();
}
catch(Exception ex)
{
throw new SchedulerJobException(1, 1, ex.getMessage());
}}public void cancel() {
}}
So what this basically does is, it accepts the output of an ibot and stores it in D:\Work with a dynamic file name based on the Job ID and the InstanceID (Something like this Report240.xls etc).
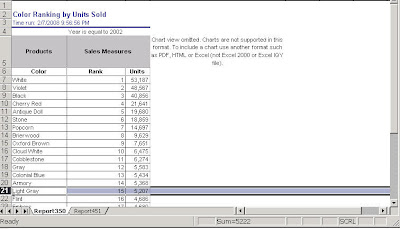
2. Now the next step is to create 2 ibots and each of them should be made to export 2 different files in Excel 2000 format. Ensure that both the ibots call the above java code using a bundled Jar. I have 2 different reports as shown below
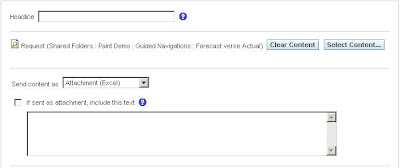
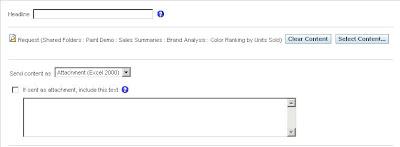
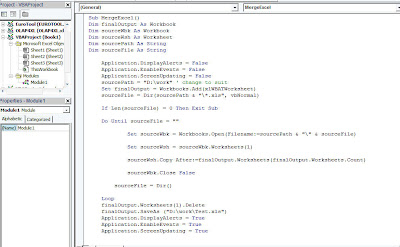
3. Just save the above 2 ibots and make each of them to call the above Java Code. Once this is done, lets move away from BI Delivers and look at the VB Scripting part which would achieve combining of multiple excel files into one excel file. In order to do this, we shall start with a simple VBA or macro script given below.
Sub MergeExcel()
Dim finalOutput As Workbook
Dim sourceWbk As Workbook
Dim sourceWsh As Worksheet
Dim sourcePath As String
Dim sourceFile As StringApplication.DisplayAlerts = False
Application.EnableEvents = False
Application.ScreenUpdating = False
sourcePath = “D:\work” ‘ change to suit
Set finalOutput = Workbooks.Add(xlWBATWorksheet)
sourceFile = Dir(sourcePath & “\*.xls”, vbNormal)If Len(sourceFile) = 0 Then Exit SubDo Until sourceFile = “”Set sourceWbk = Workbooks.Open(Filename:=sourcePath & “\” & sourceFile)Set sourceWsh = sourceWbk.Worksheets(1)sourceWsh.Copy After:=finalOutput.Worksheets(finalOutput.Worksheets.Count)sourceWbk.Close FalsesourceFile = Dir()Loop
finalOutput.Worksheets(1).Delete
finalOutput.SaveAs (“D:\work\Test.xls”)
Application.DisplayAlerts = True
Application.EnableEvents = True
Application.ScreenUpdating = TrueEnd Sub
So, what this basically does is it checks the directory D:\Work and combines all the excel files it finds in that directory into a single file Test.xls.
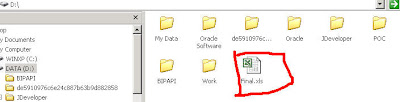
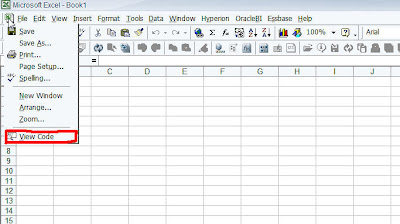
4. Remember the above is a VBA Script. BI Delivers can only call VB Scripts. Now, in order to call VBA Script, what we shall do is to create a dummy excel file called Final.xls in D:\(ensure that this excel file is not in the same directory as the above export files) and we shall create a macro using the above code in this Excel file. Our aim is to make the macro to run as soon as the Excel file is opened.
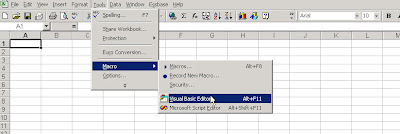
Now, in order to make this macro to run as soon as the Excel is opened, right on the Excel icon just above file menu and click on view code. Go to the Workbook and add the below code.
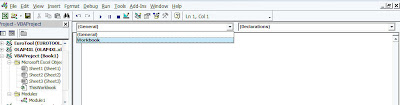
Private Sub Workbook_Open()
Run “MergeExcel”
End Sub
Then just save this file. Also, ensure that you have the security of this Excel file set to Low. Now open a text editor and add the below VB Script which will open the Excel file.
Dim app
Set app = createobject(“Excel.Application”)
app.visible = false
app.Workbooks.Open(“D:\Final.xls”)
app.Quit
Set app = Nothing
Save this file in {OracleBI}\server\Scripts\common folder.
5. Now create a third ibot which would just call the above VBScript.
6. Now schedule all the 3 ibots to execute one after the other (you can either use ibot chains or just schedule them to execute one after the other). Its better to use ibot chains since they are synchronous in nature. Now you should see 3 excel reports in the D:\Work directory, 2 being the actual reports and the third being the Test.xls which would be a combination of the above 2.
But just remember the above would work only in windows since VBScript would not work in a non-windows environment
Oracle BI EE 10.1.3.3/2 – Adding Watermarks to Delivered PDF Documents – Using PDF Merger API of BI Publisher
In the previous blog entry we have seen how to go about delivering documents to a local file system using the Delivery Manager API of BI Publisher. Along the same lines, lets look at another very interesting feature which is the PDF WaterMarking feature. Many a time you might want to watermark your documents (especially PDFs) when you send out to multiple users via iBots. Watermarking is not available out of the box for BI EE. This is where BI Publisher can come to our rescue ( i always wonder how both BI EE and BI Publisher complement each other some times). In order to do watermarking, we need to use the PDF Merge API of BI Publisher and then call it from ibots. Lets look at the list of steps below. In the example below, i shall be adding an Oracle Logo as the watermark to a delivered BI EE PDF document.
1. The first thing that you need is the following sample java code which combines your PDF output with a local image. This has to be included as part of the scheduler’s run method since the remote procedure call will only call this run method.
package bieesoap;import java.io.FileInputStream;
import oracle.apps.xdo.common.pdf.util.PDFDocMerger;
import com.siebel.analytics.scheduler.javahostrpccalls.SchedulerJavaExtension;
import com.siebel.analytics.scheduler.javahostrpccalls.SchedulerJobException;
import com.siebel.analytics.scheduler.javahostrpccalls.SchedulerJobInfo;import java.io.File;import java.io.FileOutputStream;import oracle.apps.xdo.delivery.DeliveryManager;
import oracle.apps.xdo.delivery.DeliveryRequest;
import oracle.apps.xdo.delivery.local.LocalPropertyDefinitions;public class PDFMerge implements SchedulerJavaExtension{
public PDFMerge() {
}public void run(SchedulerJobInfo jobInfo) throws SchedulerJobException {
try
{
FileInputStream[] inputStreams = new FileInputStream[1];
inputStreams[0] = new FileInputStream(jobInfo.getResultSetFile());
FileOutputStream outputStream = new FileOutputStream(“D:\\BIPAPI\\Output4.pdf”);PDFDocMerger docMerger = new PDFDocMerger(inputStreams,outputStream);
FileInputStream imagePath = new FileInputStream(“D:\\BIPAPI\\oraclelogo_small.gif”);
float[] rct = {300f, 500f, -1f, -1f};
docMerger.setImageWatermark(imagePath, rct);
docMerger.mergePDFDocs();
docMerger = null;imagePath.close();
outputStream.close();
}
catch(Exception ex)
{
throw new SchedulerJobException(1, 1, ex.getMessage());
}}public void cancel() {
}}
As you see above, what this does is, it calls the PDFDocMerger class. This class accepts 2 inputs, a stream of pdf inputs and a pdf output. It also accepts the setImageWatermark property which will set the watermark to the pointed image.
2. Compile this class and bundle this as a jar along with the dependent jars (schedulerrpccalls.jar, versioninfo.jar and xdocore.jar). For more details on how to do this refer my blog entry here and here
3. Now go to delivers and create an ibot. This ibot should contain a report exported in the PDF format. This PDF of the report will be watermarked with Oracle Logo.
4. Once this is done, now go to your Advanced tab and call the class that we created above.

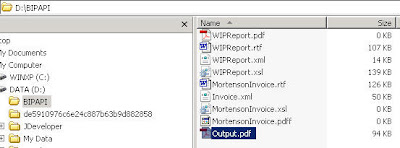
5. Now save this ibot. As soon as this is done, you would notice that a new file called output4.pdf under D:\\BIPAPI would have been created and this would contain both the report and the watermark image.
Just add delivery manager API code to the above class and now you would be in a position to send the watermarked PDF to other users.This feature can be extended to a lot of other features like combining multiple reports into a single PDF etc.
Oracle BI EE 10.1.3.3/2 – Calling BI Publisher Java APIs from iBots – Storing reports in File System Using Delivers and BI Publisher Scheduler
If you had gone through my previous blog entry here i would have talked about the means of storing BI EE reports on a periodic basis using Java Scripts. But one of the main problems with this is that it would not work in an Unix environment. So, now lets look at an approach to store the BI EE report outputs using Java APIs of BI Publisher and Delivers. But as a pre-requisite you need to go through the above mentioned blog entry to understand how Java Classes are called from BI Delivers. Now in this example, we shall be using BI Publisher Delivery Manager Java APIs and will be calling these APIs from iBots. Lets look at the steps one by one.
1. The first step to achieve this is to create the Java Class containing the relevant code. I have used JDeveloper 10.1.3.2. In order for the below code to work you need to have 3 jar files included. They are xdocore.jar, versioninfo.jar and schedulerrpccalls.jar. You can find xdocore.jar and versioninfo.jar in {OracleBI}\oc4j_bi\j2ee\home\applications\xmlpserver\xmlpserver\WEB-INF\lib. And you can find schedulerrpccalls.jar in {OracleBI}\web\javahost\lib\scheduler. Now compile the below given code and bundle it as a jar file. To know how to bundle it as a jar check the blog entry mentioned above. Remember, while deploying it as a jar you need to include the above mentioned 3 dependency jars too.
package bieesoap;import java.io.FileInputStream;
import java.io.FileNotFoundException;
import oracle.apps.xdo.delivery.DeliveryException;
import oracle.apps.xdo.delivery.DeliveryManager;
import oracle.apps.xdo.delivery.DeliveryPropertyDefinitions;
import oracle.apps.xdo.delivery.DeliveryRequest;
import com.siebel.analytics.scheduler.javahostrpccalls.SchedulerJavaExtension;
import com.siebel.analytics.scheduler.javahostrpccalls.SchedulerJobException;
import com.siebel.analytics.scheduler.javahostrpccalls.SchedulerJobInfo;import java.io.File;import oracle.apps.xdo.delivery.local.LocalPropertyDefinitions;public class LocalCopy implements SchedulerJavaExtension{
public LocalCopy() {
}public void run(SchedulerJobInfo jobInfo) throws SchedulerJobException {
try
{
FileInputStream fileInputStr = new FileInputStream(jobInfo.getResultSetFile());
DeliveryManager delMan = new DeliveryManager();
DeliveryRequest delReq = delMan.createRequest(DeliveryManager.TYPE_LOCAL);
delReq.addProperty(LocalPropertyDefinitions.LOCAL_DESTINATION, “D:\\BIPAPI\\Output.pdf”);
delReq.setDocument(fileInputStr);
delReq.submit();
delReq.close();
}
catch(Exception ex)
{
throw new SchedulerJobException(1, 1, ex.getMessage());
}}public void cancel() {
}}
This is how the above code works. When we include a Java Class from an ibot, the ibot uses the Java Host service to make a remote procedure call to the Run method of the class specified. jobInfo object would get the output of the ibot (say a PDF file) and will pass it on to the Delivery manager API of BI Publisher. The delivery manager API then makes a call to the file system to store the PDF file to a local directory.
2. Copy the deployed jar file to your java host lib path(check the above blog entry to know where to specify this path).
3. Now create an ibot and include any report content. Ensure that you are making the output type to be of PDF since we are making the above output file name to be output.pdf. Go to the Advanced properties and add a Java Class as shown below.

This can be very useful for advanced integration scenarios. You can even call the BI Publisher FOProcessor API to actually create the BIP reports and can use Delivers to deliver them. There are lots of different functionalities where this can be very helpful.
Oracle BI Publisher 10.1.3.3.1 – Creating Applications using JDeveloper 11g and Web Service SOAP APIs
I had some time today to see how easy it is to create a sample application that would basically call a BI Publisher web service and then run a report. Well if you had seen my previous blog entry on this here, i would have mentioned that i was not able to get the sample code provided in the documentation to work. Well, so far still i could not figure out the additional jars required. So we would be using a different approach here to test out these web services. Before going further, let me first list out the components and their versions that i would be using for this
1. JDeveloper Tech Preview 3 – Yes this is a new year gift(though released by the end of December). JDev has never been any better. So many changes in UI and features and many more are coming in the 11g release.
2. BI Publisher 10.1.3.3.1 (without the latest patchset).
2. BI Publisher 10.1.3.3.1 (without the latest patchset).
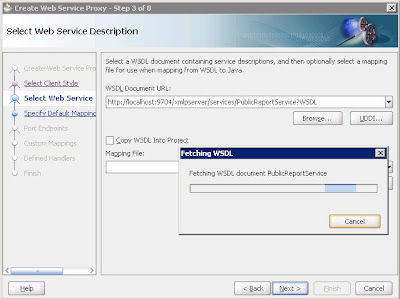
Now, the first thing that we need to do for testing this to see whether we are able to access the WSDL of the BIP web services. To check this just open a browser and enter the below URL.
http://localhost:9704/xmlpserver/services/PublicReportService?WSDL
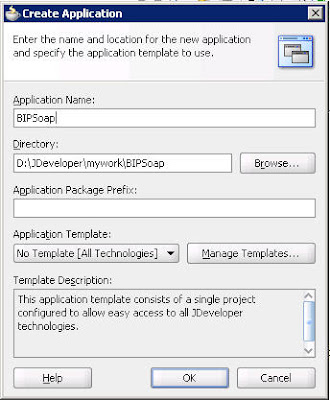
Once this is done open up the JDev Tech Preview 3 Console and start with creating a new application (without any template). In my case the application and all the project names would be bipsoap.
Now create a new web service proxy. Here we would be entering all the details regarding the BIP WSDL.
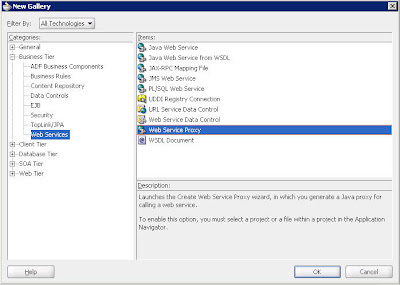
Use JAX-RPC as the Web Service Client type and enter the WSDL URL that we used above. Do not make any changes to the port end points (every other step will be having the default values. No changes required).
Now this would automatically create a java file containing the relevant code. Now go to the main method of this java file and in the Try block enter the below piece of code
// @GeneratedBlockBegin (value={“oracle.j2ee.ws”} );
samplesoap.proxy.PublicReportServiceClient myPort = new samplesoap.proxy.PublicReportServiceClient();
// @GeneratedBlockEnd (value={“oracle.j2ee.ws”} );
String userName = “Administrator”;
String passWord = “Administrator”;System.out.println(“calling ” + myPort.getEndpoint());
System.out.println(myPort.validateLogin(userName,passWord));ReportRequest repReq = new ReportRequest();
ReportResponse repRes = new ReportResponse();repReq.setAttributeFormat(“pdf”);
repReq.setAttributeLocale(“en-US”);
repReq.setAttributeTemplate(“World Sales”);
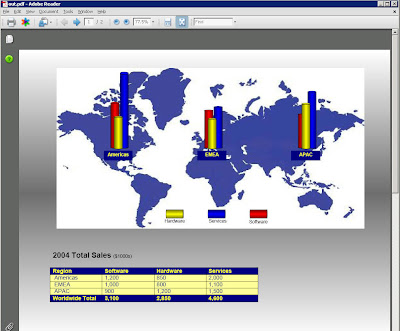
repReq.setReportAbsolutePath(“/Sales Manager/World Sales/World Sales.xdo”);repRes = myPort.runReport(repReq,userName,passWord);
System.out.println(repRes.getReportContentType());byte[] binaryBytes = repRes.getReportBytes();
OutputStream out = new FileOutputStream(“D:\\out.pdf”);
out.write(binaryBytes);
out.close();
System.out.println(“Success for Run Report”);
What this code does it runs the World Sales report (present under Sales Manager -> World Sales) and exports it into PDF format in the local D drive. Lets try to understand the code above.
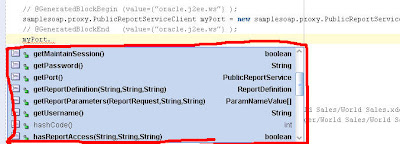
samplesoap.proxy.PublicReportServiceClient myPort = new samplesoap.proxy.PublicReportServiceClient();
The above instantiation opens up myPort which would your service handle. So, in JDeveloper if you type myPort. and press Ctrl+Space you can find all the methods that have been exposed in the BIP webservice.
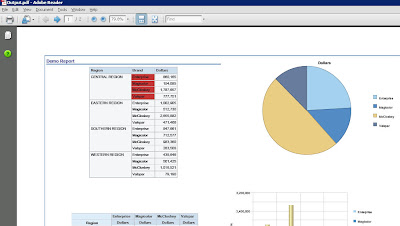
Now compile this report and run it. If you get Success for Run Report in the output window, then go to your D drive. You would find out.pdf which would contain the report in a PDF format.
Very simple but again can be very useful when you are doing custom integration. You dont have to have any more of xdo related jar files in your code (Java APIs). All you need is the service handle!!!
Oracle BI Publisher and BI EE – Invisible Admin Tab!!!
I had a couple of users today who had sent me an email informing me about a strange issue while installing BI EE. Call it coincidence, we had the same question pop up in the forums today as well. I do not have a complete solution to this problem yet. But i thought this is worthwhile to blog about since there are chances that other users might come across a similar issue. The problem was, after the default install of 10.1.3.3.1/0(using OC4J), the users are unable to perform any kind of administration on BI Publisher. i.e if they log into BI Publisher as Administrator, they do not see the “Admin” tab!!!. There can be multiple reasons why this can happen. But following should give you a general set of guidelines on where to look at to see where the source of the problem is.
When you install BI EE, the BI Publisher that also gets installed would be configured to use BI Server security. So, in order to access BI Publisher you need to ensure that BI Server and the Presentation Services(if you want reports from Answers as data source) are up and running. There are 3 different files that are worth a mention here.
1. {OracleBI}\xmlp\XMLP\Admin\Configuration\xmlp-server-config.xml
2. {OracleBI}\xmlp\XMLP\Admin\Security\principals.xml
3. {oc4j_bi}\j2ee\home\applications\xmlpserver\xmlpserver\WEB-INF\xmlp-server-config.xml
Now, each of these files store certain parameters that would be used in the security and also in identifying the reports. So, if you have an install where your BI Publisher does not show you the Admin tab, try to check the following.
1. Open the file {OracleBI}\xmlp\XMLP\Admin\Configuration\xmlp-server-config.xml using a text editor. Go to {OracleBI}\xmlp\XMLP\Admin\Configuration\xmlp-server-config.xml. Check whether you have SUPERUSER_PASSWORD and SUPERUSER_USERNAME set. Also check whether SECURITY_MODEL property is properly set.

Edit the property SECURITY_MODEL and change it to XDO. i.e. for example <property name=”SECURITY_MODEL” value=”XDO”/>. This would basically change the security model from BI Server security to BI Publisher Security.
2. Restart OC4J and see whether you are able to log in as Administrator and see the Admin tab. If you are able to see the Admin tab then there is some problem with BI Publisher not being able to connect to BI Presentation Services in order to leverage the security. By default, when we install BI EE, BI Publisher would use BI Server security. By changing it to XDO we are making it to leverage local BI Publisher security instead of BI EE security. In the {OracleBI}\xmlp\XMLP\Admin\Configuration\xmlp-server-config.xml, try placing the ip instead of the hostname. For example, <property name=”BI_SERVER_SECURITY_URL” value=”jdbc:oraclebi://vejanaki-pc:9704/”/>. Default install will take the hostname and in some cases BI Publisher does not seem to recognize the hostname.
3. Go to {OracleBI}\xmlp\XMLP\Admin\Security\principals.xml. Check whether you the Administrator Role mapping is enabled there.
The above are some checks that should get you started. If others have any other comments feel free to post them here. In the meantime, i am off for a mini vacation to celebrate the festival of lights!!!. Should be back next week with more posts.