Purpose
This tutorial mainly covers how to get started with Oracle Business Intelligence Publisher, and how to create highly formatted reports using BI Publisher based not only on conventional data sources (such as Oracle Database) but also on various other data sources (such as Web Services, RSS feeds, and so on). It also covers how to create reports with parameters and list of values (LOVs).
Because BI Publisher is integrated with Oracle Business Intelligence Enterprise Edition, you will learn how to create reports based on Oracle BI subject area and Oracle BI Answers request. You will also learn how to create RTF templates in MS Word by connecting to BI Publisher, and publish these templates for the reports to view data in BI Publisher. You will learn to configure the BI Publisher scheduler to schedule reports and view the saved data.
Because BI Publisher is integrated with Oracle Business Intelligence Enterprise Edition, you will learn how to create reports based on Oracle BI subject area and Oracle BI Answers request. You will also learn how to create RTF templates in MS Word by connecting to BI Publisher, and publish these templates for the reports to view data in BI Publisher. You will learn to configure the BI Publisher scheduler to schedule reports and view the saved data.
Overview
Oracle BI Publisher (formerly known as XML Publisher) is a revolutionary reporting and document output management solution from Oracle. Oracle BI Publisher report formats can be designed using Microsoft Word or Adobe Acrobat, the tools that are easy to use, and most users are already familiar with. Oracle BI Publisher also allows you to create reports from multiple data sources.
Oracle BI Publisher can be used as a stand-alone reporting product or integrated with the Oracle Business Intelligence Suite Enterprise Edition. You will start by logging in to BI Publisher and create reports from various data sources, such as Oracle Database, Web services, RSS feeds, and Files. You will also create parameterized report that uses LOVs.
Because BI Publisher is integrated with Oracle BI Enterprise Edition, you can also create the BI publisher reports based on Oracle BI Answers request, and also based on Oracle BI Server subject area. However, these topics are briefly discussed in this tutorial. For more details, you can refer to the OBE titled "Integration of Oracle BI Publisher with Oracle Business Intelligence Enterprise Edition, 10.1.3.2."
Also, you will be guided through the steps to create and publish RTF templates in MS Word by connecting to BI Publisher. You will also schedule the report, and view the saved data.
Scenario
You will be using various data sets for this OBE. For example, you will create a simple employee salary report based on the human resources (HR) sample schema of the Oracle Database. For the File data set, you will use the demo files and templates that are provided with BI Publisher. For the BI Answers request and BI Server subject area, SH.rpd is used, which is based on the SH schema of the database, and so on.To continue with the steps listed in the topics, you should have installed the required software and performed the other setup as mentioned in the following topic, Prerequisites.
Before starting this tutorial, you should:
| 1. |
Have access to or have installed Oracle Database 10g (preferably version 10.2)
|
| 2. |
Have access to or have installed the sample schemas (HR, OE, and SH specifically)
|
| 3. | Have access to or have installed Oracle BI Publisher and Oracle BI Publisher Desktop 10.1.3.2.
You can install BI Publisher Desktop by clicking the Template Builder link in BI Publisher:
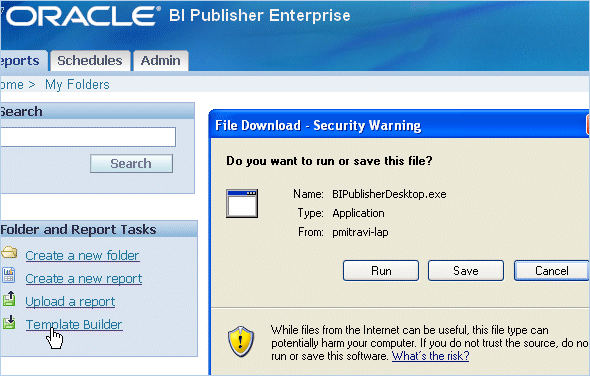
When you have successfully installed BI Publisher Desktop, the BI Publisher menu and BI Publisher toolbars are displayed in MS Word.
Note: Oracle BI Publisher Desktop was formerly known as Template Builder, and is mainly used for building the RTF templates for BI Publisher reports in MS Word. |
| 4. | Have created a user for installing the BI Publisher scheduler schema tables by performing the following: Create a BIPSched user with the required privileges in the database by logging in to SQL* Plus as the sys or system user: SQL> create user bipsched identified by bipsched default tablespace users temporary tablespace temp quota unlimited on users; SQL> grant connect, resource to bipsched; Note: The name of the user can be any appropriate name. |
| 5. | Have set up the proxy parameters (to avoid any firewall problems with the Web Services and RSS data set reports) in the xmlpserverstart.bat file or the oc4j.cmd file as per your installation. Modify the following line, which defines JAVA_HOME. (Observe the proxy parameters in bold.):
|
If you want to create reports based on Oracle BI Answers request and Oracle BI Server subject area, then you should also:
| 1. |
Have access to or have installed Oracle BI EE 10.1.3.2 including Oracle BI Publisher and Oracle BI Publisher Desktop 10.1.3.2.
You can follow the instructions as listed in the OBE " Installing the Oracle Business Intelligence Suite Enterprise Edition on Windows."
|
| 2. |
Have created an ODBC connection to the Oracle Database, and set up the SH.rpd metadata repository by following the steps listed in the OBE "Creating Interactive Dashboards and Using Oracle Business Intelligence Answers." Also, it is strongly recommended that you go through this tutorial to know the steps involved in creating an Answers request, creating a dashboard page, and so on.
|
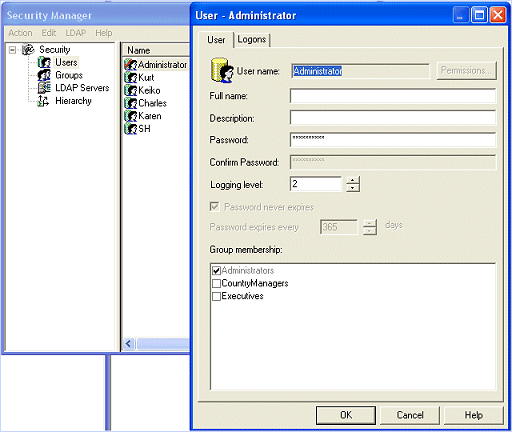
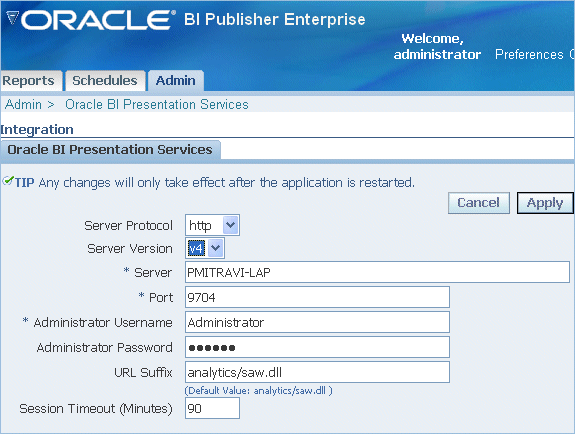
| 3. | Have set up the integration between BI Publisher and Oracle BI EE: If you have included BI Publisher Enterprise, when you installed Oracle BI Enterprise Edition, then Oracle BI installer will set up the integration with the Presentation Services, by setting host name, port, and URL values. However, you need to set the Administrator password from the BI Administration tool as follows:
If the Integration with Presentation Services is not set up at the time of Oracle BI EE installation, you can also set up this integration from BI Publisher as follows:
 |
For getting started with BI Publisher, perform the steps listed in each of the following subtopics:
Logging In to Oracle BI Publisher:
To log in to BI Publisher, perform the following steps:
1.
| Enter the URL for BI Publisher in a browser window which is of the format: http://<hostname>:<port>/xmlpserver/ (for example, http://localhost:9704/xmlpserver/) The Log In screen for the BI Publisher appears. Enter Administrator as the Username and Password. Click Sign In.  Note: Ensure that you have the correct password for the Administrator user in BI Publisher, else you may face problems in logging in to BI Publisher.
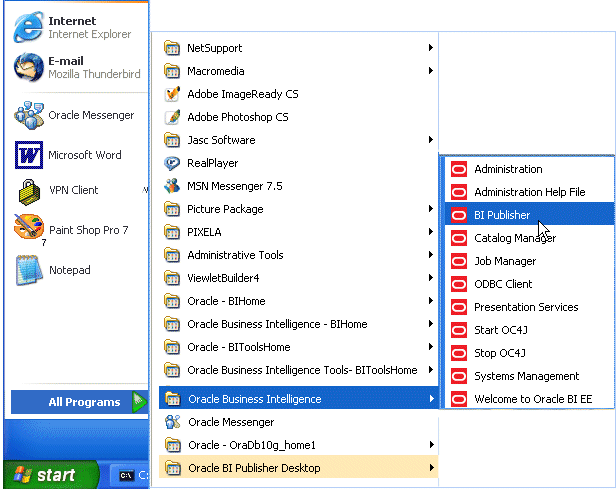
Also, on Windows, depending on the type of installation you have done, you can invoke BI Publisher as follows:
|
| 2. | This displays the Welcome screen for BI Publisher.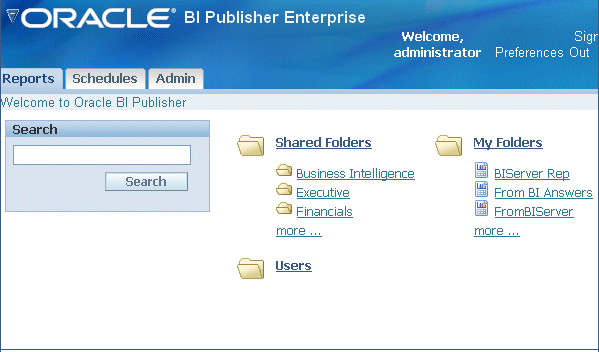 Note: As you have logged in as the Administrator, the welcome page displays the Reports, Schedules, and Admin tabs. For the users who do not have administrator privileges, the Admin tab is not displayed. |
Setting Preferences
To change the preferences, perform the following steps:
| 1. | Click Preferences link. (highlighted in the screen below): The Preferences screen is displayed with the General Preferences and Account tabs. 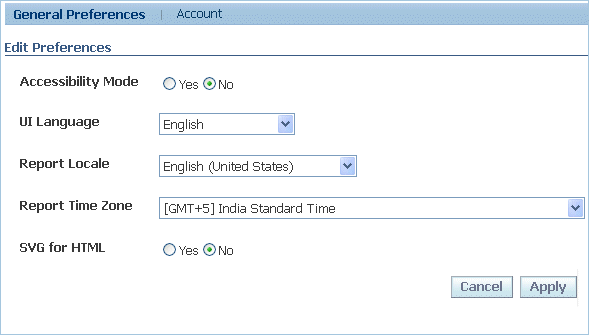 |
| 2. | Observe the options on the General Preferences tabbed page, and select the appropriate options for UI Language, Reports Locale, Reports Time Zone according to your requirements. Click Apply. 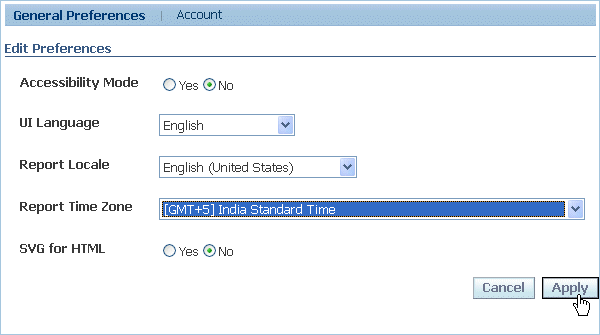 Note: You can also enable the accessibility option. |
| 3. | To edit the password settings for the Administrator account, click the Account tab. Change the password for Administrator as required by entering the current and new passwords in the screen. Click Apply to save the preference settings. 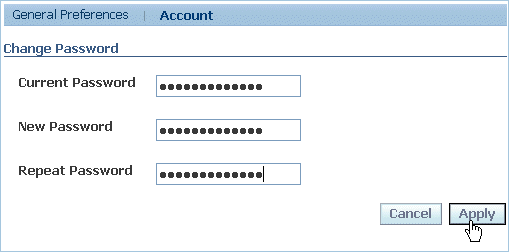 Note: If you have installed BI Publisher along with Oracle BI Enterprise Edition, for the integration between these to work, for any given user account , you should set the same password in BI Administration Tool and in BI Publisher. (Refer to Prerequisites section for setting up integration between BI Publisher and Oracle BI EE.) |
In this topic, you will create an employee salary report based on the HR schema of Oracle Database. To create a BI Publisher report based on a query directed to Oracle Database, perform the following steps:
| 1. | Before you create a query based on Oracle Database, you need to define the connection details in the Admin tab. Click the Admin tab. Click JDBC Connection found under the Data Sources section of the page.  |
| 2. | In the JDBC Data Sources screen that is displayed, click demo to edit the connection details for this data source. Note: You can also add a new data source and define the connection details. |
| 3. | In the Update Data Source screen, enter the following details: Connection String: This is of the format: jdbc:oracle:thin:@<Host name>: <Port>:<SID>, for example, a sample connection string may look like: jdbc:oracle:thin:@myhost:1521:orcl User Name: oe Password: oe Database Driver Class: oracle.jdbc.driver.OracleDriver (This is the default.) Do not click Cancel or Apply. 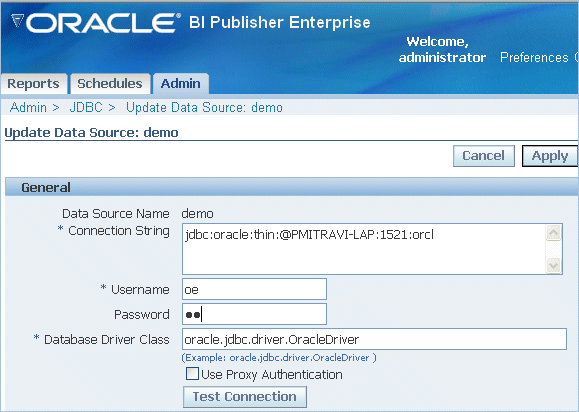 |
| 4. | After entering the above details, click Test Connection. When the confirmation message is displayed saying that the connection is established successfully, click Applyto save the connection details. 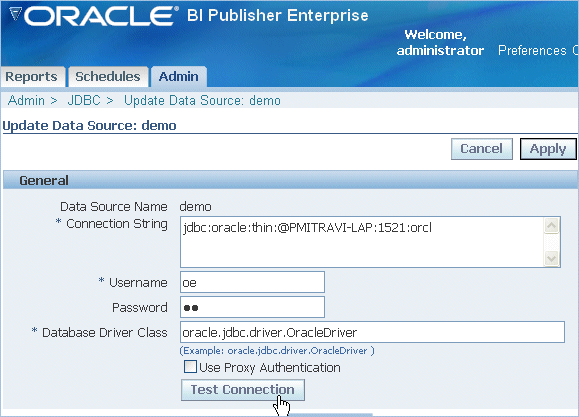 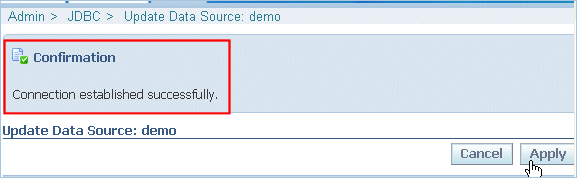 Note: OE schema also gives access to HR schema. |
| 5. | Click Reports to go back to the Reports page. Click My Folders , and click Create a New Folder link (found in the Folder and Report Tasks section). Enter Learn as the folder name and click Create. (You will save the reports you create in this tutorial in this folder.) 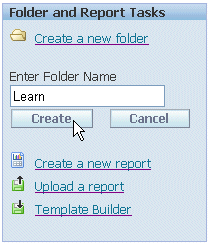 |
| 6. | To create report based on Oracle Database, navigate to My Folders > Learn, and click Create a New Report. Enter Based on OracleDB as the name of the report, and click Create. 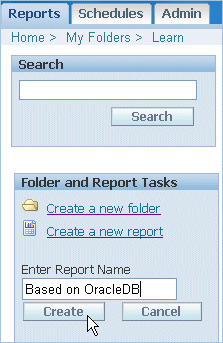 |
| 7. | The report is displayed in the Learn folder in BI Publisher. Click the Edit link under the name of the report to open the report in Edit mode. 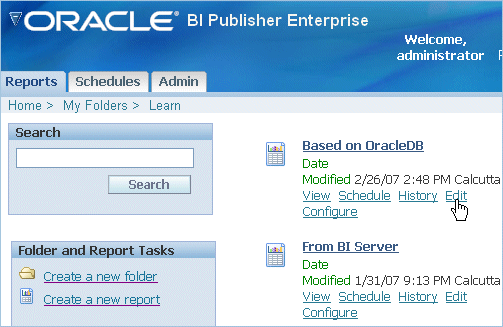 |
| 8. | In the General Settings section of the Report Properties, select demo from the Default Data Source drop-down list. Click the Save 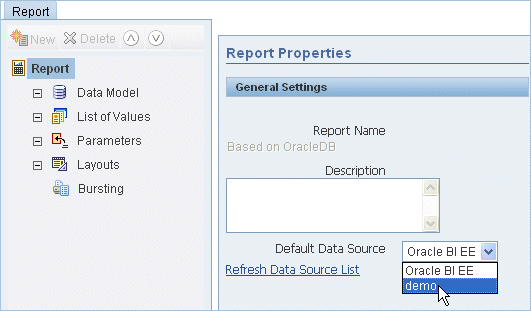 |
| 9. | Click Data Model and click New to define the data source for this report. |
| 10. | In the Data Set screen that appears, ensure that SQL Query is selected as Type, and demo is selected as Data Source. Select the Cache Results check box, and click Query Builder to define the query. 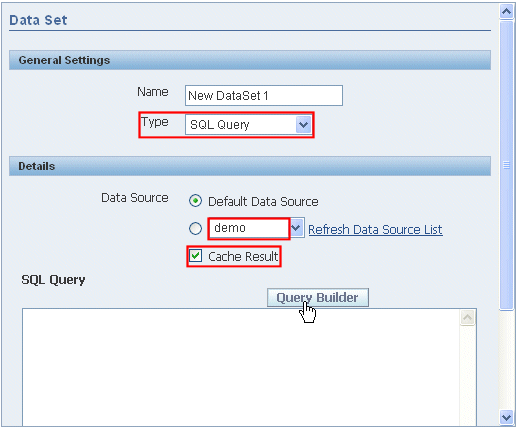 |
| 11. | The Query Builder screen appears, ensure that HR is selected from the Schema drop-down list. This displays objects from HR schema on the left. Click EMPLOYEES and DEPARTMENTS tables to add them to the Model canvas on the right. 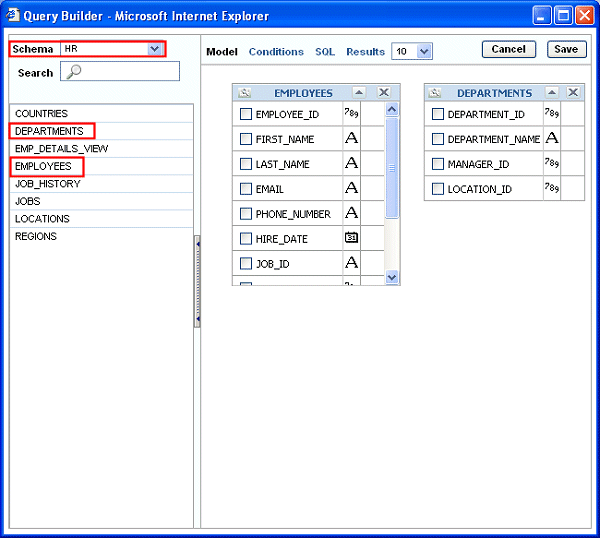 |
| 12. | Define a join between these two tables as follows: Click the box beside the DEPARTMENT_ID column in the DEPARTMENTS table. (See the following screens.) Similarly click the box beside the DEPARTMENT_ID column in the EMPLOYEES table. These boxes when marked for joins turn to light gray. Also note that a fine line joining the tables appears in the Model canvas. Hint: Take the help of the screens below:  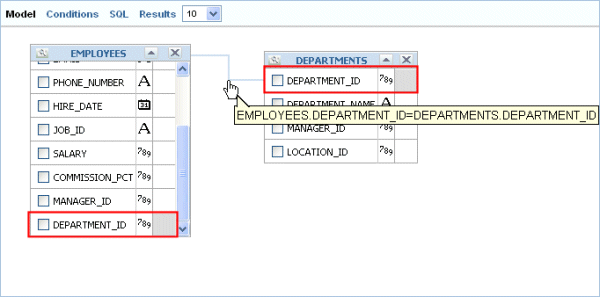 |
| 13. | Select the following columns from the tables (by selecting the check boxes beside the column names): -Select FIRST_NAME, LAST_NAME, HIRE_DATE, and SALARY columns from the EMPLOYEES table -Select DEPARTMENT_NAME from the DEPARTMENTS table. (See the following screen.)  |
| 14. | Click Conditions, and move the DEPARTMENT_NAME, to appear first in the list (as shown in the screen below). You can use these icons 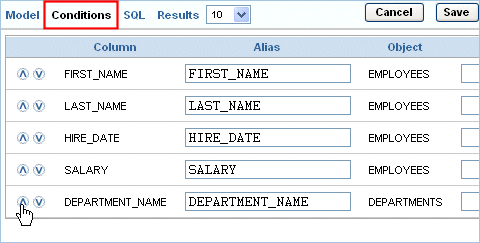 Similarly, move SALARY and other columns, so that the final list appears like this: 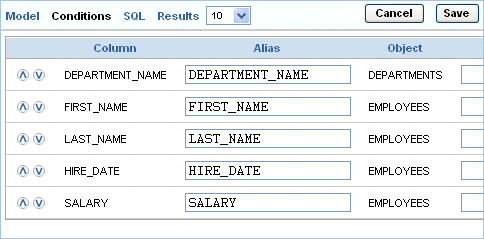 |
| 15. | Click Results to see how the query results appear in Query Builder. Click Save to save the query. 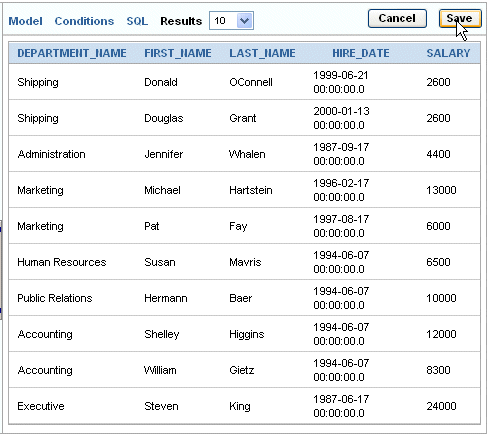 |
| 16. | This will take you back to the Data Set screen, with the query you created reflected in the SQL Query text area. Click Save 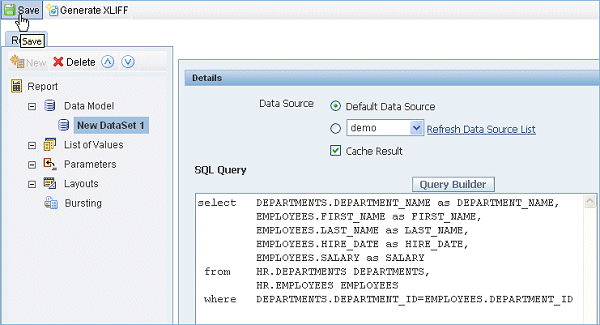 |
| 17. | If required, you can further edit the query manually. For example, instead of displaying the FIRST_NAME and LAST_NAME columns separately, you may want to concatenate both these columns and display this as a single column EMPLOYEE_NAME. So you can modify the query as: select DEPARTMENTS.DEPARTMENT_NAME as DEPARTMENT_NAME, EMPLOYEES.FIRST_NAME || ' '||EMPLOYEES.LAST_NAME as EMPLOYEE_NAME, EMPLOYEES.HIRE_DATE as HIRE_DATE, EMPLOYEES.SALARY as SALARY from HR.DEPARTMENTS DEPARTMENTS, HR.EMPLOYEES EMPLOYEES where DEPARTMENTS.DEPARTMENT_ID=EMPLOYEES.DEPARTMENT_ID 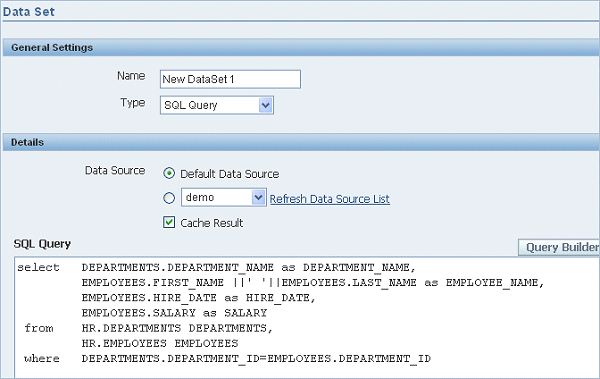 Click Save Note: Ensure that a space is included in the query (as in the example) between the FIRST_NAME and LAST_NAMEcolumns in the concatenation string of EMPLOYEE_NAME. Also, note that once you have edited the query manually, you will not be able to edit the query in Query Builder. |
| 18. | Click View to view the report. Because you have not defined a template, you can view only XML data. Click View again to view the XML data. 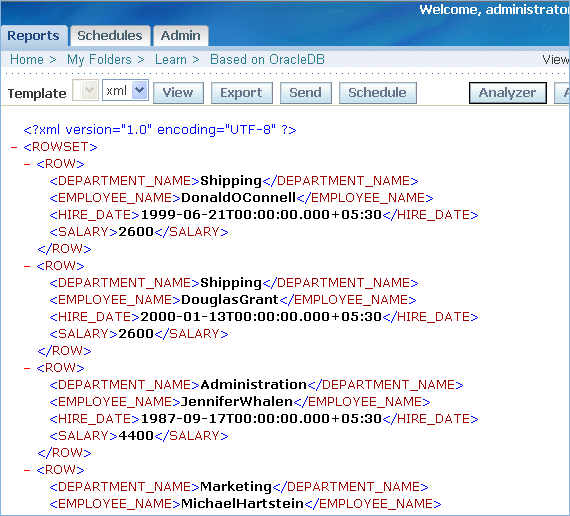 Note: You may not be able to interpret the XML data, but you may want to check whether the BI Publisher report is returning some valid data by viewing the XML data before creating a template for the report. Creating and publishing templates is covered in the next topic. |
In this topic, you create RTF template for a BI Publisher report and publish it. You will also work with multiple templates for a report, and view the report data using these templates in various formats.
Note: All the subtopics in this topic are continuous, so follow the instructions, and do not close any applications or windows as mentioned in the steps.
Creating an RTF Template with a Table and Chart
| 1. | Start the MS Word application from the program menu. From the Oracle BI Publisher menu, select Log On.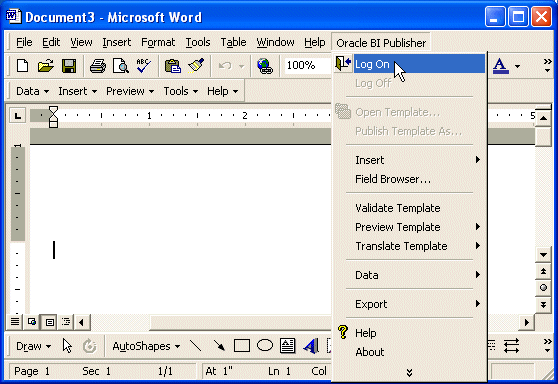 Note: The Oracle BI Publisher menu is displayed in MS Word only when you have successfully installed the Oracle BI Publisher Desktop as mentioned in step 3 of the Prerequisites section. Also, observe the BI Publisher toolbar in MS Word, with the Data, Insert, Preview, Tools, and Help menus. Observe the various options in these menus. 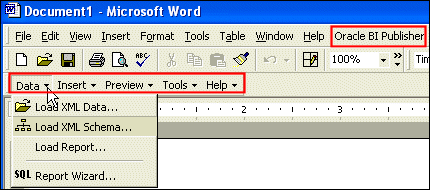 |
| 2. | In the Login screen that appears, enter Administrator as the Username and Password, and click Login. The first time when you connect, you may be asked for the report server URL, enter the URL which is of the format: http://<Host>:9704/xmlpserver 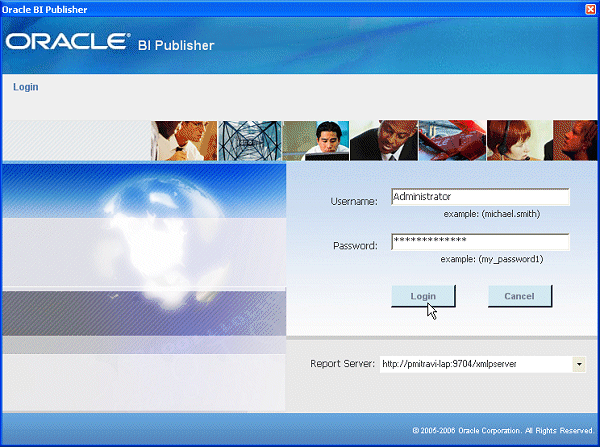 |
| 3. | This displays the Open Template window. Ensure that BI Publisher is selected from the Workspace drop-down list. Navigate and select the Based on Oracle DB report that you have created from My Folders> Learn. Click Open Report.  Note: When you open the report you will not see any data in the MS Word document, but this will load the XML data definitions from the query to facilitate the defining of a template. |
| 4. | In the Word document that loads this report, select Insert> Table Wizard on the BI Publisher toolbar to define a format for the table data in the query. |
| 5. | This displays the Table Wizard. Select Table and click Next. |
| 6. | In the next step, ensure that ROWSET/ROW is selected as the Grouping Field, and click Next.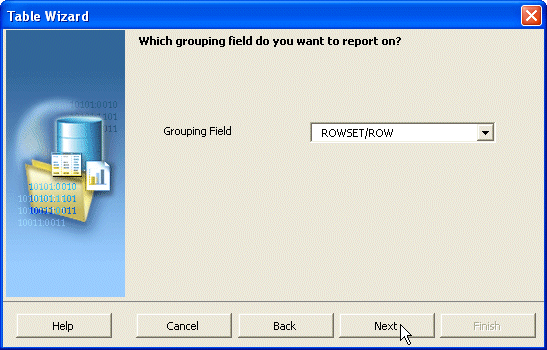 |
| 7. | In the next step, click Click Next. 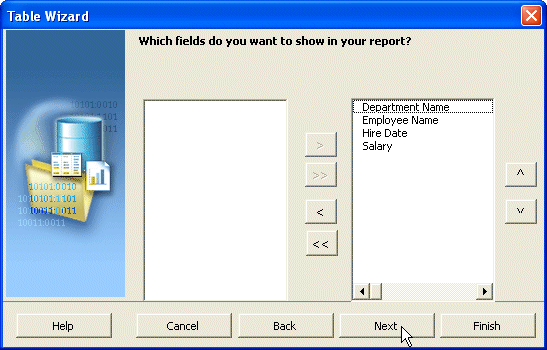 |
| 8. | In the next step, select Department Name from the Group By drop-down list, ensure that the Group above option is selected, and accept the defaults for other options. Click Next.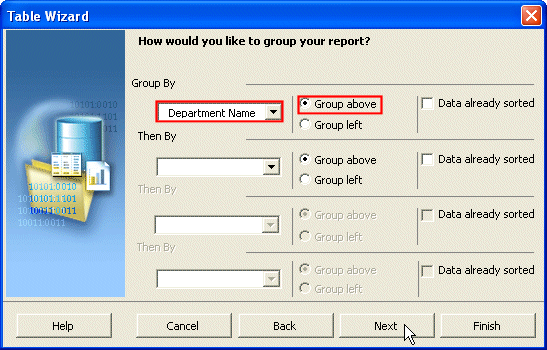 |
| 9. | In the next step, select Salary from the Sort By drop-down list, and select the options Descending and Number to sort the Salary column in descending order. Click Next.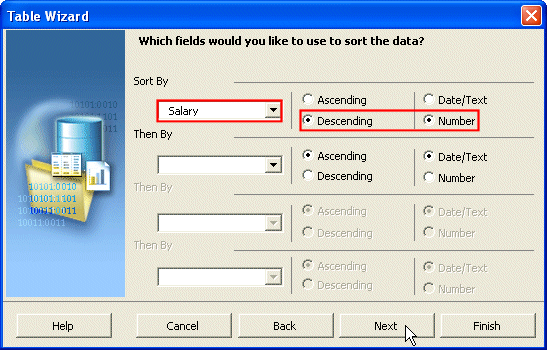 |
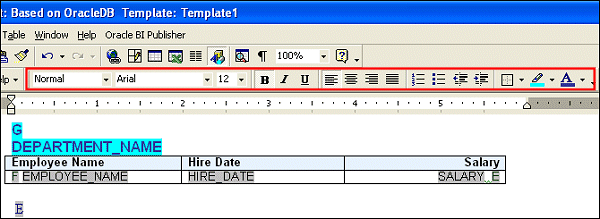
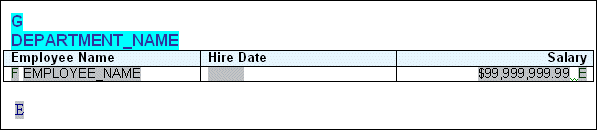
| 10. | In the next step you can edit the labels of the columns as required. Accept the defaults and click Finish. The template you created looks like this:  Important Note: The BI Publisher Desktop Template Builder has just created a table for you. Notice the words and letters with the gray background. These are called form fields. Form fields are Word objects that allow you to reference other data (for example, a mail merge letter). BI Publisher uses form fields in two ways:
Also, you can additionally use MS Word's native formatting features on this template, such as changing the background and text colors, adding a title, and so on. This is covered in the next topic. |
| 11. | You can also add a chart in the template. For example, you can add a chart to display the average employee salaries by department in this report. To add a chart to the template, select Insert > Chart. 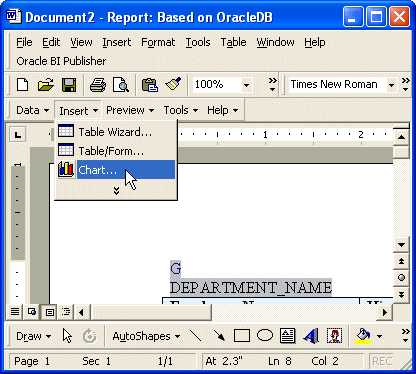 |
| 12. | In the Chart window that appears, define the graph characteristics by following the instructions listed below carefully:
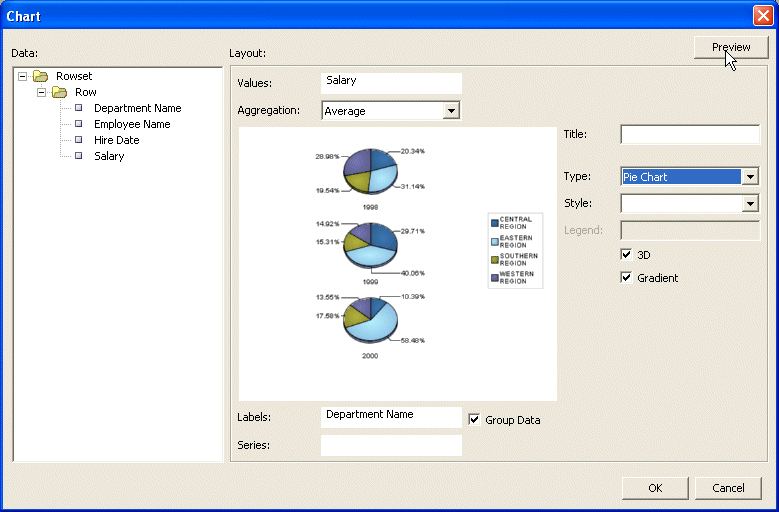  Note: If you do not like the style and type of the graphs in the preview, you can change them after the preview or later. |
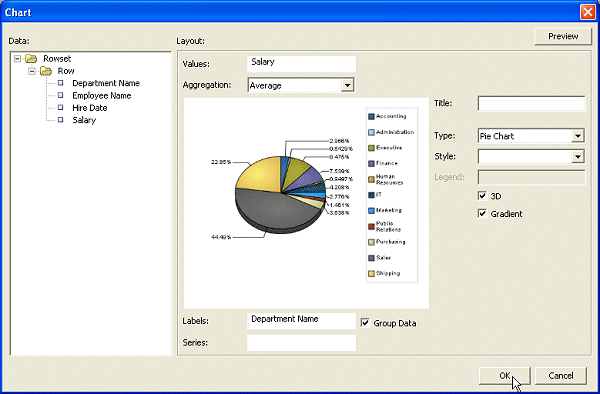
| 13. | Now the template along with the graph in the Word document looks like this: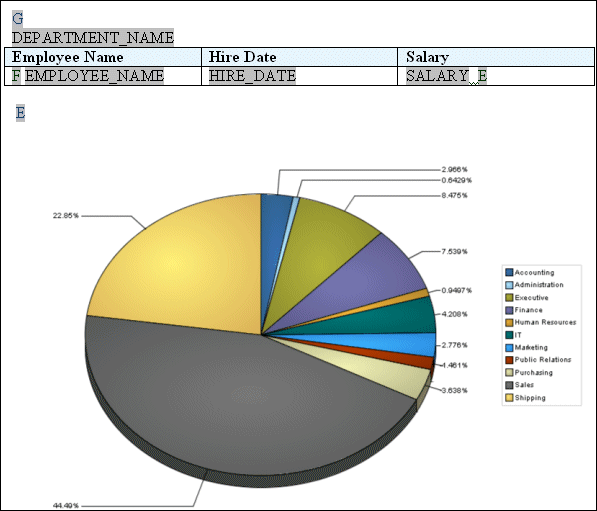 |
| 14. | Select the File> Save As option. Enter Based_On_OracleDB.rtf as the name of the template, and click Save. Do not close the file or log out of BI Publisher. 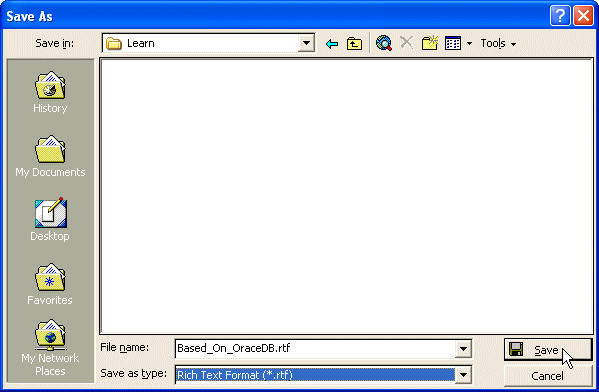 Note: You can save the file in any local folder on your system, but you have to save the template in the .rtf format (not in the .doc format). |
| 15. | You can also preview how the template looks like with the data by selecting Oracle BI Publisher> Preview Template, and then selecting a format like PDF to view the data.  The data looks like this: 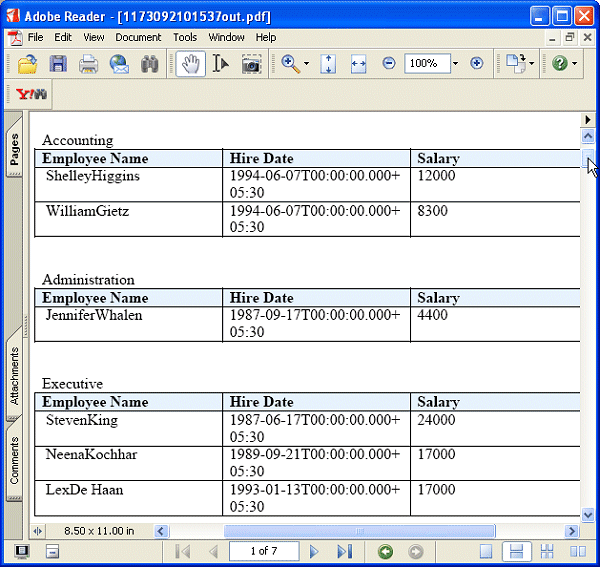 The graph looks like this: 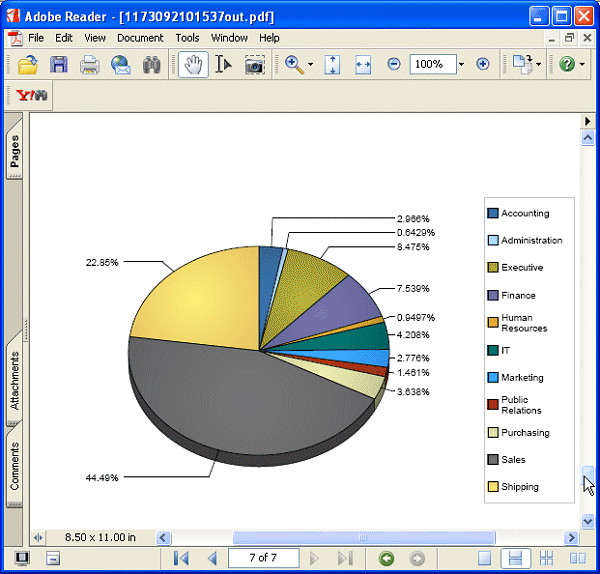 |
Publishing the Template for a BI Publisher Report
You can directly publish a template that you have created in MS Word for a BI Publisher report, provided:
- You are connected to BI publisher from MS Word
- The BI Publisher report is opened in MS Word
- The template is saved in RTF format
To publish the Based_On_OracleDB.rtf template that you created in MS Word, and then view data for the report in BI Publisher using this template, perform the following steps: (Note that the template you have created satisfies all the above criteria.)
| 1. | In MS Word, select the Oracle BI Publisher> Publish Template As option.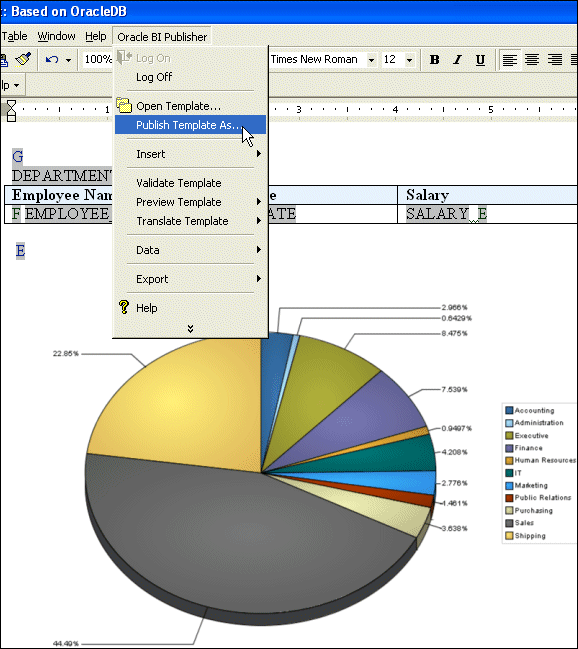 Note: If you have not saved the template in RTF format, it may prompt you to save the template in RTF format first before publishing. |
| 2. | The Upload as new dialog box appears. Enter Template1 as the template name, and click OK. 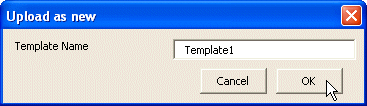 After the template is uploaded, it displays the following message indicating that the template is added to the BI Publisher report. Click OK again. 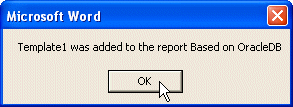 |
In this topic, you will modify the Based_On_OracleDB.rtf template that you have created using the MS Word native features, such as changing the background and text colors, adding a title, and so on.
Perform the following steps:
1.
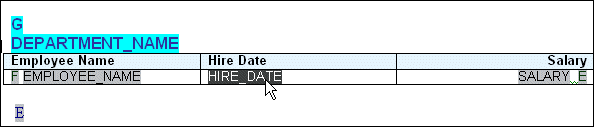
| The basic Based_On_OracleDB.rtf template that you have created is shown below:
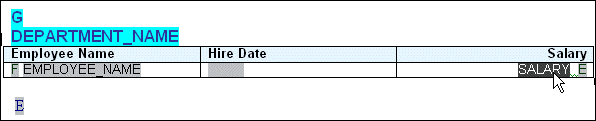
Make the following changes using the MS Word features:
 |
2.
|
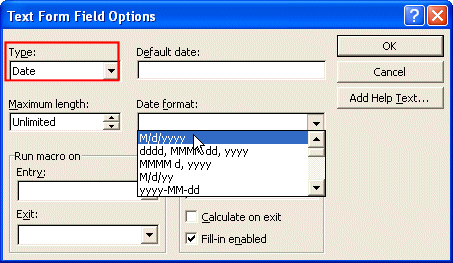
Edit the Hire Date field to add the appropriate format as follows:
|
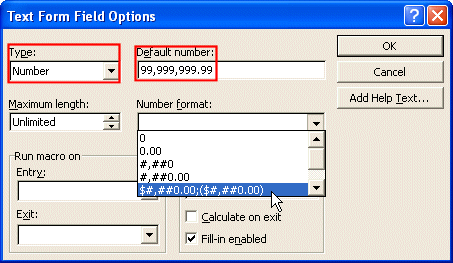
| 3. | Similarly, edit the Salary field now to add an appropriate format as follows:
|
| 4. | Add a title Employee Salary Report to the template, and format the text color and fonts as you require. You can also add an image or a clip art to the template. (Resize it to fit your template better.) You can also insert a header or footer in template. Observe the following screen: 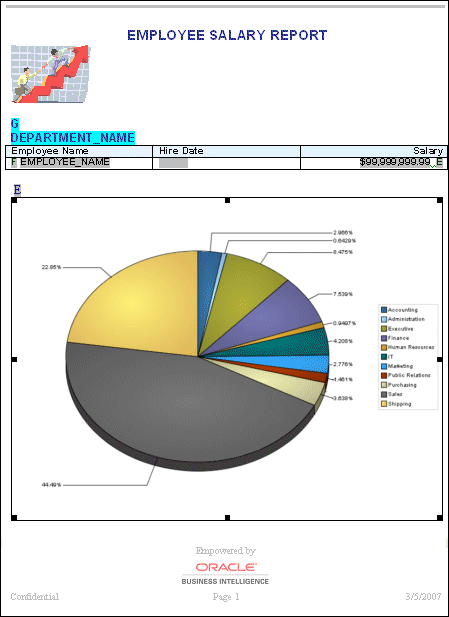 |
| 5. | Save the file as Based_On_OracleDB_1.rtf. (Do not close the file or log out of BI Publisher.) 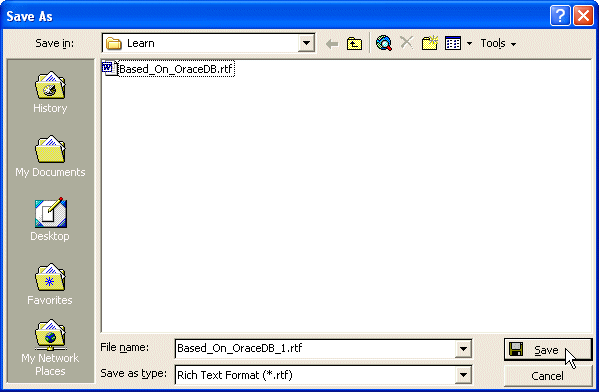 |
Creating and Publishing Multiple Templates for a BI Publisher Report
In the previous topic, you have already created another template Based_On_OracleDB_1.rtf for the Based on Oracle DB report, for which you have already published a simple template. You can create many templates with different formats and styles, and publish them for a single report.
To publish the Based_On_OracleDB_1.rtf template created from MS Word, perform the following steps:
| 1. | (If not already opened) Open the Based on OracleDB BI Publisher report as follows:. In MS Word, select the BI Publisher> Open Template option. Open the Based on OracleDB report from the path My Folders>Learn. 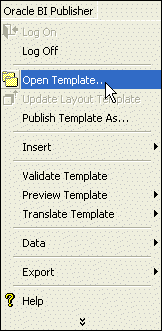 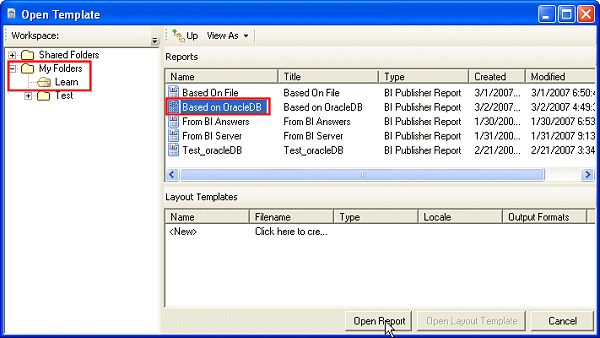 |
| 2. | In MS Word, select the Oracle BI Publisher> Publish Template As option.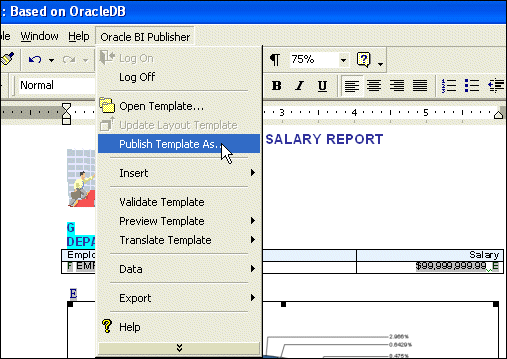 |
| 3. | This opens the Upload as new dialog box. Enter Template2 as the template name, and click OK.  After the template is uploaded, it displays the following message. Click OK again.  Note: You have added two different templates for the same report Based on OracleDB. You can modify the template file, and publish it as different template each time you modify. |
| 4. | If you have time, perform the following steps to edit the chart in the template file to change the graph style, and publish it as Template3: Right-click the chart in the template and select BI Publisher Chart to edit the chart: 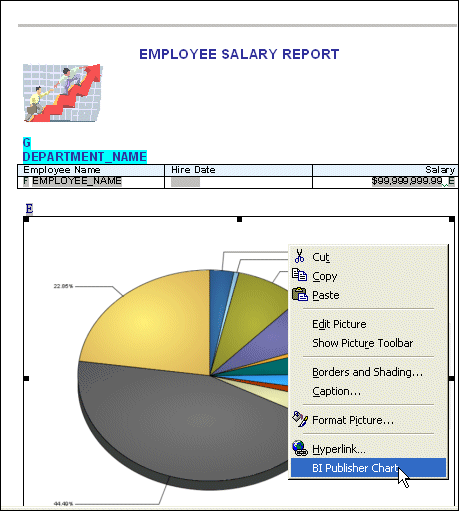 Ensure that Average is selected as the Aggregation for the Salary, select Regatta as the graph Style, and addAverage Employee Salaries by Department as the Title. Click Preview, and then click OK. 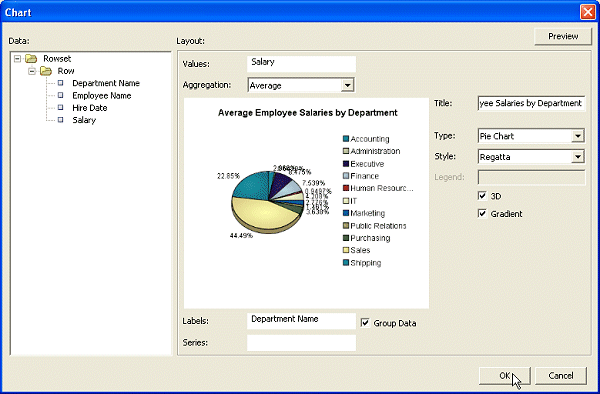 |
| 5. | Select the Oracle BI Publisher> Publish Template As option, and publish the modified template as Template3(as shown in the screens below):  |
| 1. | (If not logged in) Log in to Oracle BI Publisher as Administrator. |
| 2. | Navigate to My Folders>Learn, and click the View link below the Based on OracleDB report.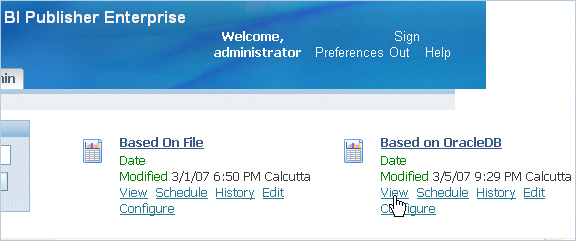 |
| 3. | You can see that the report is displayed using Template1 that you have published. Also,you can see the other templates that you have published for the report in the drop-down list.  Scroll down to see the table data in HTML format. A portion of the data is shown below: 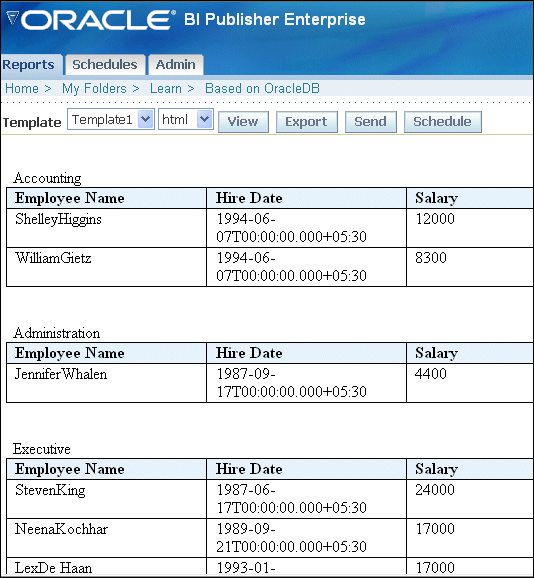 Scroll down to see the graph: 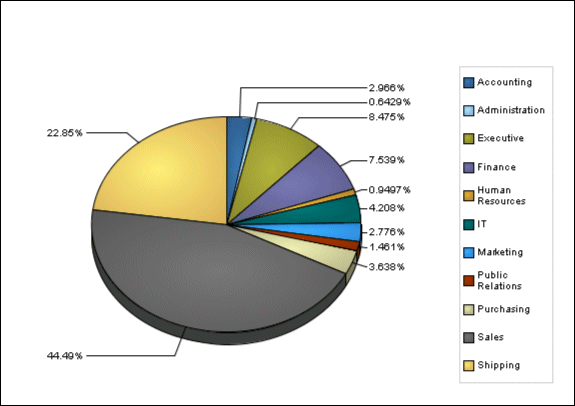 Note: You can also view the data in other formats, such as PDF, RTF, MS Excel, and so on. 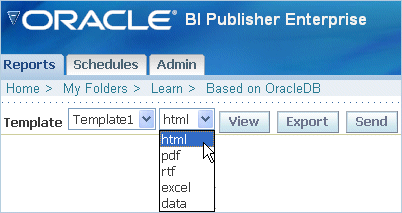 |
| 4. | Similarly, view the report data in PDF format using Template2 and Template3. The data and graph in PDF format using Template2 are shown below: 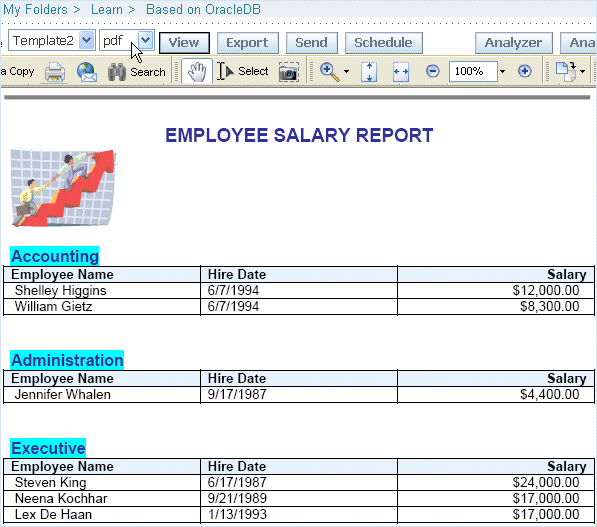 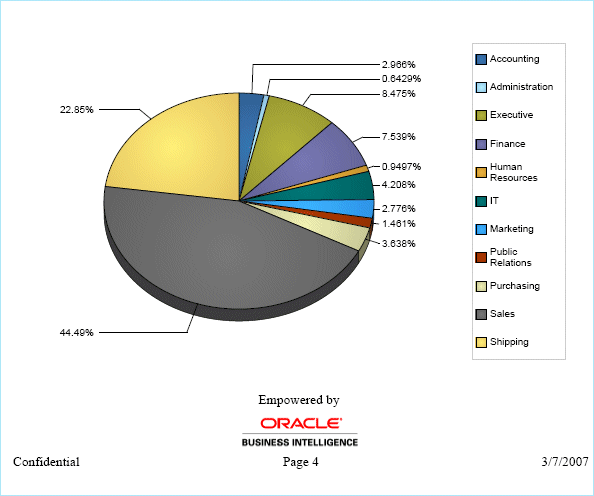 The data and graph in PDF format using Template3 are shown below: 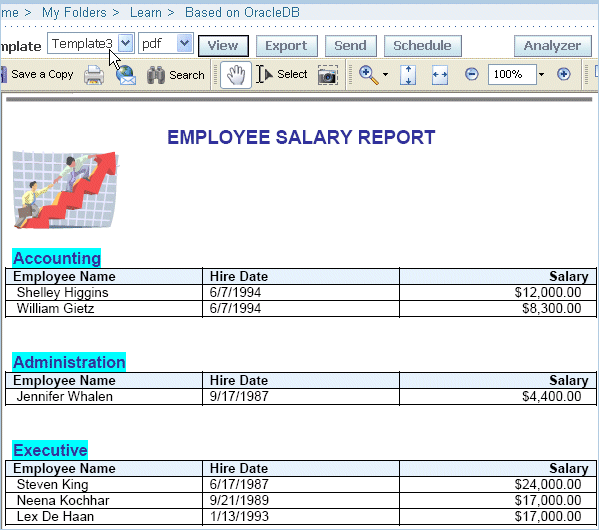 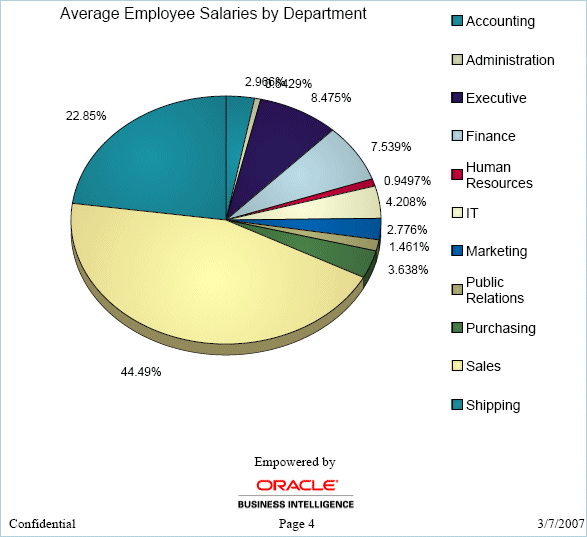 |
In this topic, you create a report with parameters and list of values.
To create a report with parameters and list of values, perform the following steps:
| 1. | (If not logged in) Log in to BI publisher as Administrator, and navigate to My Folders> Learn. Click the report  |
| 2. | This displays additional report actions in Folder and Report Tasks. Click Copy Report and then click Paste from Clipboard to paste it in the same folder. (See the screens below): 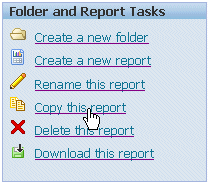 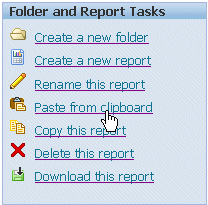 Rename this copied report Report with Parameters and LOVs. 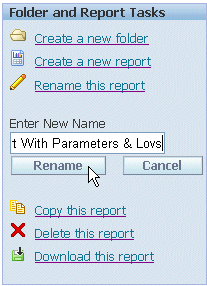 |
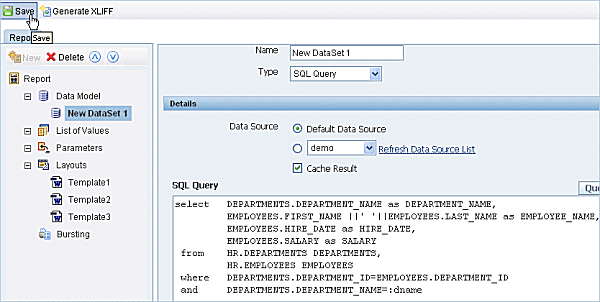
| 3. | Click the Edit link below the report to open the report in Edit mode.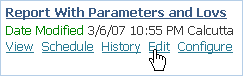 Click New Data Set1 found under the Data Model node in the Report pane on the left to edit the SQL Query for the report. Observe the screen below:  |
| 4. | This displays the SQL Query for the report on the right. Edit the query to add a bind variable dname in the query as in the following: (Observe the last line.)
select DEPARTMENTS.DEPARTMENT_NAME as DEPARTMENT_NAME,
EMPLOYEES.FIRST_NAME ||' '||EMPLOYEES.LAST_NAME as EMPLOYEE_NAME, EMPLOYEES.HIRE_DATE as HIRE_DATE, EMPLOYEES.SALARY as SALARY from HR.DEPARTMENTS DEPARTMENTS, HR.EMPLOYEES EMPLOYEES where DEPARTMENTS.DEPARTMENT_ID=EMPLOYEES.DEPARTMENT_ID and DEPARTMENTS.DEPARTMENT_NAME =:dname
Click Save
 |
| 5. | Click the Parameters node in the Report pane on the left and click New to create a parameter. |
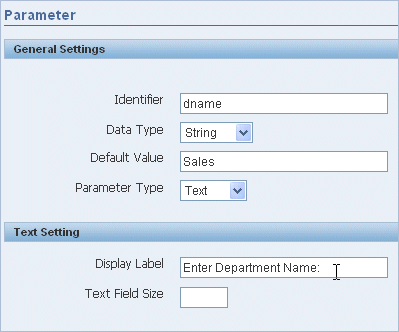
| 6. |
This displays the Parameter screen on the right, in which define the following:
Enter dname as the name of the parameter, and select String as the Data Type.
Enter Sales in the Default Value field, and select Text as the Parameter Type. Also, enter Enter Department Name as the Display Label. (See the screen below.)
Click Save
 |
| 7. |
Click View to view the report data using Template2 in PDF format.
Note that the report data is displayed with the default parameter value, that is for Sales department. 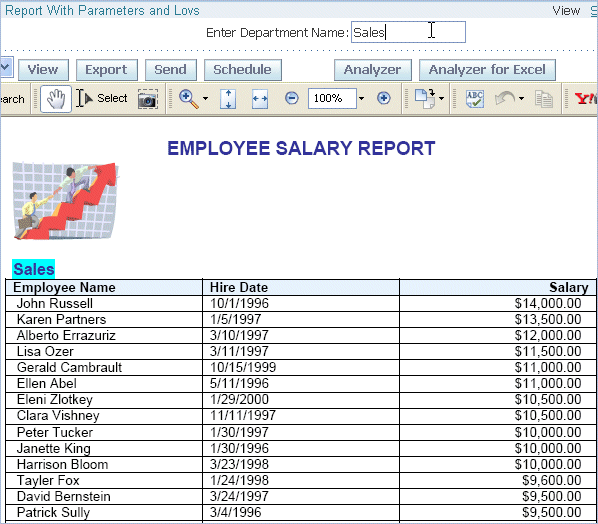 |
| 8. |
You can enter the names of other departments to see the data.
For example, in the parameter field enter Shipping as the department name and click View again to see the data for the Shipping department: 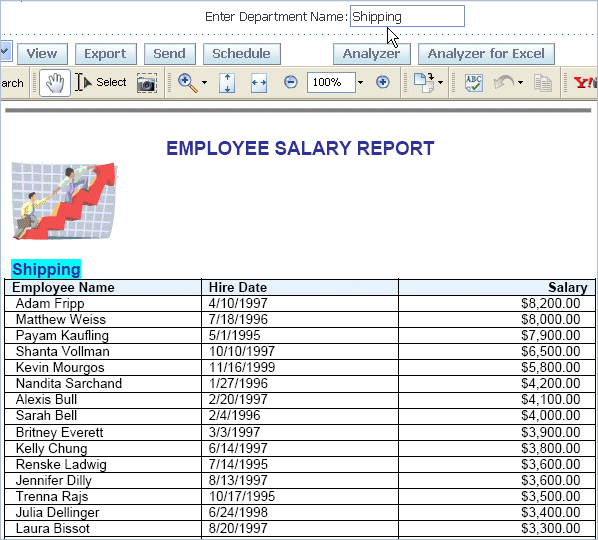 |
| 9. | Click Edit to edit the report and define a List of Values to be used with this parameter dname. In the Report pane displayed on the left, click List of Values, and click New to create a new list of values.  |
| 10. | In the List of Values screen that appears on the right, ensure that demo is selected as the Data Source, and clickQuery Builder to define a query for defining a list of values. |
| 11. | In the Query Builder screen that displays the HR schema tables on the left, click DEPARTMENTS to add it to theModel canvas on the right, and select DEPARTMENT_NAME column (by selecting the check box beside it). Click Save.  This takes you back to the List of Values screen again which displays the query. Click Save 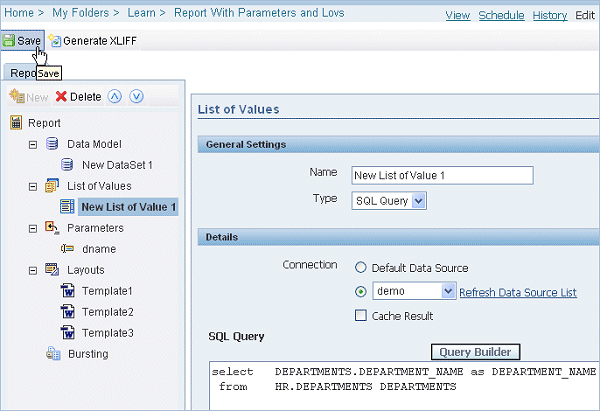 |
| 12. | Click dname under the Parameters node in the Report pane on the left to edit it and associate it with the List of Values that you have created: |
| 13. | In the Parameter screen that appears on the right, select Menu as the Parameter Type.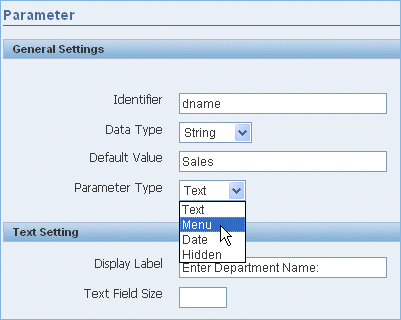 In the Menu Setting section that appears below the General Settings section, enter Select Department Name: in the Display Label field, and ensure that the New List of Values 1 (that you created) is selected from the List of Values drop-down list. Also, select the Can select all option to be able to see the data for all the departments. Click Save 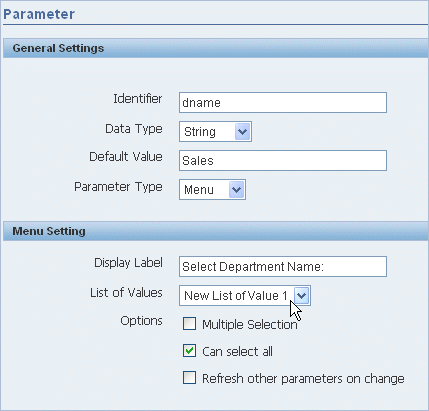 |
| 14. | Click View to view the report using Template2 in PDF format. Observe that the dname parameter is now displayed in the report using the list of values for the department name that you have defined: 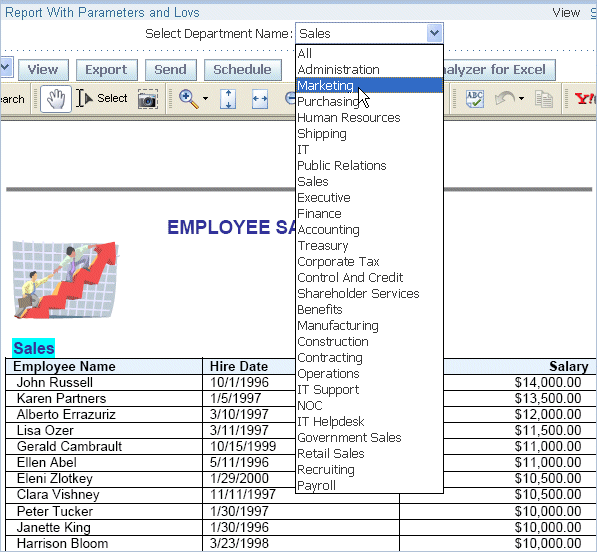 Note: You can select any of the departments from the drop-down list to view the data for that department or selectAll to view the data for all departments. |
Scheduling is a very important feature for any reporting system, which enables you to schedule long-running reports, to be run at a specified time and date. This enables you to select a time and date at which the load on the system is low, to run your daily/weekly and/or monthly reports. In this topic, you configure the BI Publisher scheduler to schedule the reports and view the report history and saved output.
Configuring the BI Publisher Scheduler
| 1. | Log in (if not logged in) to BI Publisher (Web) as Administrator (password Administrator). Click Admin to go to the Admin tabbed page.  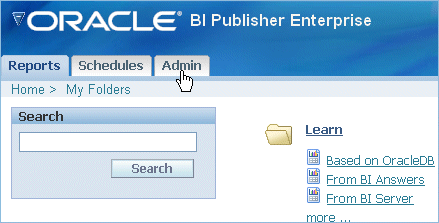 Note: You can log in to BI Publisher by entering the URL (in the following format) in the browser: http://<host>:9704/xmlpserver/ |
| 2. | On the Admin tabbed page, click the Scheduler Configuration link in the System Maintenance section.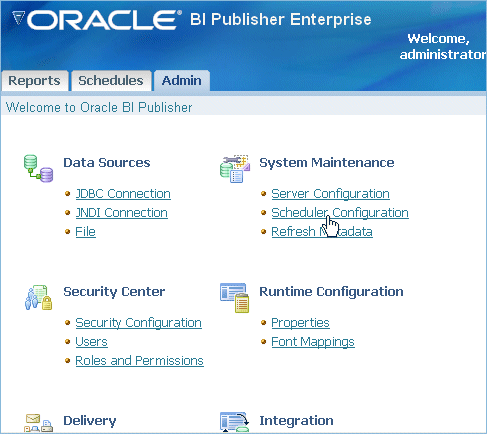 |
| 3. | On the Scheduler Configuration page:
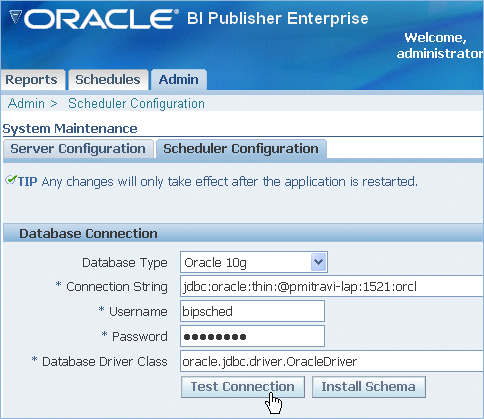 This should display the following message indicating that the connection was successful:  |
| 4. | Click Install Schema to install the required scheduler schema tables.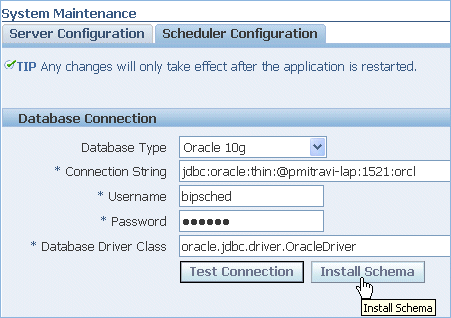 After the tables are installed in the database, the following message is displayed: 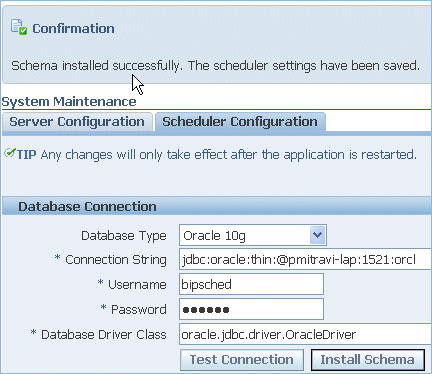 |
In this topic, you schedule the Based on OracleDB report that you have created previously and view the saved output in the report history:
| 1. | Login to BI Publisher (if not already logged in), and click Reports tab to go to the Reports tabbed page.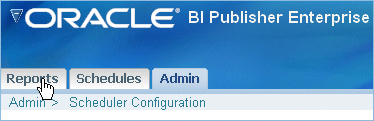 Navigate to the My Folders > Learn folder. Click the Schedule link displayed below the report name for the Based on OracleDB report. 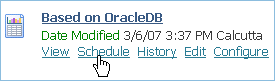 |
| 2. | On the Schedule Report page that appears, select Template3 from the Template drop-down list, and PDF as theFormat.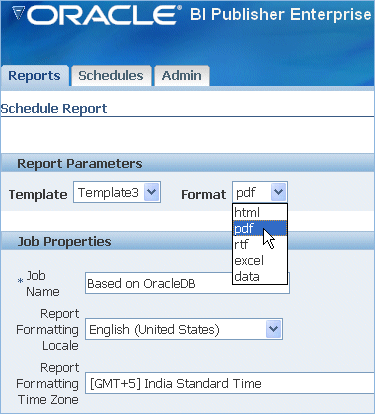 Enter Based on OracleDB-Scheduled as the Job Name, and select appropriate language and time options as per your requirements. Also, ensure that the Save Data for Republish and Save Output options are selected. (Observe the screen below.) 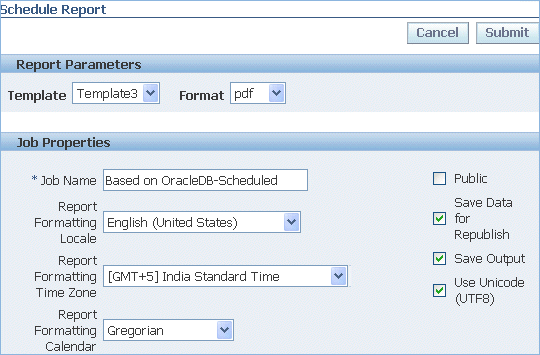 . |
| 3. | In the Time section of the Schedule Report page, select the Run Daily/Weekly option. Select the check box beside Wed to run the report on every Wednesday, select the Run Time as 22.00 (to run the report at 10 p.m. in the night), and choose an appropriate Active Start Date and Active End Date. Click Submit.  This displays a message indicating the scheduling job is created successfully. Also, note that the scheduled job is now displayed on the Schedules tabbed page: 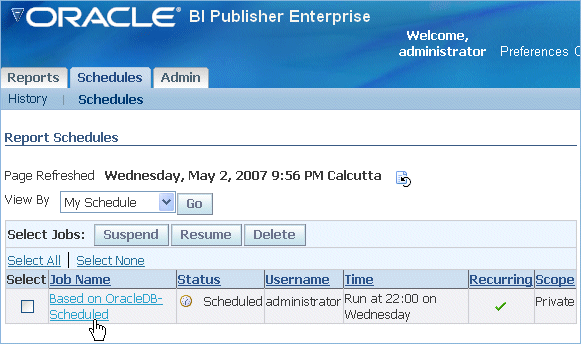 You can also see that, the job is run at the scheduled time: 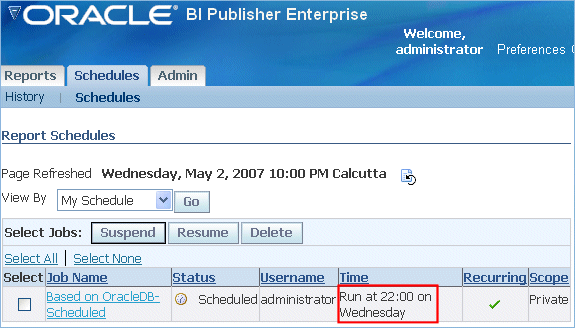 Note: You can deliver the scheduled report to destinations such as Email, FTP Server, and so on. Configuring delivery destinations is out of scope of this tutorial.  |
| 4. | Click the History tab to view the report history. Note that the Data XML and Document columns are shown in the history table. Click the icon in the Document column to see the saved report. 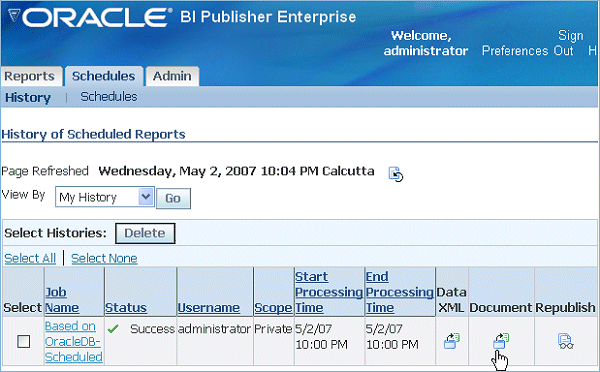 This displays the report generated when the schedule was executed, using the template and format that you selected. 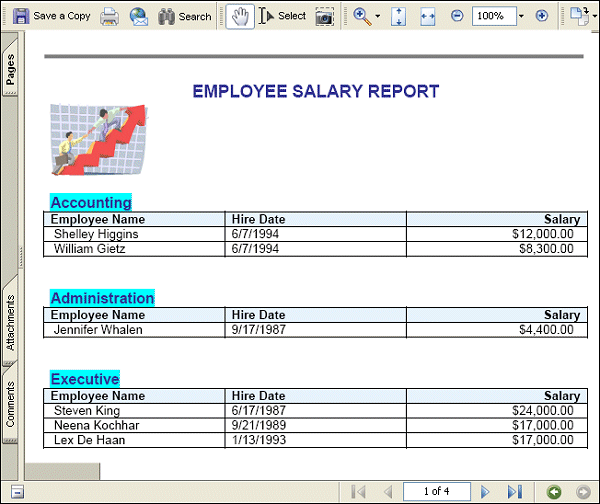 Note: If you want to see the data of the scheduled report in XML form, you can click Data XML. If you want to republish, that is take the data from the scheduled job and generate a new document using the same template (or a different one) you can select Republish option. |
| 5. | You can view the job information by clicking the job name.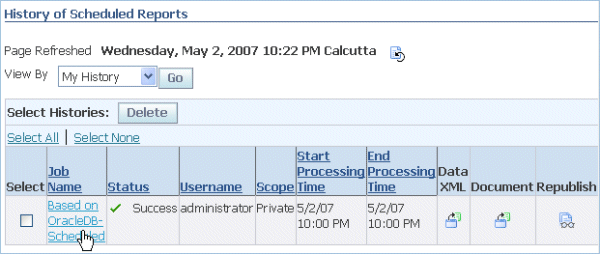 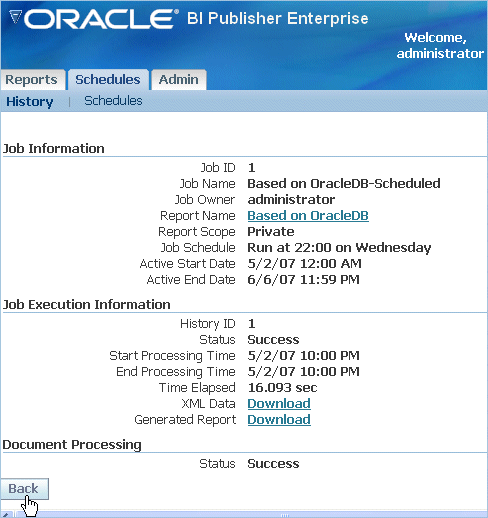 |
| You can also manage the jobs as well as the job histories in BI Publisher. For example, to delete the job history for a specific job, select the job, and then click Delete. 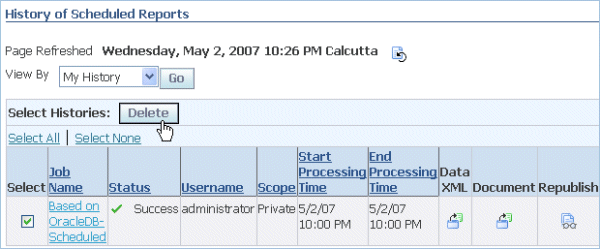 Similarly, you can suspend, resume or delete a scheduled job from the Schedules tabbed page. 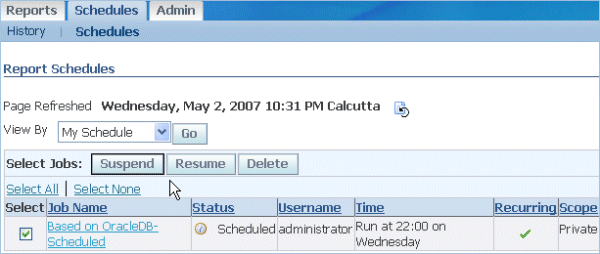 |
Previously, you have created reports based on Oracle Database. BI Publisher also supports various types of data sources such as Web Services, HTTP/RSS, and Files. Because BI Publisher is integrated with Oracle Business Intelligence, you can also create reports based on the Oracle BI Answers request and Oracle BI Server subject area.
The following topics guide you to create reports based on these various types of data sets:
The following topics guide you to create reports based on these various types of data sets:
Creating a Report Based on Oracle BI Answers Request
The steps for creating a report based on BI Answers request are briefly discussed here. For more details, refer to the topic "Creating a BI Publisher Report Based on Oracle BI Answers Request and Viewing Data" in the OBE titled "Integration of Oracle BI Publisher with Oracle Business Intelligence Enterprise Edition, 10.1.3.2."
You can create a BI Publisher report from a new answers request or an existing one. A brief list of steps is provided here for your reference:
| 1. | Start the MS Word application, and log in to Oracle BI Publisher as Administrator.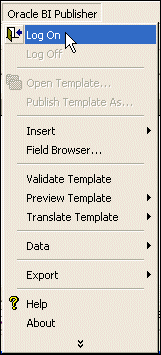  Note: The Oracle BI Publisher menu and the BI Publisher toolbar with the Data, Insert, Preview, Tools, and Help menu is displayed in MS Word only when you have successfully installed the Oracle BI Publisher Desktop as mentioned in step 6 of the Prerequisites section.  |
| 2. | In MS Word, open the Answers request based on which you want to create the BI Publisher report: In the Open Template window, ensure that Oracle BI is selected from the Workspace drop-down list. Navigate to the folder where you have saved the BI Answers request, and double-click the BI Answers request. 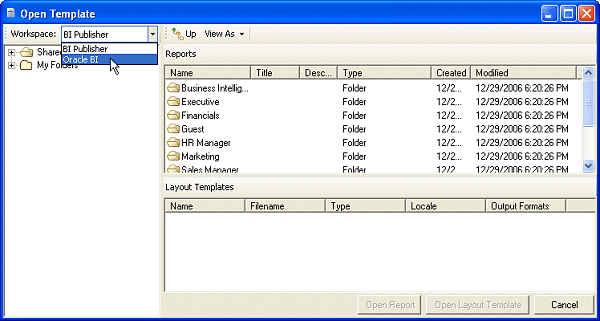  |
| 3. | This displays the Save As Oracle BI Publisher Report window. Navigate to the folder in which you want to save the report, and click Save.  Here the report is saved in the My Folders>Learn folder in BI Publisher. Note: You can also create a BI Publisher report based on the BI Answers request by logging in to BI Publisher (Web UI), and selecting the Data Set type for the report as Oracle BI Answers. |
| 4. | You can create an RTF template for the report by inserting the table and charts (Insert > Table Wizard, Insert > Chart menu options from the BI Publisher toolbar) as per your report design requirements, using the Table and Chart Wizards provided in MS Word for BI Publisher.  Note: Creating template files with charts and table is discussed in detail later in this tutorial. |
| 5. | Publish the RTF file as template for the BI Publisher report.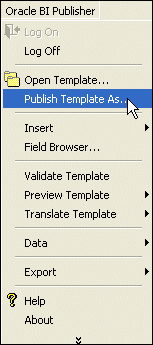 You can also preview how the report looks like: 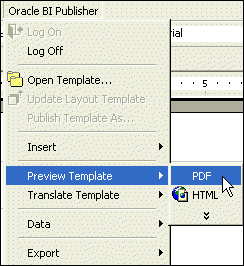 The sample report and the template from the OBE titled "Integration of Oracle BI Publisher with Oracle Business Intelligence Enterprise Edition, 10.1.3.2" is shown here: 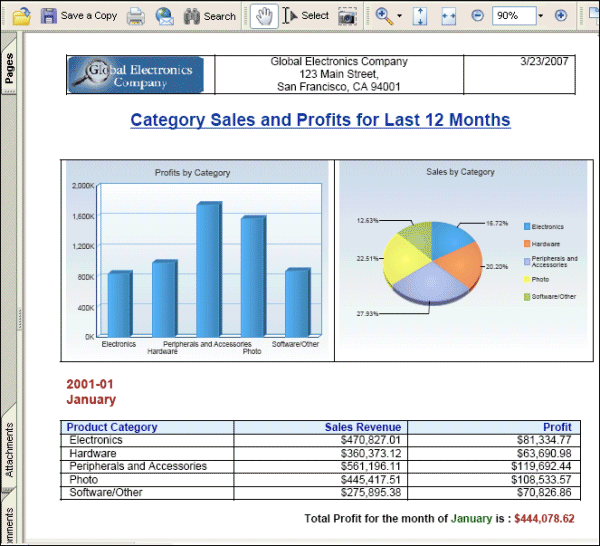 You can also view the report in BI Publisher (Web) using the templates by logging in as Administrator. |
The steps for creating a report based on BI Server subject area are briefly discussed here. For more details, refer to the topic "Creating a BI Publisher Report Based on Oracle BI Server Subject Area and Viewing Data" in the OBE titled "Integration of Oracle BI Publisher with Oracle Business Intelligence Enterprise Edition, 10.1.3.2."
A brief list of steps is provided here for your reference:
| 1. | Log in (if not logged in) to BI Publisher (Web) as Administrator (password Administrator). Note: You can log in to BI Publisher by entering the URL (in the following format) in the browser: http://<host>:9704/xmlpserver/  Or, if you have installed and set up Oracle Business Intelligence Enterprise Edition, you can also log in to BI Publisher from the All Programs > Oracle Business Intelligence > BI Publisher option from the Start menu. |
| 2. | Navigate to the folder where you want to create the report, and click Create a new report. Enter an appropriate name for the report, and click Create. 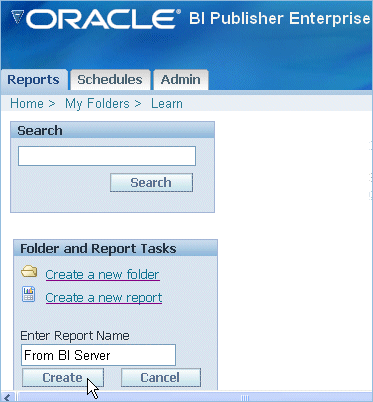 Here the report is created in the My Folders>Learn folder in BI Publisher. |
| 3. | Click Edit link displayed below the name of the report to to edit the report properties. Click Data Model and click New to define the data source for this report. 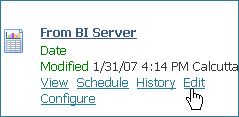  |
| 4. | On the Data Set page, ensure that SQL Query is selected from the Type drop-down list. Select Cache Result and ensure that Oracle BI EE is selected as the Data Source.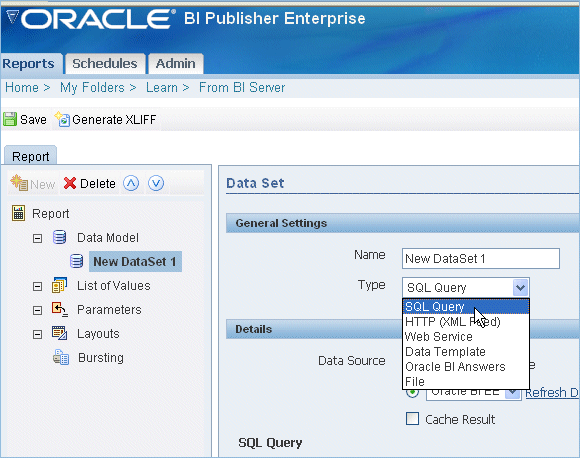 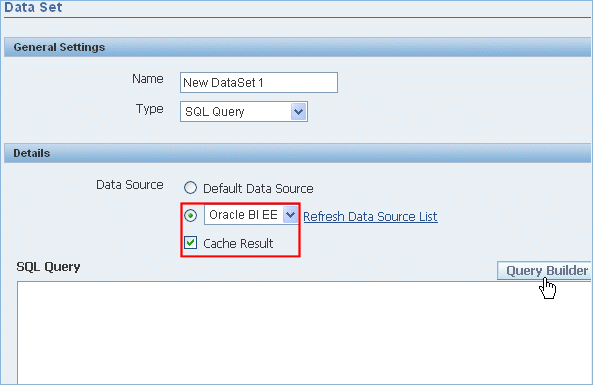 |
| 5. | Click Query Builder to create a SQL Query. The Query Builder is opened displaying the SH subject area (metadata repository) objects displayed on the left. Drag the Channels, Products, and Sales Facts SH schema objects one by one to the Model canvas on the right. 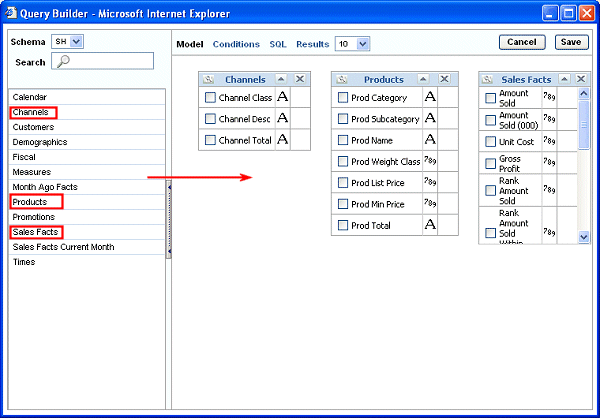 Select the following columns to be displayed in the query from the Model objects (by selecting the check boxes beside the column names): -Select Channel Desc from Channels. -Select Prod Category and Prod Name from Products. -Select Amount Sold from Sales Facts. The screen looks like this after the column selection: 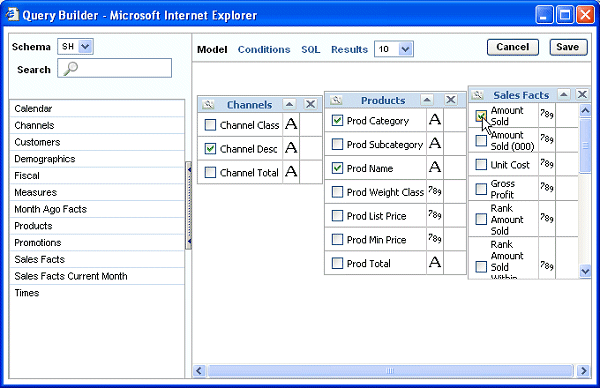 |
| 6. | Click Save to save the query. Observe that the query is displayed in the SQL Query field of the Data Set page. Click the Save 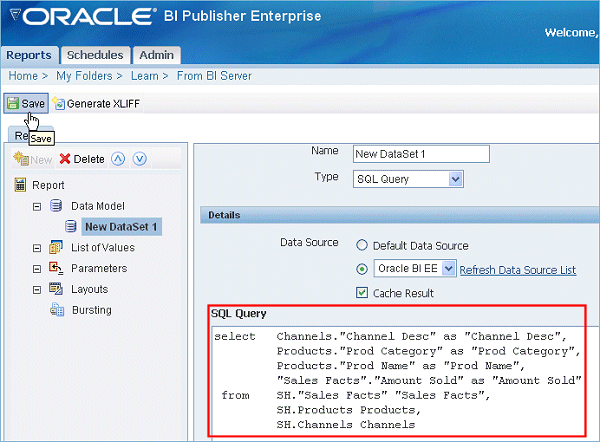 |
| 7. | You can create an RTF template for the report from MS Word by logging in to BI Publisher. The PDF output of the report using the template created in the OBE titled "Integration of Oracle BI Publisher with Oracle Business Intelligence Enterprise Edition, 10.1.3.2" is shown here: 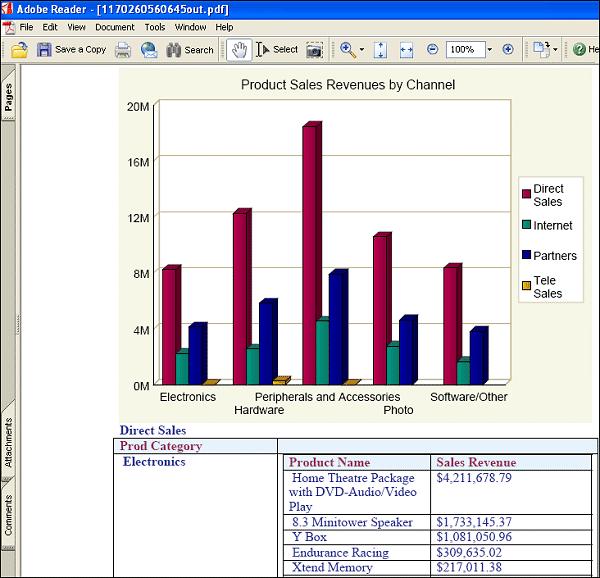 |
Web services are open standard–based (such as WSDL and SOAP) Web applications that interact with other Web applications for the purpose of exchanging data. Web services help quickly integrate applications across multiple platforms, systems and even across businesses in an easier, and cheaper way than ever before. Some of the Web services standards are SOAP, WSDL and UDDI, which enable system-to-system communication that is platform independent. Some of the popular Web services implementations are the ones to exchange information about stock quotes, currency converters, global weather, and so on.
Note: To avoid any firewall problems with the reports based on Web Services and RSS feeds, ensure that you have done the proxy settings as mentioned in step 6 of the Prerequisites.
In this topic, you will create a BI Publisher report based on a Web service, which provides the stock quotes. You will also use a predefined RTF template (provided with this OBE) to view the data.
Perform the following steps:
| 1. | Log in (if not logged in) to BI Publisher (Web) as Administrator (password Administrator). Note: You can log in to BI Publisher by entering the URL (in the following format) in the browser: http://<host>:9704/xmlpserver/  |
| 2. | Navigate to the folder where you have created the previous reports (Learn folder), and click Create a new report.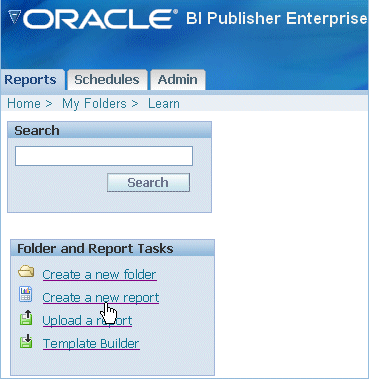 Enter Based on Web Services as the name for the report, and click Create. 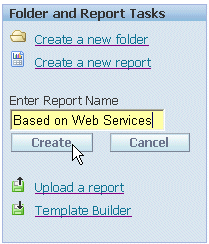 The report is created in the My Folders>Learn folder in BI Publisher. |
| 3. | Click the Edit link below the name of the report. Select the Data Model node on the left, and click New to define a new data model for the report. 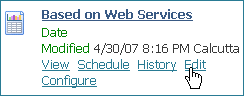 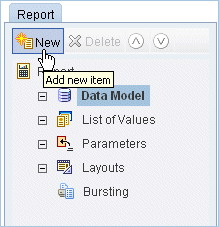 |
| 4. | Click the New Data Set1 created, this opens the Data Set page on the right. Select Web Service from the Type drop-down list. 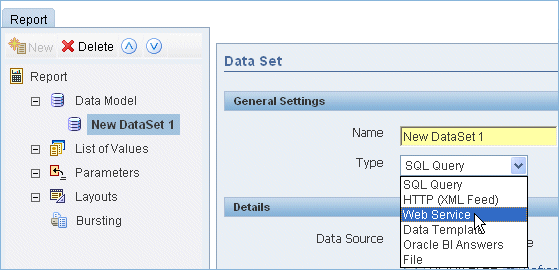 |
| 5. | Enter http://www.webservicex.net/stockquote.asmx?WSDL in the WSDL URL field, and GetQuote as the method name. Click the Save 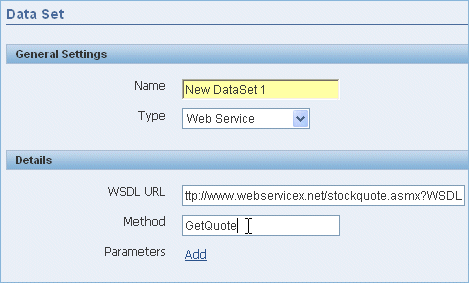 Note: WebserviceX.NET provides on-demand XML Web Services for Financial,Distribution, Retail, Health Care, Manufacturing, Telecom, Government, and Educational organizations or industries. |
| 6. | Click Parameters and click New to add a parameter for the stock symbol.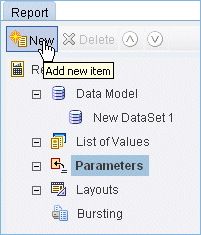 |
| 7. | On the Parameter page that appears:
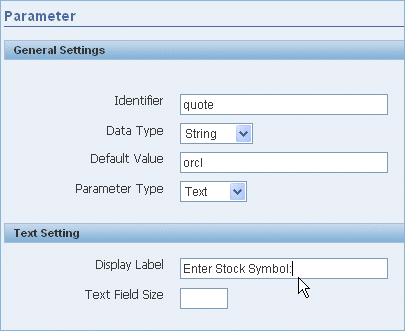 Click the Save |
| 8. | Click New Data Set1 under the Data Model node. The Data Set page appears on the right. Ensure that Quote is selected in the Parameters drop-down list. 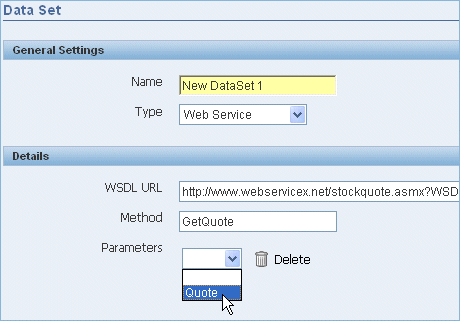 |
| 9. | The Data Set page looks like the screen below: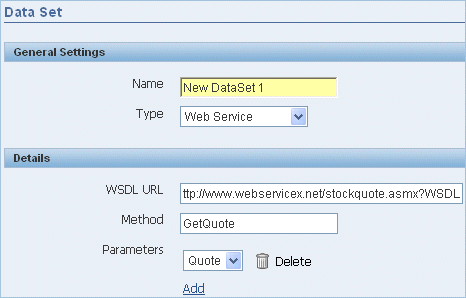 Click Save View the XML data to see if the stock quotes for Oracle Corporation are being returned to the report.  You can also view the stock quotes for other corporations by entering appropriate stock symbols such as msft(Microsoft), GE (General Electric), and so on. |
| 10. | Open the WebServices.rtf (provided with this OBE) template file and save it on your local system with the same name. Now open this file in MS Word. The file looks like this: 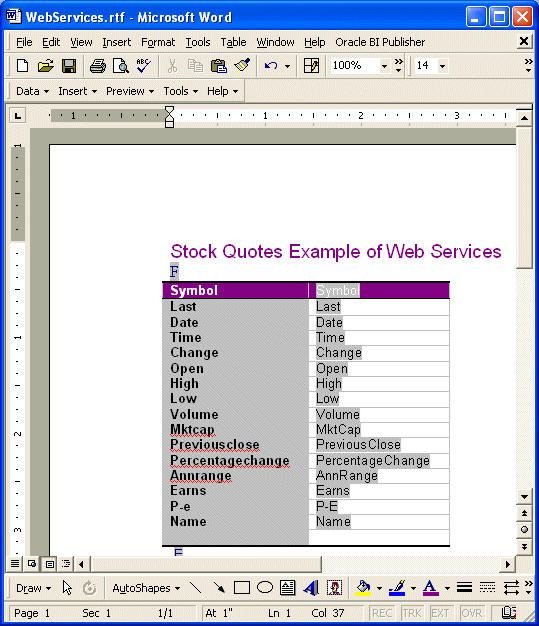 |
| 11. | Connect to Oracle BI Publisher as Administrator in MS Word.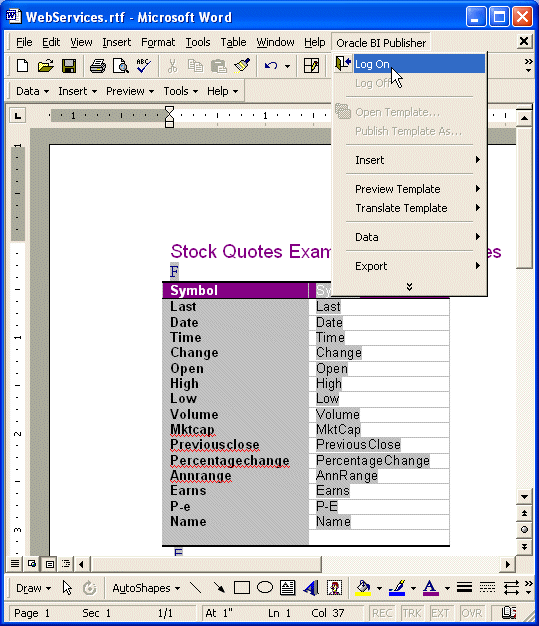 |
| 12. | This opens the Open Template window. Navigate to My Folders> Learn. Select Based on Web Services report and click Open Report. 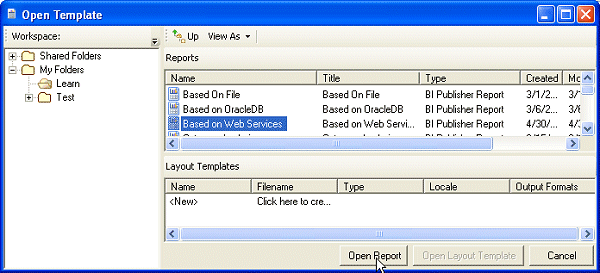 |
| 13. | Select the BI Publisher > Preview Template > PDF option from the menu to preview the data in the report using this template.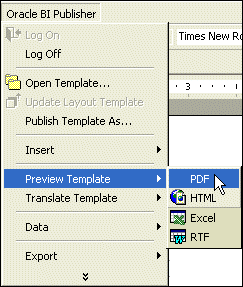 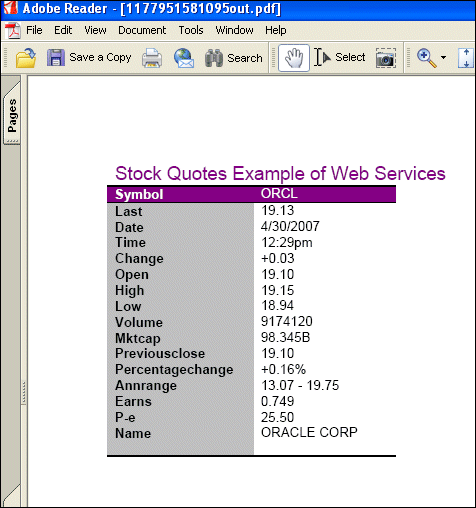 |
| 14. | Select the BI publisher> Publish Template As option to publish the template for this report. Enter Template1 (or any other appropriate name) as the template name, and click OK.  Click OK again when the following message is displayed. 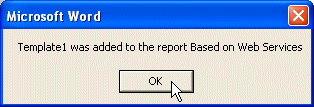 |
You can create a BI Publisher report based on RSS feeds available on the Web. You can do this by selecting HTTP as the Data Set type in BI Publisher when creating the report.
About RSS Feeds: As defined by Wikipedia, RSS (acronymic for Really Simple Syndication) is "a group of XML based web-content distribution and republication (Web syndication) formats primarily used by news sites and web-logs (popularly known as blogs)." Essentially, an RSS feed is a hosted XML file from which your RSS newsreader pulls headlines, URLs, and other content as it is updated.
Users of RSS content use software programs called "feed readers" or "feed aggregators." The user subscribes to a feed by entering a link to the feed into the reader program. The reader can then check the user's subscribed feeds to see if any of those feeds have new content since the last time it was checked, and if so, retrieve that content and present it to the user.
In this topic, a simple site with RSS feed links (The New York Times) is used to show how the data is rendered to a BI Publisher report.
(However, note that the RSS readers or aggregators are not discussed here, as they are out of the scope for this tutorial.)
| 1. | Log in (if not logged in) to BI Publisher (Web) as Administrator (password Administrator). Note: You can log in to BI Publisher by entering the URL (in the following format) in browser: http://<host>:9704/xmlpserver/  |
| 2. | Navigate to My Folders>Learn, and click Create a new report. Enter Based on HTTP-RSS as the name of the report, and click Create. 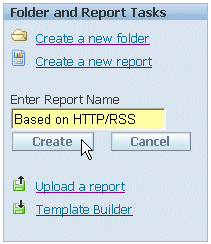 |
| 3. | Click the Edit link below the name of the report. Select Data Model node on the left and click New to define a new data model for the report. 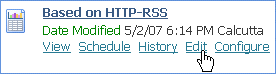 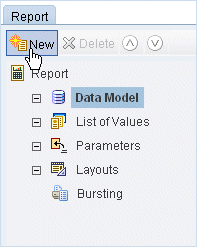 |
| 4. | Click the New Data Set1 created. The Data Set page is displayed on the right. Enter News in the Name field, and select HTTP (XML Feed) from the Type drop-down list. 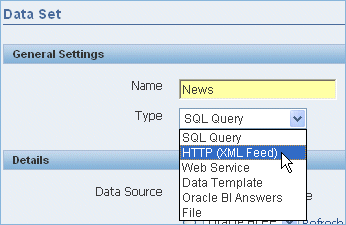 |
| 5. | Enter http://www.nytimes.com/services/xml/rss/nyt/Business.xml as the URL, select GET from the Method drop-down list, and select the Cache Results option. (Observe the screen below.) Click Save  You can view the XML data to check whether this news site is rendering valid data to the report. 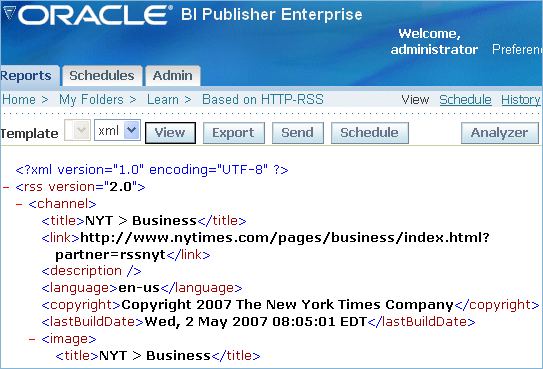 |
| 6. | Open the HTTP-RSS.rtf template file (provided with this OBE) and save it with the same name in your local system. Now open this file in MS Word. The file looks like this:  |
| 7. | (If not connected) Connect to Oracle BI Publisher as Administrator in MS Word. |
| 8. | This opens the Open Template window. Navigate to My Folders> Learn. Select Based on HTTP-RSS report and click Open Report.  |
| 9. | Select the BI Publisher > Preview Template > PDF option from the menu to preview the data in the report using this template. 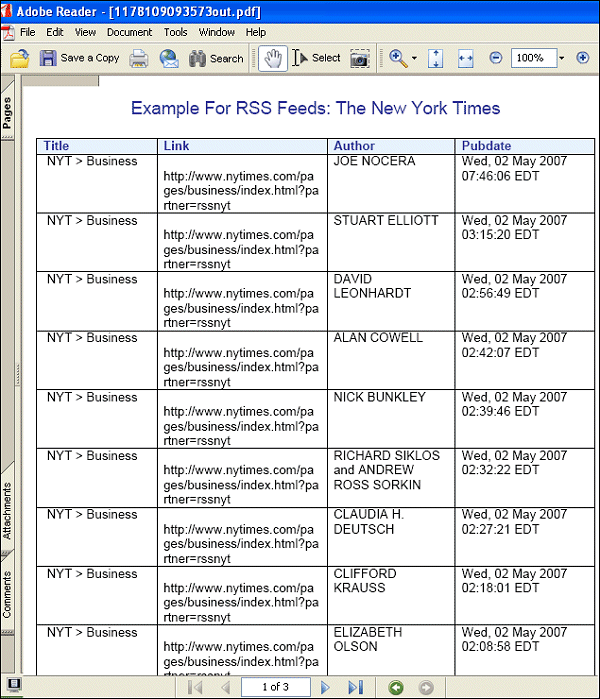 |
| 10. | Select the BI publisher> Publish Template As option to publish the template for this report. Enter Template1 (or any other appropriate name) as the template name, and click OK.  Click OK again when the following message is displayed.  If you have time, try creating the reports using the RSS feeds available on the Oracle Web site at : http://www.oracle.com/rss/index.html, or those available on Yahoo at: http://news.yahoo.com/rss. |
Creating a Report Based on File Data Set
In this topic, you create a report based on File data set. You will use the XML demo files provided along with the BI Publisher.
Note: The demo files are generally found in the <Oracle Home>/ xmlp/XMLP/DemoFiles directory. Check with your administrator for the exact path.
Note: The demo files are generally found in the <Oracle Home>/ xmlp/XMLP/DemoFiles directory. Check with your administrator for the exact path.
To create a BI Publisher report from a File data set, perform the following steps: (Here you will be using a purchase order data set from the demo files, and also upload a predefined template for the report.)
| 1. | Navigate to My Folders> Learn, and click Create a New Report. Enter Based on File as the name of the report and click Create.   |
| 2. | The report is displayed in Learn folder in BI Publisher. Click the Edit link under the name of the report to open the report in Edit mode. 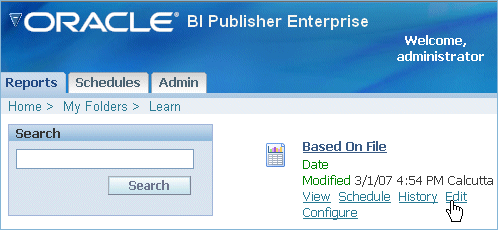 |
| 3. | Click Data Model (found on the left of the Report Properties page) and click New to define the data source for this report.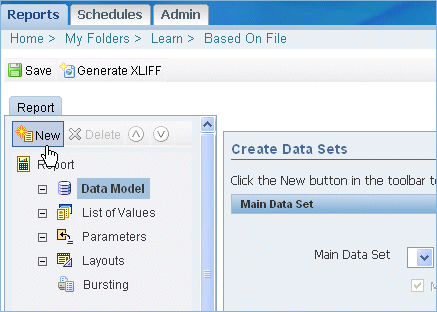 |
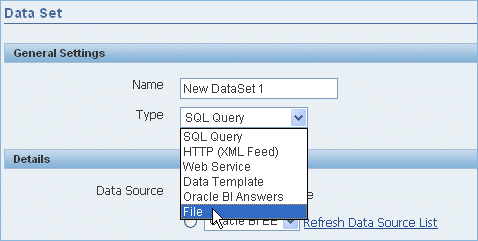
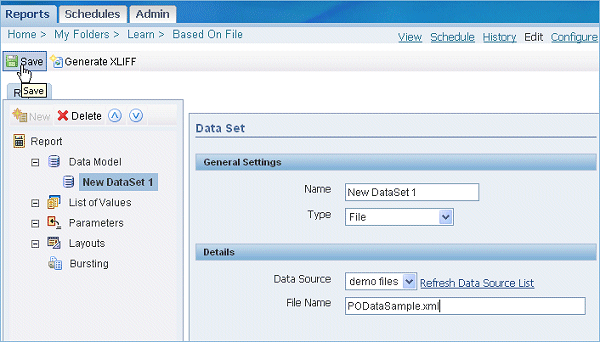
| 4. | In the Data Set screen that appears:
  |
| 5. | Click View to go to the View mode of the report. Click View again to view the XML data. (A portion of the sample purchase order XML data is shown here.) 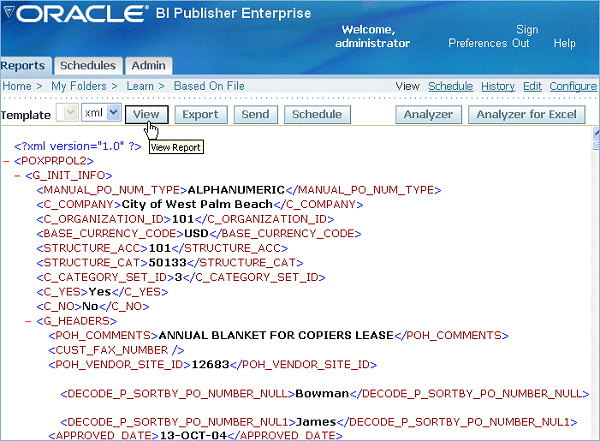 Note: As you have not associated the report with any template, you can see only XML data. However, in the next step, you will define a layout for the report and associate it with a predefined template. A set of predefined templates are also shipped along with the demo XML files in BI Publisher. (These templates are generally found in <Oracle Home>/ xmlp/XMLP/Reports which has many folders with various RTF templates.) |
| 6. | In View mode of the report, click the Edit link (found at the top-right corner of the page) to go back to edit mode of the report. Click Layouts in the Report pane on the left. This displays the Create Layouts section on the right. Click Browse in the Manage Template Files section to browse and upload a predefined RTF template. 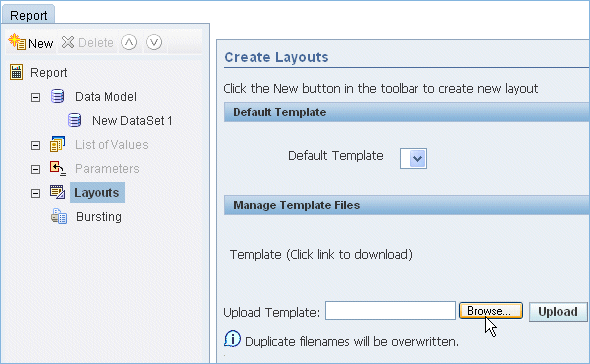 Navigate to the <Oracle Home>/ xmlp/XMLP/Reports> Supply Chain management>Purchase Order folder. Select the POTemplateSample.rtf file and click Open. 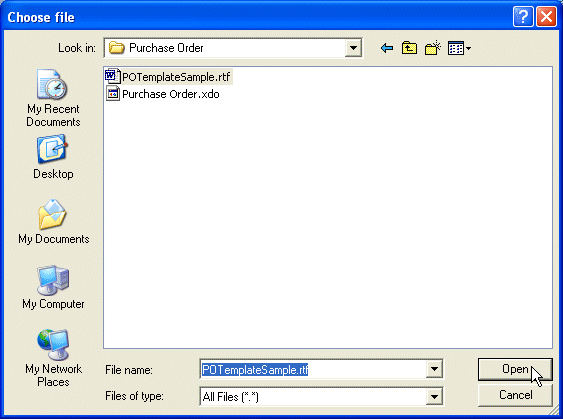 (If you are not able to locate this file, check with your administrator to locate the demo files and the templates shipped with BI Publisher, which has many folders with various RTF templates). Note: You can publish a template from MS Word. Previously you have published the templates from MS Word, so in this topic, uploading a predefined template from BI Publisher (Web) is shown. |
| 7. | Click Upload to upload this RTF template for the report. Click Save  |
| 8. | Click Layouts again, and click New to create a new report Layout to associate it with the template uploaded. |
| 9. | In the Layout section, that is displayed on the right make sure that POTemplateSample.rtf is selected from theTemplate drop-down list and All formats is selected as the Output Format. Click Save 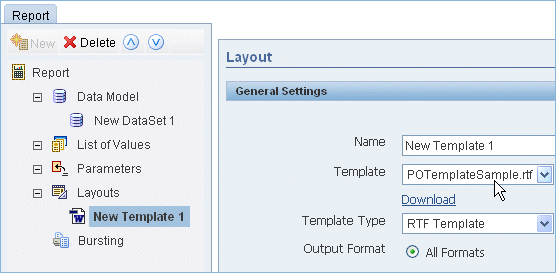 |
| 10. | Click View to open the report in View mode. Select the template that you have uploaded from the Template drop-down list, select pdf as the data format from the drop-down list, and click View to view the report. 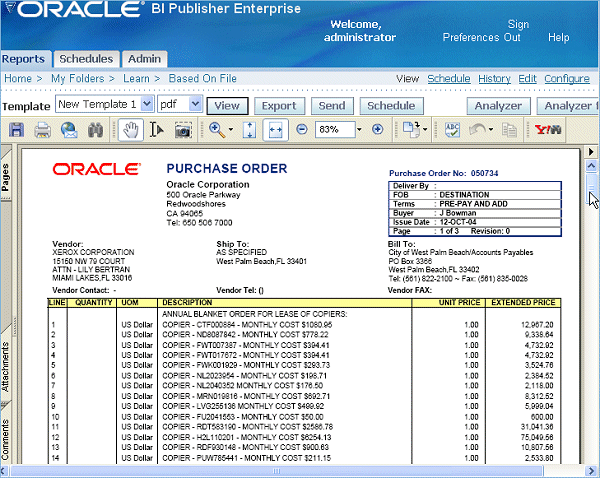 Scroll down and see the report. 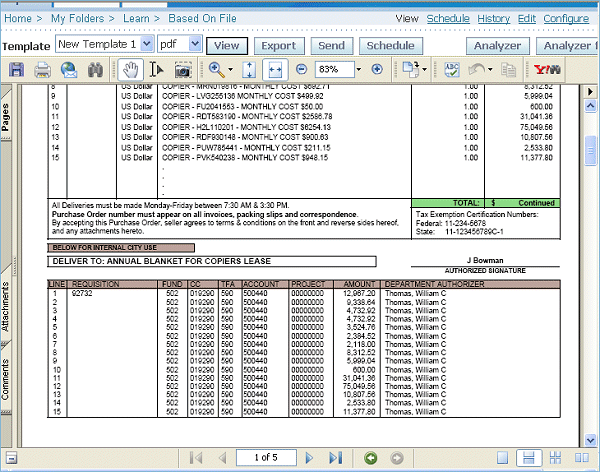 Note: You can also try and create BI Publisher reports based on the other demo files such as Marketing.xml, Balance.xml, PriceList.xml, or any other XML data file that you have. (All the demo files have been provided with predefined templates.) |
In this tutorial, you learned how to:
| Create a BI Publisher report based on Oracle Database | ||
| Create an RTF template with a table and chart using BI Publisher desktop in MS Word | ||
| Publish the template for a report | ||
| Modify the template using the native features of MS Word | ||
| Create and publish multiple templates for a BI Publisher report | ||
| View data in BI Publisher reports using the templates in various formats supported | ||
| Create a report with parameters and list of values | ||
| Schedule and manage the BI Publisher reports | ||
| View the saved output in scheduled report history | ||
| Create a BI Publisher reports based on other data sources, such as Oracle BI EE, HTTP, Web Services, and File data sets | ||