Make sure that you have Windows Media player or Quick time player Installed.
Step 1: Video player to the Dashbhard
Open a Dashboard page and add a new TEXT section and add the below html code.
##########################################################################
<html>
<body>
<embed src="http://localhost/Sandy/Wildlife.wmv" width="650" height="430" CONTROLLER="true" LOOP="false" AUTOPLAY="true" loop="true"></embed>
</body>
</html>
###########################################################################
Mark the contents as HTML.

Step 2: Music Player to the Dashboard
##########################################################################
<table border="10" cellpadding="10" height="5" width="450" style="background-color:33CCFF"/>
<tr>
<td>
<html>
<body>
<embed src="http://localhost/Sandy/Kalimba.mp3"width="450" height="120" CONTROLLER="true" LOOP="true" AUTOPLAY="true" "</embed>
</body>
</html>
</td>
</tr>
############################################################################
Mark the contents as HTML

Step 3: Adding Google Maps to the Dashboard
The steps for this has been mentioned in my previous posts. If you have missed it , then find the Steps ti Google Maps OBIEE Integration Here

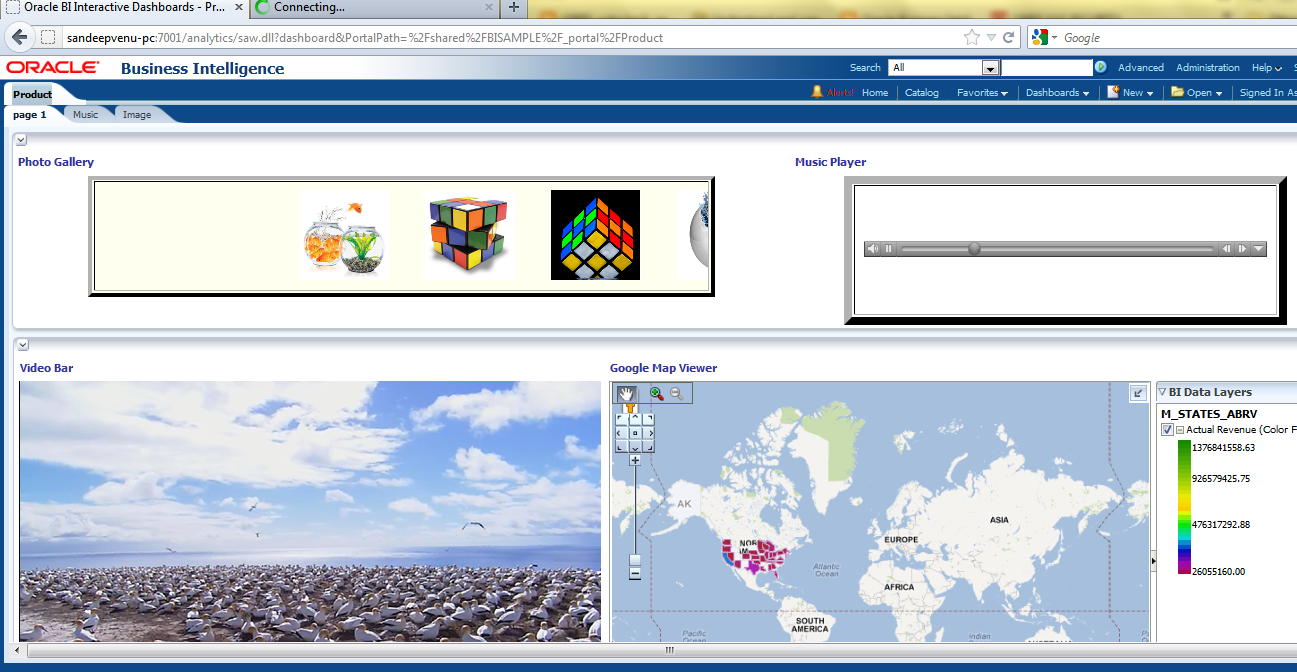
Step 4: Slide Show (Photo Gallery)
Copy your required Images to the following location
C:\inetpub\wwwroot

<!--code by obieelive.blogspot.com-->
<table border="5" cellpadding="1" height="135" width="700" bgcolor="FFFFF" />
<tr>
<td>
<marquee onmouseover="this.stop()" onmouseout="this.start()" scrollamount="5" direction="left" align="center" loop="true">
<img src="http://localhost/c.jpg" width="100" height="100" alt="smile" />
<img src="http://localhost/a.jpg" width="100" height="100" alt="smile" />
<img src="http://localhost/b.jpg" width="100" height="100" alt="smile" />
<img src="http://localhost/d.jpg" width="100" height="100" alt="smile" />
<img src="http://localhost/e.jpg" width="100" height="100" alt="smile" />
<img src="http://localhost/f.jpg" width="100" height="100" alt="smile" />
</marquee>
</td>
</tr>
</table>
############################################################################
Step 5: Arrange the Dashboard Section as needed

And check the results in Dashboad
Step 1: Video player to the Dashbhard
Open a Dashboard page and add a new TEXT section and add the below html code.
##########################################################################
<html>
<body>
<embed src="http://localhost/Sandy/Wildlife.wmv" width="650" height="430" CONTROLLER="true" LOOP="false" AUTOPLAY="true" loop="true"></embed>
</body>
</html>
###########################################################################
Mark the contents as HTML.

Step 2: Music Player to the Dashboard
##########################################################################
<table border="10" cellpadding="10" height="5" width="450" style="background-color:33CCFF"/>
<tr>
<td>
<html>
<body>
<embed src="http://localhost/Sandy/Kalimba.mp3"width="450" height="120" CONTROLLER="true" LOOP="true" AUTOPLAY="true" "</embed>
</body>
</html>
</td>
</tr>
############################################################################
Mark the contents as HTML

Step 3: Adding Google Maps to the Dashboard
The steps for this has been mentioned in my previous posts. If you have missed it , then find the Steps ti Google Maps OBIEE Integration Here
Step 4: Slide Show (Photo Gallery)
Copy your required Images to the following location
C:\inetpub\wwwroot

Open a dashboard TEXT section and add the following code
############################################################################
<!--code by obieelive.blogspot.com-->
<table border="5" cellpadding="1" height="135" width="700" bgcolor="FFFFF" />
<tr>
<td>
<marquee onmouseover="this.stop()" onmouseout="this.start()" scrollamount="5" direction="left" align="center" loop="true">
<img src="http://localhost/c.jpg" width="100" height="100" alt="smile" />
<img src="http://localhost/a.jpg" width="100" height="100" alt="smile" />
<img src="http://localhost/b.jpg" width="100" height="100" alt="smile" />
<img src="http://localhost/d.jpg" width="100" height="100" alt="smile" />
<img src="http://localhost/e.jpg" width="100" height="100" alt="smile" />
<img src="http://localhost/f.jpg" width="100" height="100" alt="smile" />
</marquee>
</td>
</tr>
</table>
############################################################################
Step 5: Arrange the Dashboard Section as needed

And check the results in Dashboad