To enable integration with Oracle E-Business Suite, you must create a database object and connection pool for the Oracle E-Business Suite database in the Oracle BI repository.
The below indicated steps should be followed for integrating OBIEE with Oracle EBS System
Creating Database Object with in RPD
1. In the Administration Tool, open the repository that you want to integrate with Oracle E-Business Suite.
2. Right-click in the Physical layer and select New Database.
3. Enter a name for the new database (for example, Oracle E-Business Suite 12).
4. For Database, select the appropriate Oracle Database type for your Oracle
E-Business Suite database (for example, Oracle 10g R2 or Oracle 11g).
5. Click OK.
6. Right-click the new database object you just created and select New Object, then
select Connection Pool.
7. Enter a name for the connection pool (for example, Oracle E-Business Suite 12).
8.Provide a unique name for this connection pool
Note:Do not name the object as 'Connection Pool.'
8. For Call interface, select OCI 10g/11g.
9. For Data source name, enter the TNS name of the Oracle E-Business Suite database.
10. For User name and Password, enter the user name and password of the Oracle E-Business Suite super user. (Apps/Apps)
11. Select the Connection Scripts tab.
12. Click New for Execute on connect.
13. Enter the following physical SQL, and then click OK:
call APP_SESSION.validate_icx_session('valueof(NQ_SESSION.ICX_SESSION_COOKIE)')
14. Click OK in the Connection Pool dialog box "Save ALL"
Authentication Setup Process
Session variables would be setup for authentication.
To set up proper authentication , you must set up eight session variables and an initialization block in the Oracle BI Repository.
To set up session variables for authentication in the Oracle BI Administration Tool:
1. In the Administration Tool, open the repository that you want to integrate with
Oracle E-Business Suite.
2. Select Manage, then select Variables.
3. From the Action menu, select New, then Session, then Initialization Block.
4. Enter a name for the initialization block (for instance, Oracle E-Business SSO).
5. Click Edit Data Source.
6. For Default initialization string, enter the following:
SELECT
FND_GLOBAL.RESP_ID,
FND_GLOBAL.RESP_APPL_ID,
FND_GLOBAL.SECURITY_GROUP_ID,
FND_GLOBAL.RESP_NAME,
FND_GLOBAL.USER_ID,
FND_GLOBAL.EMPLOYEE_ID,
FND_GLOBAL.USER_NAME
FROM DUAL
This utilises the standard fnd_global package available within the E Business Suite to retrieve the
login credentials.
7. For Connection Pool , click Browse , select the connection pool you created for the Oracle E-Business Suite database (for example, Oracle E-Business Suite 12), and click Select.

8. Click OK.
9. Click Edit Data Target .
10. Create the following session variables:
EBS_RESP_ID
EBS_RESP_APPL_ID
EBS_SEC_GROUP_ID
EBS_RESP_NAME
EBS_USER_ID
EBS_EMPLOYEE_ID
USER
To do this, click New, enter the variable name, and then click OK. Click Yes when you receive a warning about the special purpose of the USER variable
Make sure that the variables are listed in the given order. If necessary, select a variable and click Up or Down to reorder the list.

11. Click OK in the Session Variable Initialization Block Variable Target dialog.
12. In the Session Variable Initialization Block dialog, select Required for authentication.
13. Click OK.
14. Save the repository
Updating authenticationschemas.xml
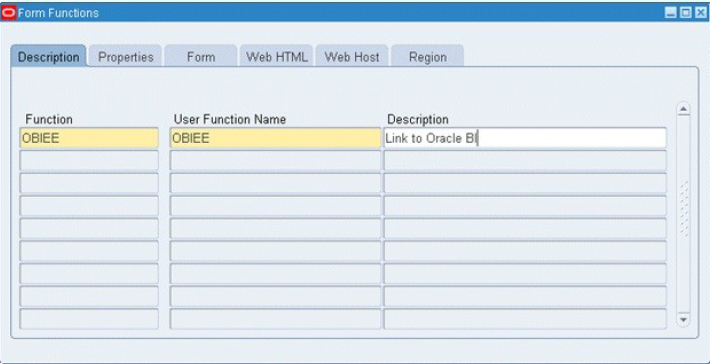
To embed a link in Oracle E-Business Suite that opens Oracle Business Intelligence dashboards, you need to create a form function and then assign menus and
responsibilities.Before you begin, log in to Oracle E-Business Suite as the system administrator (for example, sysadmin).
Then, select the System Administrator responsibility from the responsibility navigator pane on the left. The available menus appear on the right.
Follow the steps in this section to create the following objects, in sequence:
This section explains how to create a form function in Oracle E-Business Suite.
To create a form function:
The below indicated steps should be followed for integrating OBIEE with Oracle EBS System
Creating Database Object with in RPD
1. In the Administration Tool, open the repository that you want to integrate with Oracle E-Business Suite.
3. Enter a name for the new database (for example, Oracle E-Business Suite 12).
4. For Database, select the appropriate Oracle Database type for your Oracle
E-Business Suite database (for example, Oracle 10g R2 or Oracle 11g).
5. Click OK.
6. Right-click the new database object you just created and select New Object, then
select Connection Pool.
7. Enter a name for the connection pool (for example, Oracle E-Business Suite 12).
8.Provide a unique name for this connection pool
Note:Do not name the object as 'Connection Pool.'
8. For Call interface, select OCI 10g/11g.
9. For Data source name, enter the TNS name of the Oracle E-Business Suite database.
10. For User name and Password, enter the user name and password of the Oracle E-Business Suite super user. (Apps/Apps)
11. Select the Connection Scripts tab.
12. Click New for Execute on connect.
13. Enter the following physical SQL, and then click OK:
call APP_SESSION.validate_icx_session('valueof(NQ_SESSION.ICX_SESSION_COOKIE)')
14. Click OK in the Connection Pool dialog box "Save ALL"
Authentication Setup Process
Session variables would be setup for authentication.
To set up proper authentication , you must set up eight session variables and an initialization block in the Oracle BI Repository.
To set up session variables for authentication in the Oracle BI Administration Tool:
1. In the Administration Tool, open the repository that you want to integrate with
Oracle E-Business Suite.
2. Select Manage, then select Variables.
3. From the Action menu, select New, then Session, then Initialization Block.
4. Enter a name for the initialization block (for instance, Oracle E-Business SSO).
5. Click Edit Data Source.
6. For Default initialization string, enter the following:
SELECT
FND_GLOBAL.RESP_ID,
FND_GLOBAL.RESP_APPL_ID,
FND_GLOBAL.SECURITY_GROUP_ID,
FND_GLOBAL.RESP_NAME,
FND_GLOBAL.USER_ID,
FND_GLOBAL.EMPLOYEE_ID,
FND_GLOBAL.USER_NAME
FROM DUAL
This utilises the standard fnd_global package available within the E Business Suite to retrieve the
login credentials.
7. For Connection Pool , click Browse , select the connection pool you created for the Oracle E-Business Suite database (for example, Oracle E-Business Suite 12), and click Select.
8. Click OK.
9. Click Edit Data Target .
10. Create the following session variables:
EBS_RESP_ID
EBS_RESP_APPL_ID
EBS_SEC_GROUP_ID
EBS_RESP_NAME
EBS_USER_ID
EBS_EMPLOYEE_ID
USER
To do this, click New, enter the variable name, and then click OK. Click Yes when you receive a warning about the special purpose of the USER variable
Make sure that the variables are listed in the given order. If necessary, select a variable and click Up or Down to reorder the list.
11. Click OK in the Session Variable Initialization Block Variable Target dialog.
12. In the Session Variable Initialization Block dialog, select Required for authentication.
13. Click OK.
14. Save the repository
Updating authenticationschemas.xml
Update the authenticationschemas.xml file to add the name of the EBS ICX
authentication cookie.
To update authenticationschemas.xml:
1. Open the file authenticationschemas.xml for editing. You can find this file at:
ORACLE_HOME/bifoundation/web/display
2. Find the following element:
<AuthenticationSchema name="EBS-ICX"
Setting Up Authentication
3. Locate the sub-element RequestVariable source="cookie" and change the value of
the nameInSource attribute from ICX_SESSION to the name of the EBS ICX
authentication cookie prefix.
For example:
<RequestVariable source="cookie" type="auth" nameInSource="VIS" biVariableName=
"NQ_SESSION.ICX_SESSION_COOKIE" />
Do not update the RequestVariable source="url" sub-element.
“Cookie” can be found here
1. Log in to Oracle E-Business Suite.
2. Enter the following text in the address bar of your browser:
javascript:document.writeLn(document.cookie);
3. The cookie is displayed. For example:
ORA_BIPS_LBINFO=1262d6a5f9a; ORA_MOS_LOCALE=en%7CUS; ORA_UCM_
INFO=3~00027147766664614052270216870092~XXXX~SXXX~XXX.XXX
XX@XX.com~USA~en~~~~~1; ORA_UCM_VER=%2FMP%2F8kgic%2Cr_
wjmp%3Emp_ajc%2CamkMP%2F8iega*p%5DXX%3Ckn%5D_ha*_
kiMP%2F8%2F26%2C65%2C7%2C22MP%2F8-04*43*5*00; ORA_UCM_
SRVC=3*OTN~1~0~//~null~*OPN~1~0~//~SE1%3ASE1%3ASE1%3ASE1%3ASE1%
3ASE1%3ASE1%3ASE1%3A~*EMP~1~0~/34/~null~*GMO~1~0~//~null; ORA_
XXXX_PREFS=-0--------------; VIS=ZcEJeoLNVqcHGiGYvCpzTx3N:S;
ADMINCONSOLESESSION=0yQmLP2D67vJKgtXLxsNl534QTWlThYkyvXfR0fjFK0
LPsD3Hh83!1322564050
The value you need to provide in authenticationschemas.xml is
the prefix of the EBS ICX authentication cookie. In the previous
example, the EBS ICX authentication cookie is
VIS=ZcEJeoLNVqcHGiGYvCpzTx3N:S;, and the prefix is VIS.
4. In the same entry (RequestVariable source="cookie"), ensure that the value of the
biVariableName attribute is the same as the value you entered as part of the
connection script when you created the connection pool for the Oracle E-Business
Suite database. “See Creating Database objects within RPD at start of document”
5. Find the following element:
<SchemaKeyVariable source="cookie"
6. Change the value of the nameInSource attribute from ICX_SESSION to the name
of the EBS ICX authentication cookie prefix (often VIS). For example:
<SchemaKeyVariable source="cookie" nameInSource="VIS" forceValue="EBS-ICX"/>
7. Save and close the file.
Updating instanceconfig.xml.
You must update the instanceconfig.xml file to add EBS-ICS as one of the enabled schemas, and set it as the default.
To update instanceconfig.xml:
1. Open the file instanceconfig.xml for editing. You can find this file at:
ORACLE_INSTANCE/config/OracleBIPresentationServicesComponent/coreapplication_
obipsn
2. Locate the Authentication element.
3. Include EBS-ICX in the list of enabled schemas.
For example:
<EnabledSchemas>UidPwd,Impersonate,UidPwd-soap,Impersonate-soap,EBS-ICX</Enable
dSchemas>
Ignore the comment in instanceconfig.xml that says this setting is centrally
managed. EBS-ICX must be manually added to the EnabledSchemas element.
4. Save and close the file.
5. Restart Oracle Business Intelligence. From the Fusion Middleware Control
E Business Suite Functional Setup Creating Menu within E Business Suite to Link to OBIEE.
To embed a link in Oracle E-Business Suite that opens Oracle Business Intelligence dashboards, you need to create a form function and then assign menus and
responsibilities.Before you begin, log in to Oracle E-Business Suite as the system administrator (for example, sysadmin).
Then, select the System Administrator responsibility from the responsibility navigator pane on the left. The available menus appear on the right.
Follow the steps in this section to create the following objects, in sequence:
- Function
- Menu
- Responsibility – Attach to a User
- Profile
This section explains how to create a form function in Oracle E-Business Suite.
To create a form function: